

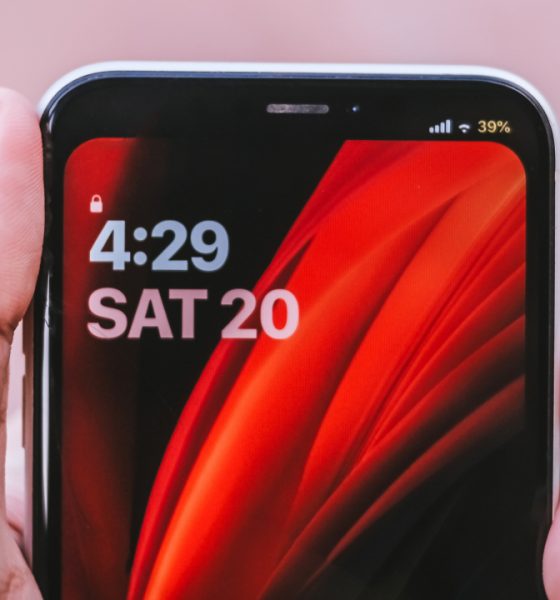
It’s been a month since the jailbreaking community got hyped over the latest jailbreak tool for iOS. At the same time, Apple’s iOS 14 announcement is just around the corner.
Jailbreaking was introduced way before the early releases of iOS through iPhone and iPod Touch. Coined from the word itself, jailbreaking is “breaking free” from the restrictions of iOS, Apple’s proprietary operating system.
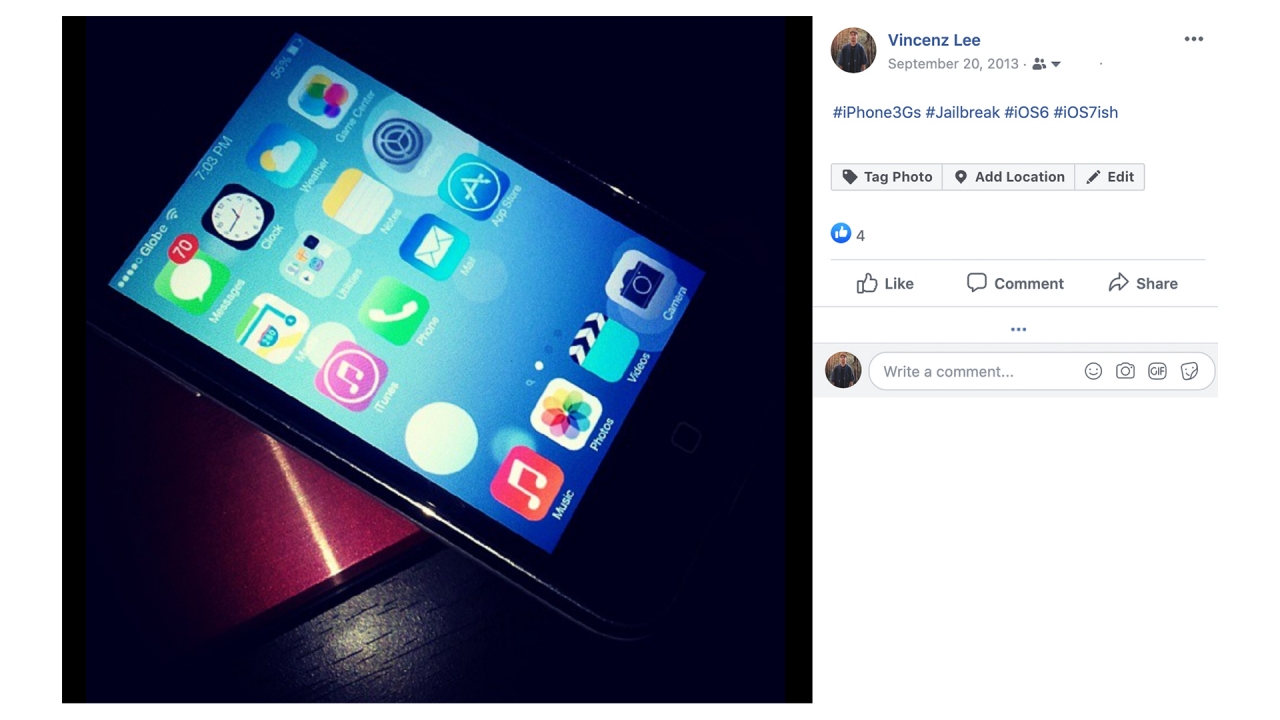
This isn’t new to me. In fact, I was able to do it on my first ever iPhone 3Gs nearly seven years ago — back when I was just a high school student. As far as I can remember, it was risky yet successful.
Around that period, it’s when Apple announced a major design change through iOS 7. Unfortunately, devices older than the iPhone 4s are not supported. But with the power of jailbreaking, I was able to make my phone look like one. I even kept a single Instagram post as a remembrance.
Some of the iPhone users out there might not be contented with what iOS has to offer. And for someone (like me) who needs iOS services but wants to get more “Android-like” features, jailbreaking your iPhone is the closest answer.
Installation
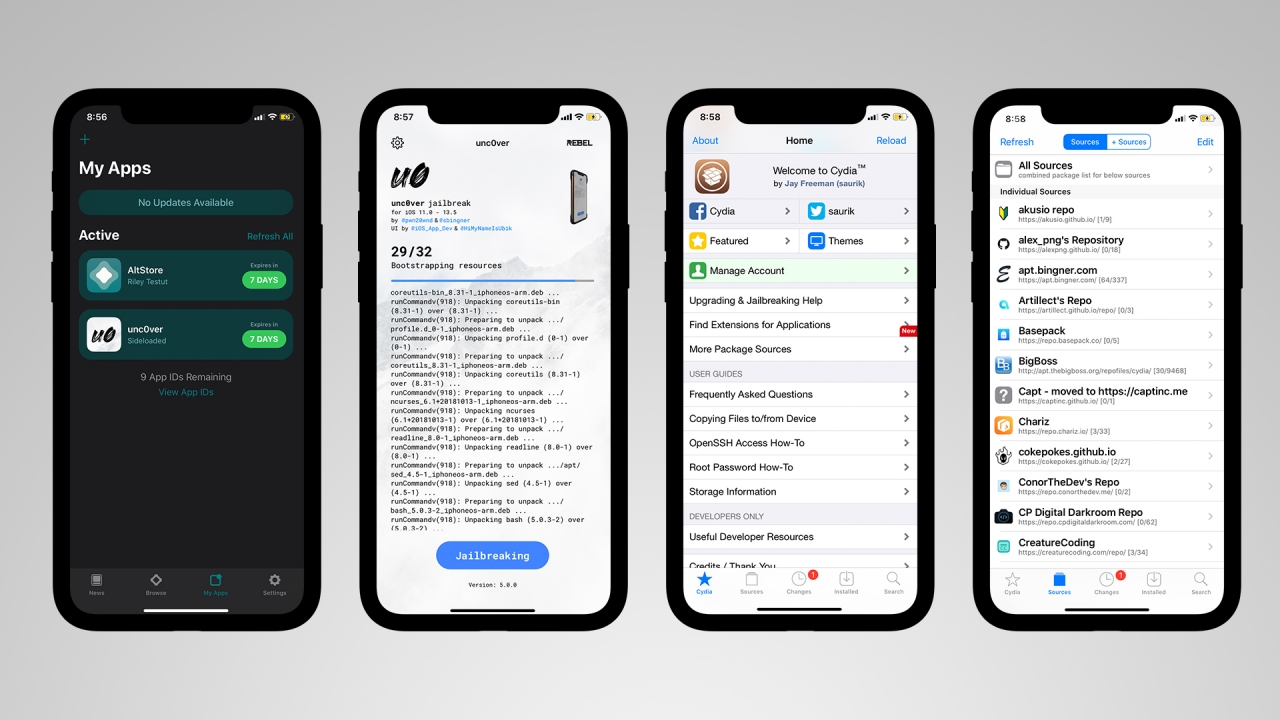
This isn’t mainly a tutorial on how to jailbreak your iPhone. There’s a step-by-step installation video that helped me throughout the jailbreak process. Just make sure your phone is running iOS 13.5 or below. This method uses the unc0ver jailbreaking tool.
For devices running the patched iOS 13.5.1 or the latest iOS 13.5.5 Beta, you can still jailbreak your device through a different method with checkra1n‘s tool. If you have the latter version, watch this video instead.
Customization through jailbreak tweaks
If your iPhone shows Cydia on your home screen and runs without errors, it’s a sign that your iPhone is already jailbroken. If you’re not yet familiar, Cydia is the less intuitive (and cluttered) version of the App Store where you can find tons of tweaks that make your jailbroken iPhone magical.
Some jailbreak tools use Sileo as a substitute for Cydia with a refined UI. Only downside is that it still has incompatibilities in most tweaks.
By adding more repositories (or repos), you can gain more access to limited and exclusive tweaks that cannot be found through default tweak sources (such as BigBoss).
As most of these tweaks were made by several developers, most of them are free of charge. You should take note that advanced tweaks are paid.
Lock screen, Home Screen, and App Switcher

First thing you’ll notice is the different look of the lock screen. These are the tweaks I used:
- Jellyfish is a tweak that completely overhauled my lock screen. It’s mostly compatible to music player tweaks. A free alternative would be April but it’s incompatible to other tweaks (which causes a crash then resprings into safe mode).
- AOD allows you to add Always-On Display functionality in your OLED-powered iPhones (such as the iPhone X, XS, XS Max, 11 Pro, and 11 Pro Max).
- Tap Tap Lock is a simple tweak that lets you lock your iPhone by double tapping anywhere on the home screen.
- AutoUnlockX, from the word itself, it automatically unlocks your Face ID-powered iPhone without the hassle of swiping up. This is fast and convenient for users who are always in a hurry when unlocking their phones.
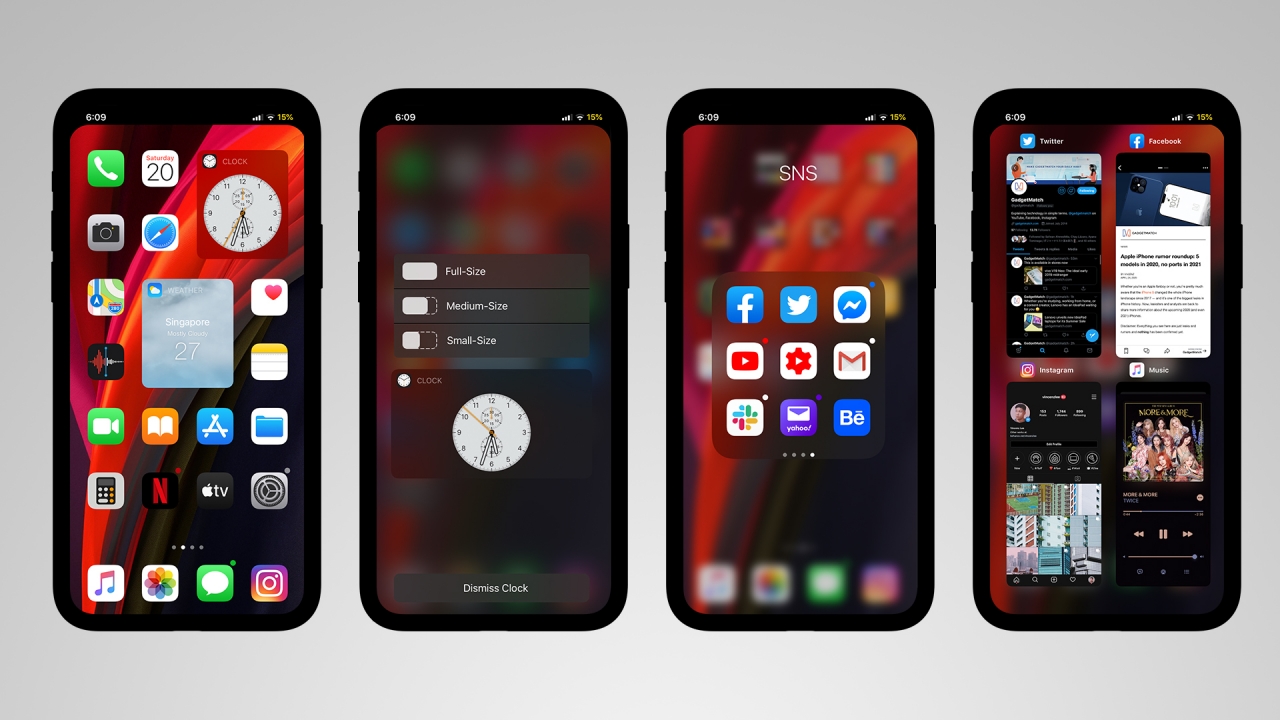
For years, iOS’ home screen has been stuck with a grid of app icons with the plain red notification badges. But with jailbreaking, customization is possible.
- Velox Reloaded lets you transform home screen icons into widgets. This was rumored to be an iOS 14 feature but is possible through jailbreak.
- dotto+ is a replacement tweak for iOS’ default notification badges. It adapts the color of the app’s icon and eliminates the notification count for a simpler appearance.
- CastSwitcher is a tweak that replaces your old stacked card-style switcher into a grid, iPad-like switcher.
- Dockify either lets your dock look transparent or hides the dock icons completely.
Other small tweaks you can install for your home screen:
- AwesomePageDots makes those simple page dots more lively with the option to choose your preferred animation style.
- HideLabels13 simply hides texts of apps on your home screen for a cleaner, minimalist look.
- iconvibe adds haptic feedback whenever you open apps.
- Manila is a simple tweak that reveals the apps found inside the folder through 3D/Force Touch menu.
- No3DLines is a non-configurable tweak that hides lines whenever you activate 3D/Force Touch.
Notifications and Control Center
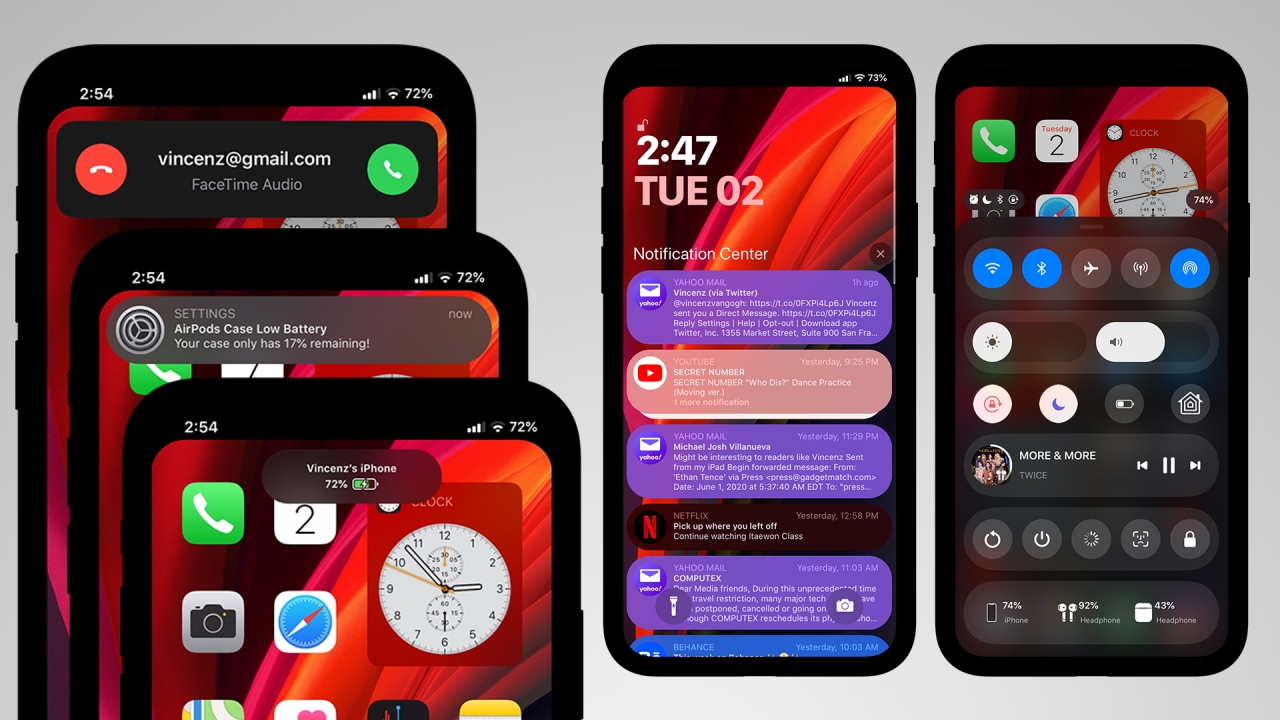
If some of you miss the bottom-style control center, Prysm brings back that nifty feature. Although it’s not a total rip-off of the iOS 10 control center, it still includes the rounded look of the latest Control Center in a less-cluttered order.
Other than the added power options (such as reboot, shutdown, respring, lock, and safe mode), it even displays the battery percentage of your Apple devices such as the AirPods and Apple Watch.
Other tweaks that are useful for Control Center:
- RealCC lets you completely turn off Wi-Fi and Bluetooth toggles in Control Center.
- CCModules adds more module options (and even app shortcuts) in your default iOS 13 control center.
And here’s a list of tweaks I installed that revamped my iPhone’s notification appearance:
- Quart completely changes the overall look of your phone’s notifications. It has customizable rounded corners, header and content text sizes, and circular icons that go well with iOS 13’s rounded look.
- ColorMeNotifs adds color to your notifications. Just like dotto+, it also adapts color based from the app’s icon.
- NoDNDBanner is a tiny tweak that completely removes Do Not Disturb banner when activated.
- PencilChargingIndicator replaces your old charging icon in favor of the Apple Pencil-like charging banner alert.
- AirPods Case Low Battery is convenient if you carry an AirPods or AirPods Pro with you. It lets you prompt whenever the case is below the charged level.
- Scorpion replaces the full call window into a less intrusive banner. You can now accept or decline calls without blocking what’s currently on your screen.
- SilentRecorder hides the annoying red status on the time bar when the screen is recording.
Settings
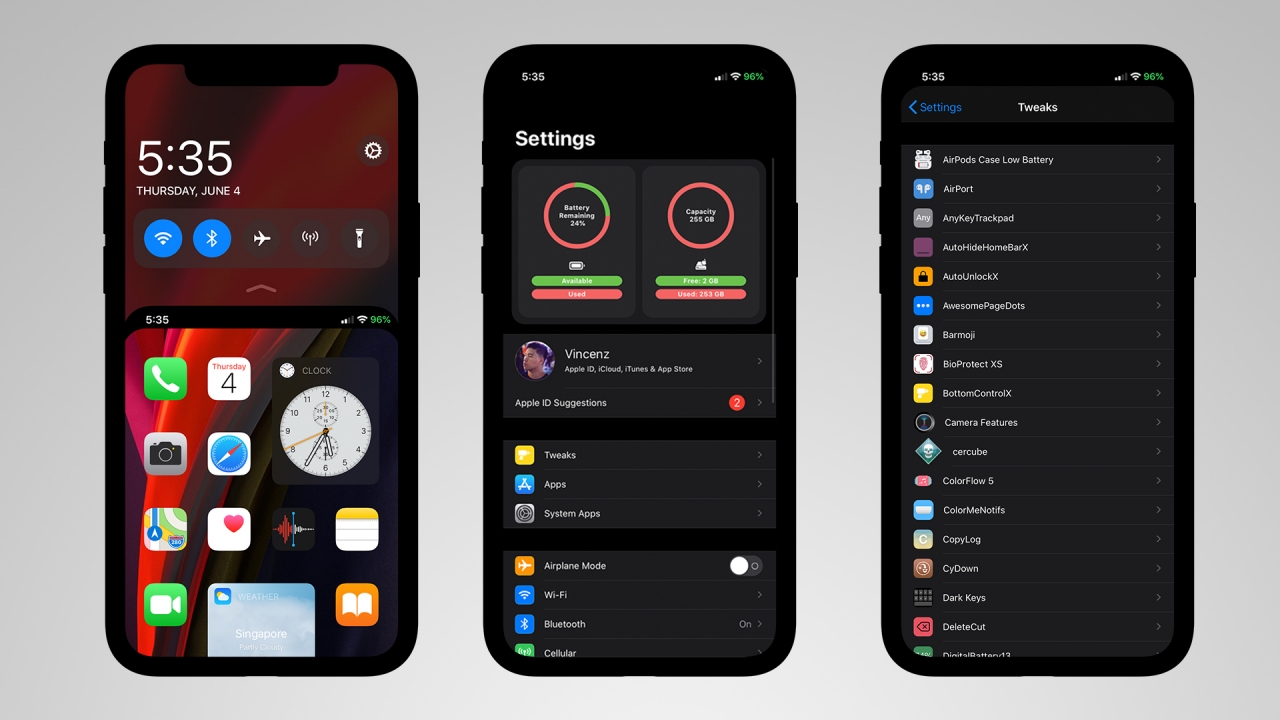
Three tweaks are responsible for the changed look of the top and bottom bar:
- noNotch completely hides the notch through a black bar and makes the app windows rounded. It gives the illusion of an iPhone without a notch.
- DigitalBattery13 replaces the battery icon with a battery percentage symbol.
- Saw maximizes the look of your app screen by removing the home bar and the bottom padding altogether.
For settings, here are two important tweaks:
- shuffle categorizes setting list based on where they belong. Originally, the settings and tweaks list are both cluttered.
- ModernSettings adds a visual graphic of your phone’s battery and storage information as well as basic details of Wi-Fi, Bluetooth, and even the phone itself.
There are also optional tweaks you can install to configure reachability:
- Carbonite adds quick toggles whenever you activate reachability.
- StayDown lets reachability stay as it is without coming back from its original position.
Apps
For music apps such as Apple Music and Spotify, these tweaks are helpful enough to make your playback more appealing:
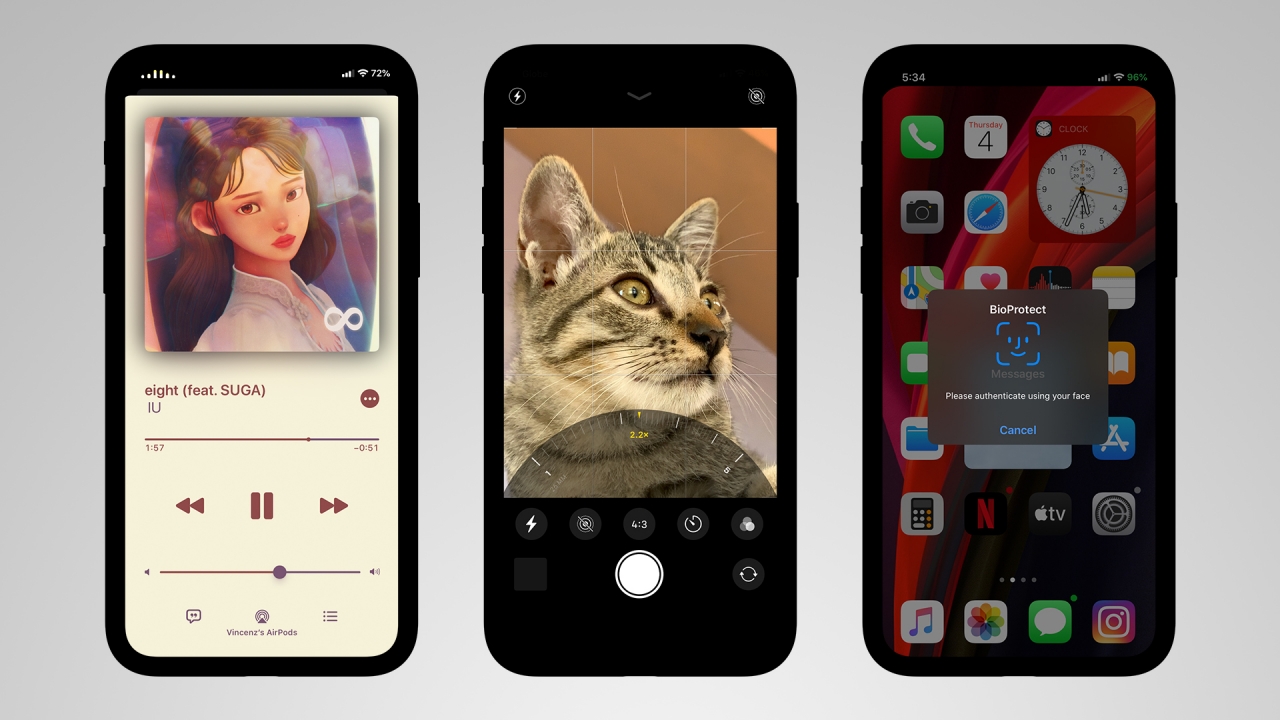
- StatusViz adds a little visualizer at the upper left corner of the screen whenever you play music — which replaces the time status.
- ColorFlow 5 beautifies your music player by adapting the color of the album art as the background (instead of white).
For the camera app, here are tweaks that can imitate the look of iPhone 11 series’ camera UI on older devices:
- Camera Features lets you change the camera layout of your old iPhones. It brings the exclusive camera UI of the iPhone 11 series — including the zoom slider, QuickTake, and the ability to tap and change video resolution and frame rate in video mode. Other than that, you also have the option to choose an iPad-style camera UI plus show/hide certain camera elements and modes.
- PortraitXI is a tweak that lets you take portrait mode shots even if your iPhone only has a single lens.
- Enlighten brightens most of shots taken in low-light. However, this isn’t a complete imitation of the Night Mode found on the iPhone 11 series.
For security, BioProtect XS is a helpful paid tweak that uses Face ID (or Touch ID on older devices) to lock specific apps — including system apps such as messages, photos, videos, Safari and more.
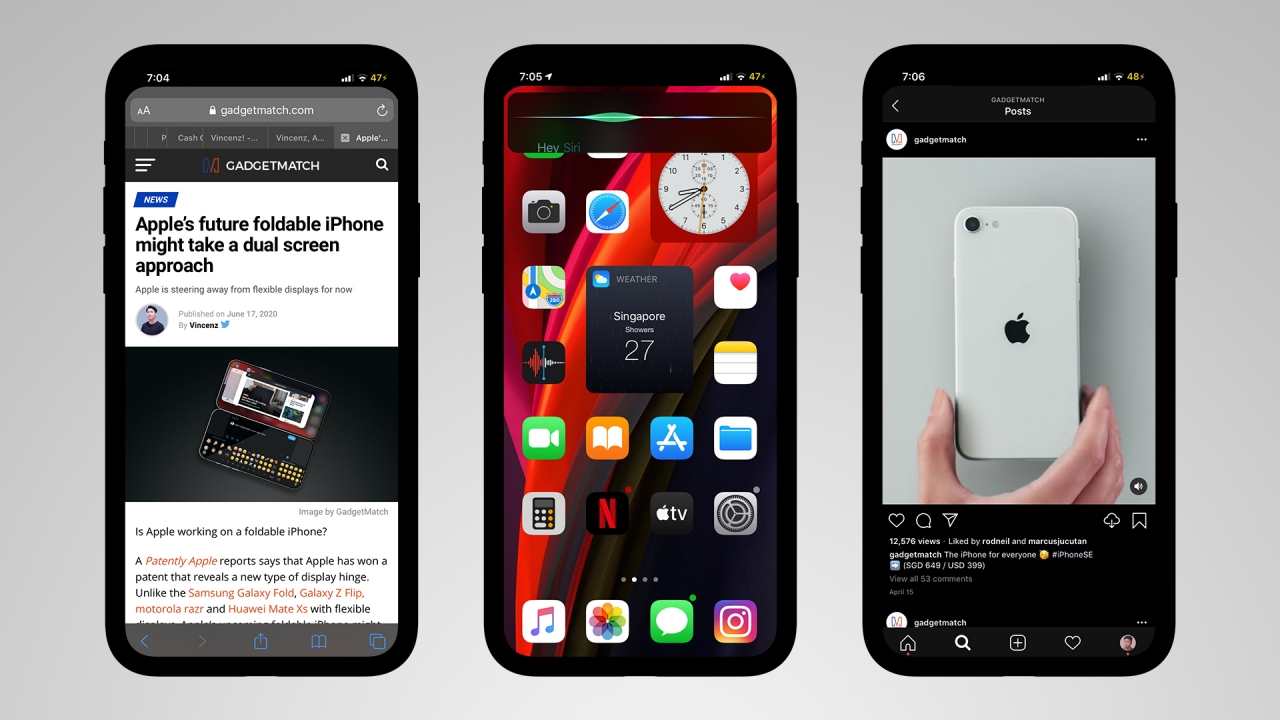
- Safari Features completely enhances your Safari experience by adding a tab bar and even show a 2×2 grid switcher.
- SmallSiri shows Siri through a small banner, instead of the usual full window prompt.
- InstagramPlus is a handy paid tweak that lets you control your Instagram completely. Features include saving photos, videos on feed and through IG stories, follow status, anonymously see stories of other people, and the inclusion of Instagram Music even if your region isn’t supported.
Keyboard
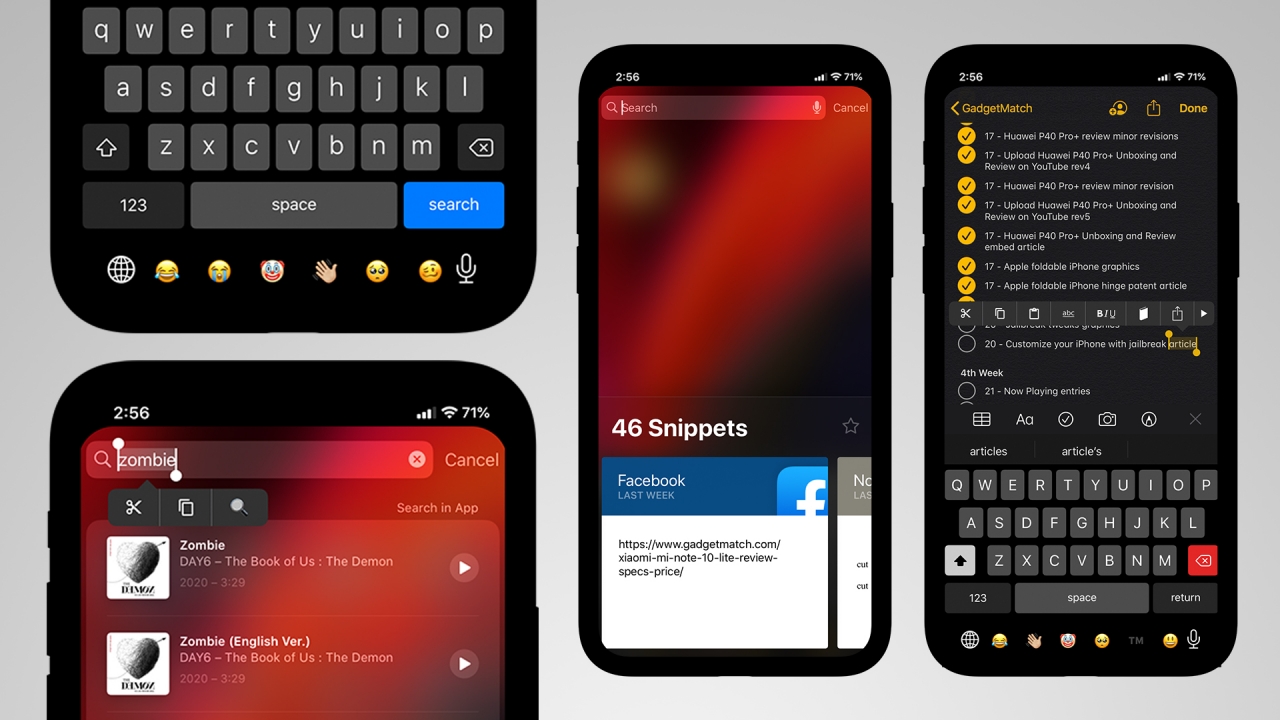
The default keyboard in iOS is intuitive yet lacks certain features that make it stand out. Here are some tweaks to maximize your typing experience.
- BarMoji lets you add your frequently used emojis at the bottom of the keyboard between the global keyboard switch and voice control icons.
- Dark Keys enables a system-wide dark keyboard, which goes well if you’re in Dark Mode. Default iOS Dark Mode doesn’t darken the keyboard.
- RealKeys adds a haptic (or taptic) feedback whenever you type. This makes typing more tactile and responsive.
- AnyKeyTrackpad lets you swipe over texts and words by pressing any key on the keyboard. It’s not limited to the spacebar anymore.
- DeleteCut is a helpful keyboard tweak that deletes words faster. Just click the shift key and it will delete multiple words instead of characters one by one.
- For people who use different keyboards, Keyboard Accio is a tool that lets you switch between your first two input methods. Don’t worry, long press still works for other keyboard input.
- MenuSupport replaces the text-heavy menu into a menu of icons when editing texts.
- Finally, CopyLog is a wonderful tweak that lets you save all your copy-pasted texts (or paragraphs) through a snippet log.
Stability
Some tweaks may not run properly due to certain iOS and jailbreak version limitations or overlapping and incompatible tweaks installed. You can still prevent this from happening, use these utility tweaks:
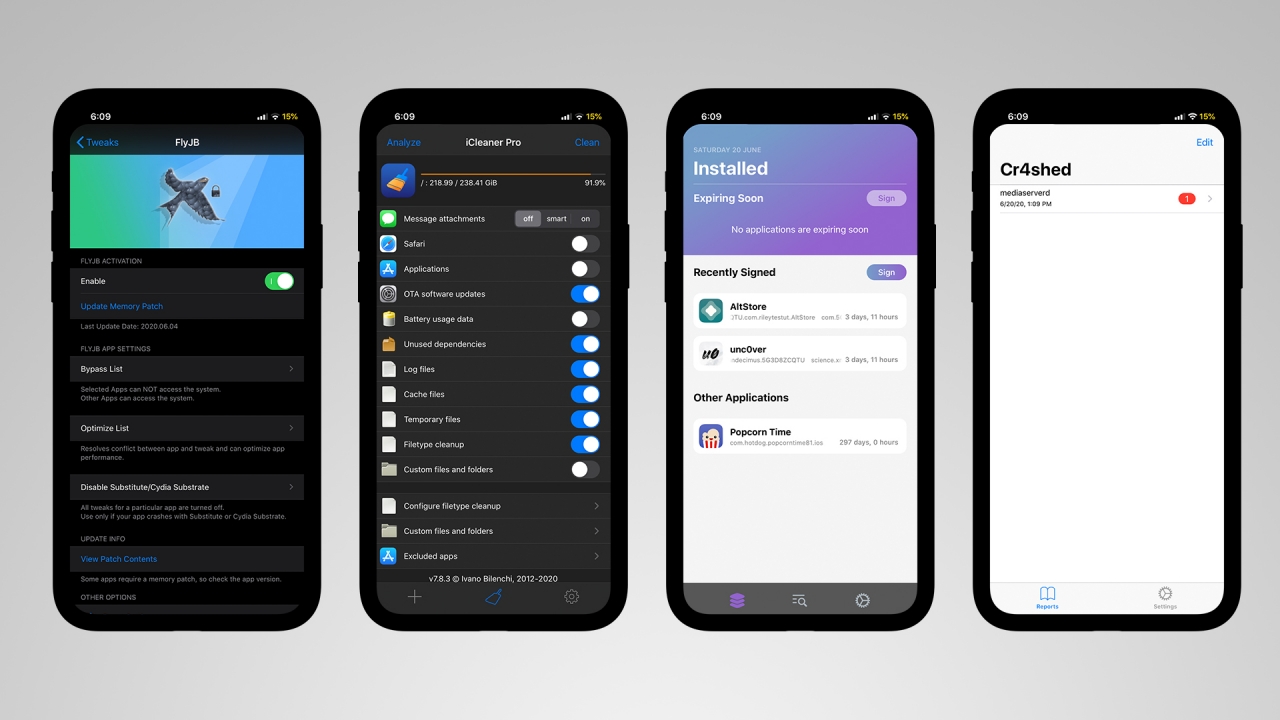
- FlyJB lets you bypass certain apps that detect jailbreak status. In that way, you can continue using your apps you need (such as Snapchat, McDonald’s, Pokémon Go) without worrying about complete removal of the jailbreak. Another similar tweaks are KernBypass and Unsub.
- Flame is a specified tweak for Cydia which enables the user to batch add repos and auto resprings/reboots after a tweak download.
- ReProvision is a tweaked app that prompts you to sign your jailbreak utility apps three days before they get revoked. This is helpful just in case you forgot to re-sign your jailbreak app or else, you’ll do the tedious process again from the beginning.
- KeepMyJB removes the software update setting on Settings. Automatic updates won’t install, keeping your jailbreak alive and kicking.
- iCleaner Pro lets you delete temporary files and tweak settings. These settings usually remain even after tweak uninstallation from Cydia.
- Cr4shed is another tweak that lists and reports any app or task that caused a UI crash. This is helpful if ever one of your installed tweaks always gives your iPhone an error before it resprings into Safe Mode.
Misconception
Some users might think that jailbreak could “unlock” their factory-locked iPhones. In that case, jailbreaking isn’t the solution. If that’s what you’re after, you should bring your iPhone to a technician to get it unlocked.
Other accessible methods are the use of GPP sim chips that “partially” unlocks sim-locked iPhones from countries like US and Japan.
Legality
Although some countries might have certain laws and restrictions when it comes to Digital Rights Management (DRM), jailbreaking in most countries isn’t illegal. Jailbreaking may void your device if it’s still under warranty but rest assured that there are methods to unjailbreak your phone and bring iOS back to its default state through iOS restore.
Community
Don’t limit yourself from the tweaks I’ve listed. There are tons of jailbreak tweaks from various repos and developers. There are also a plethora of jailbreak tweak videos on YouTube from different YouTubers and jailbreakers.
Other than that, you can also join this reddit community where they mostly talk about iOS jailbreaking.


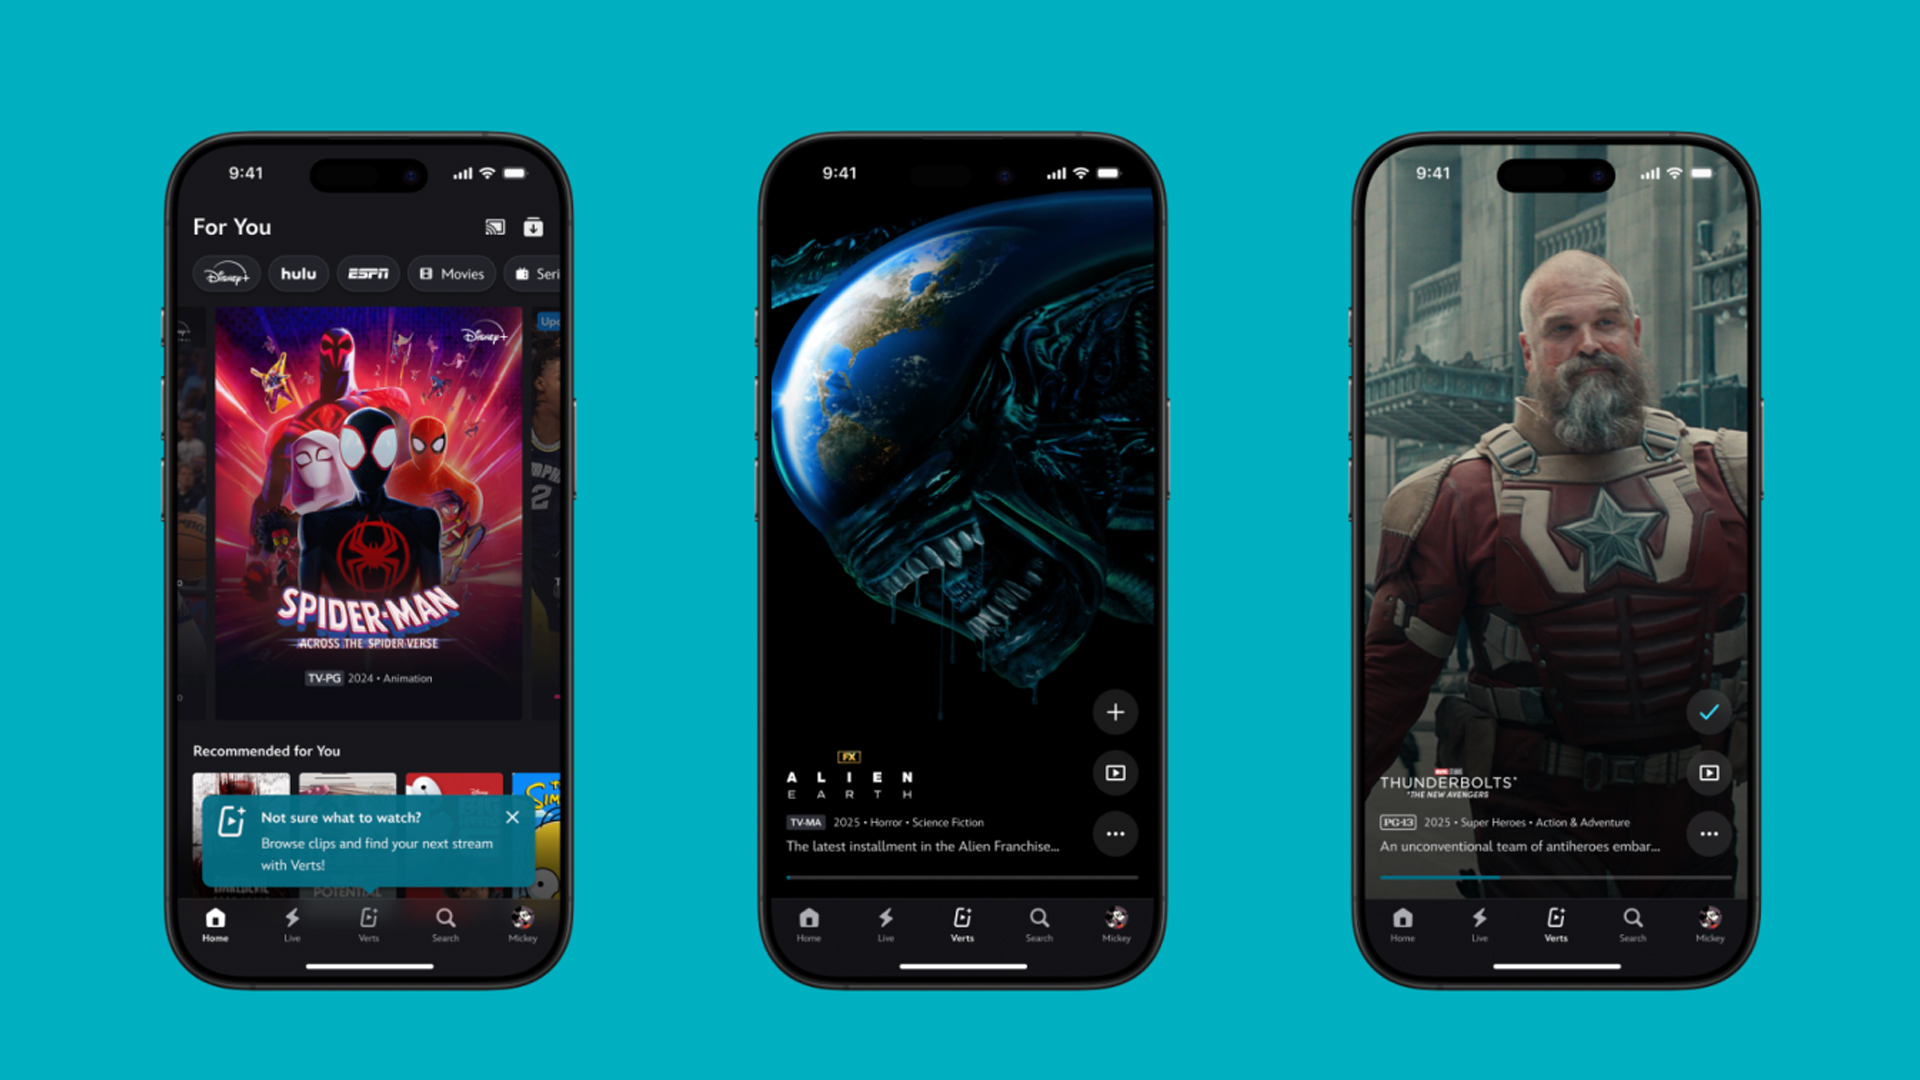
TikTok has changed how we consume media. Everything is now vertical. Even the most established streaming services, often a bastion for traditionally horizontal content, is adopting the different format. Now, Disney+ is getting a vertical feed called Verts.
Like its contemporaries, Verts presents a continuous feed of content but tailored to show the plethora of titles from the Disney+ library. This might include the first scenes of shows or notable highlights. The hope, of course, is to direct users to the longform content.
Directly from the Verts feed, users can easily add the respective title to their watchlist or go straight to the title’s page. In turn, the feed is accessible from the homepage since it has its own tab.
According to Disney, early experiments with the feature have driven engagement to available content. Right now, the feed is mostly for clipping enticing content from shows. However, the platform will experiment further with the format for new ways to tell stories.
Though Verts surely stands for “verticals” in this case, “adverts” might fit better as its full government name. Still, it might be a useful tool if you’re figuring out what to watch for the night.
Currently, Verts is available for Disney+ subscribers in the United States. Disney also has plans to expand the feature to ESPN for sports-related content.
SEE ALSO: Live NBA action on Disney Plus now available in the Philippines
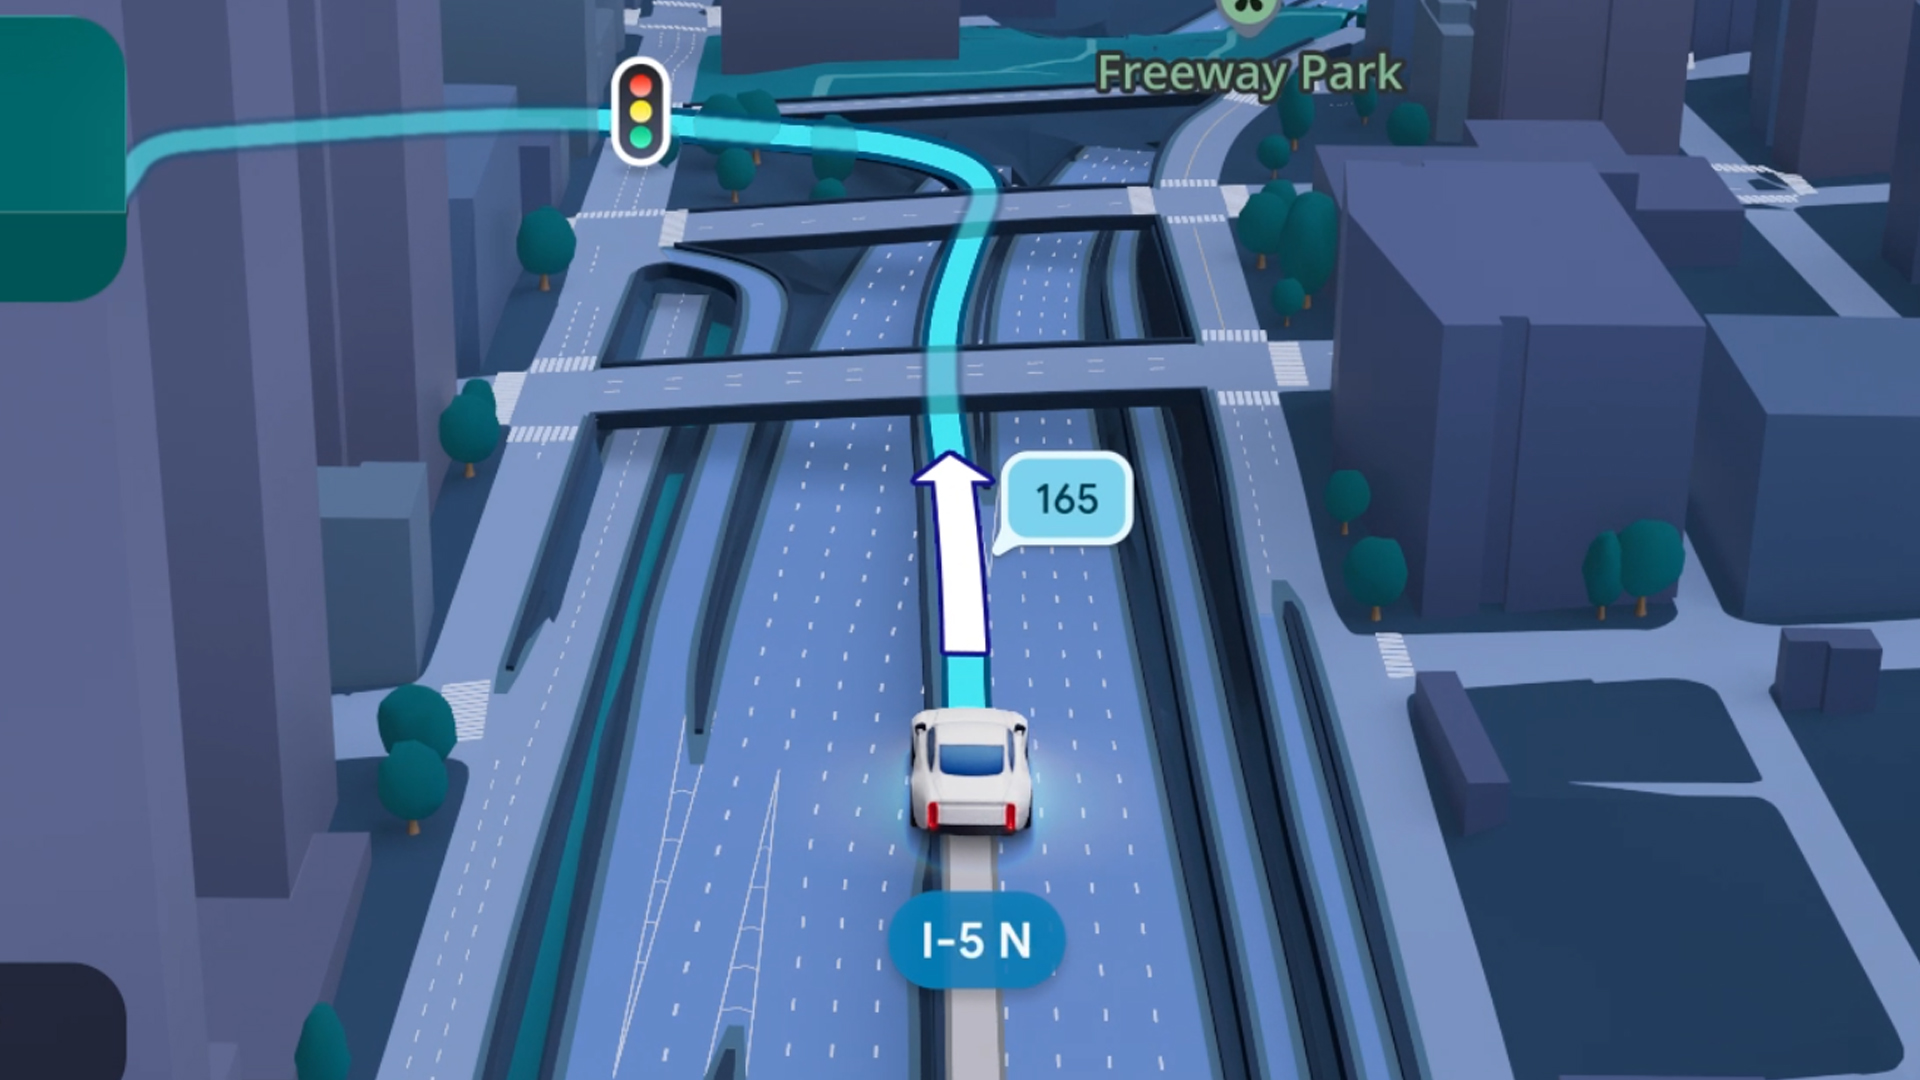
Some of today’s navigation apps are living in the future. Instead of a two-dimensional map, these apps render the user’s surroundings in 3D. It’s a nifty upgrade that helps drivers more accurately visualize directions on the fly. Finally, Google Maps is getting a much-needed upgrade and will take navigation to the third dimension.
In a new update rolling out today, the new Immersive Navigation feature will bring your surroundings to life. The 3D view creates a render of the surrounding buildings, overpasses, and terrain around the car. It takes the guesswork out of navigation by showing precisely where to turn and what landmarks to look out for.
In the same vein, you can now use Street View to preview your destination before you arrive. Google Maps will also highlight your destination’s entrance, side of the street, and nearby parking.
Outside of how the map is visualized, Google Maps is also infusing its service with Gemini. The new Ask Maps feature will let you engage with the app in a conversational manner. For example, if you’re in the middle of a long drive, you can now ask Maps where the best place is to stop over and have a coffee break. Ask Maps will provide directions, a potential itinerary, and even helpful links to book a reservation ahead of time.
Now, availability for both of these features is still a bit limited. Immersive View is rolling out today to compatible devices and vehicles in the United States. Further, availability will expand over the coming months.
Meanwhile, Ask Maps is available now in the United States and India for Android and iOS. A desktop version is coming soon.
SEE ALSO: Google Maps is finally getting a power saving mode
Apps
Apple Music, TikTok launch Play Full Song, a new music discovery experience
Rolling out worldwide exclusively through Apple Music
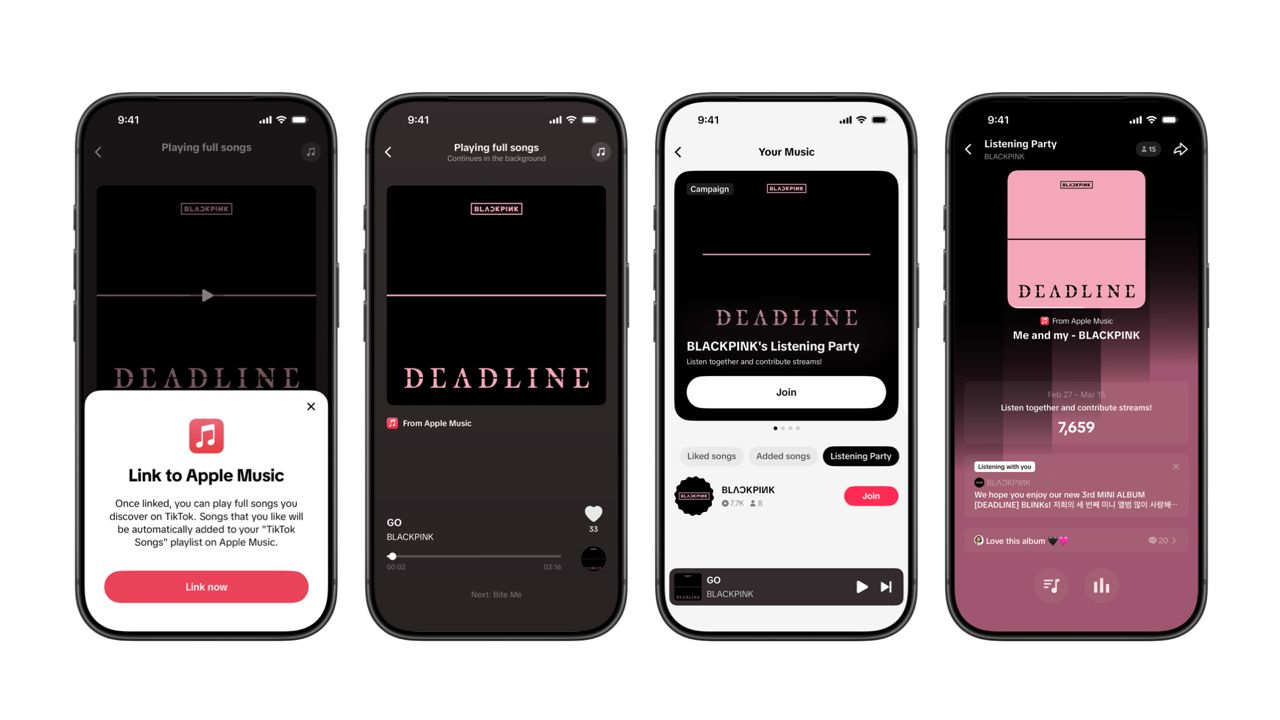
Ever came across a viral 15 or 30-second music snippet on TikTok that instantly became your jam on repeat?
For years, TikTok has been a regular source of songs that have become part of our playlists. And together with Apple Music, listening to the music you discover has just gotten even easier.
That’s through Play Full Song, a new music discovery experience, which launches exclusively though Apple Music.
With the new feature, Apple Music subscribers can now enjoy full-length tracks that they discover on TikTok. That’s without ever leaving that popular streaming app.
Fans who discover a song that they love on their For You or Sound Detail page can simply tap the Play Full Song button to open up an Apple Music player and enjoy the song in its entirety.
From there, subscribers can continue listening to a personalized stream of recommended songs. That means no more need to switch apps and search separately.
The new Play Full Song experience helps music fans move seamlessly from the moment of discovery to deeper listening. It’s also designed to be instant and all within the same environment.
Moreover, users can also save their favorite songs to Your Music and add them directly to their Apple Music playlists.
Built using Apple’s MusicKit, full-length song playback takes place on Apple Music. This way, streams are paid within the Apple Music service, supporting artists and rights holders while giving fans a smooth, uninterrupted experience.
Listening Party also launched
The feature builds on the success of TikTok’s Add to Music App. This was previously launched to help artists and fans convert discovery on TikTok to a playlist save in Apple Music and other streaming services.
To cap the announcement, TikTok and Apple Music are also introducing Listening Party. This new feature is designed to bring artists and fans together around music.
It creates a shared environment where fans can listen to songs from their favorite artists in real time, interact with each her, and engage directly with the artist during the session.


Now Playing: Hoppers

Jackery SolarSaga series: Free power for small devices

UGREEN adds new Nexode Pro power bank, charger to lineup

nubia to launch new Neo 5 series gaming phones on March 28

SHINOBI: Art of Vengeance’s SEGA Villains Stage out on April 3


-

 Reviews5 days ago
POCO X8 Pro Max review: A new beast from the far east
-

 News5 days ago
POCO X8 Pro Series: Price, availability in the Philippines
-

 Laptops2 weeks ago
Apple MacBook Neo Review
-

 Computers2 weeks ago
GIGABYTE collaborates with Capcom for RE Requiem custom PC
-

 Apps1 week ago
Google Maps is finally getting a 3D mode
-

 Entertainment2 weeks ago
The internet is thirsting over the One Piece Season 2 cast
-

 Features1 week ago
Galaxy AI on the Samsung Galaxy S26 Ultra
-

 Automotive2 weeks ago
BYD is reportedly considering an F1 team