

“Get a translator, duh?”
That’s probably what you’ll think of as a solution when it comes to overcoming language barriers while traveling in foreign countries.
In particular, traveling in Asia is challenging since the languages spoken are entirely different per country.
As much as any folks from the West would say that English is the universal language, it simply isn’t. If they believe that, they probably need to touch some grass and broaden their horizons.
Kidding aside, your smartphone might be handy. That is if you’re connected to the Internet or it still has a battery.
But when all else fails, you’re probably not keen on using a language dictionary as if it were the early 2000s. Having a portable translator that you can bring with you can be a game-changer.
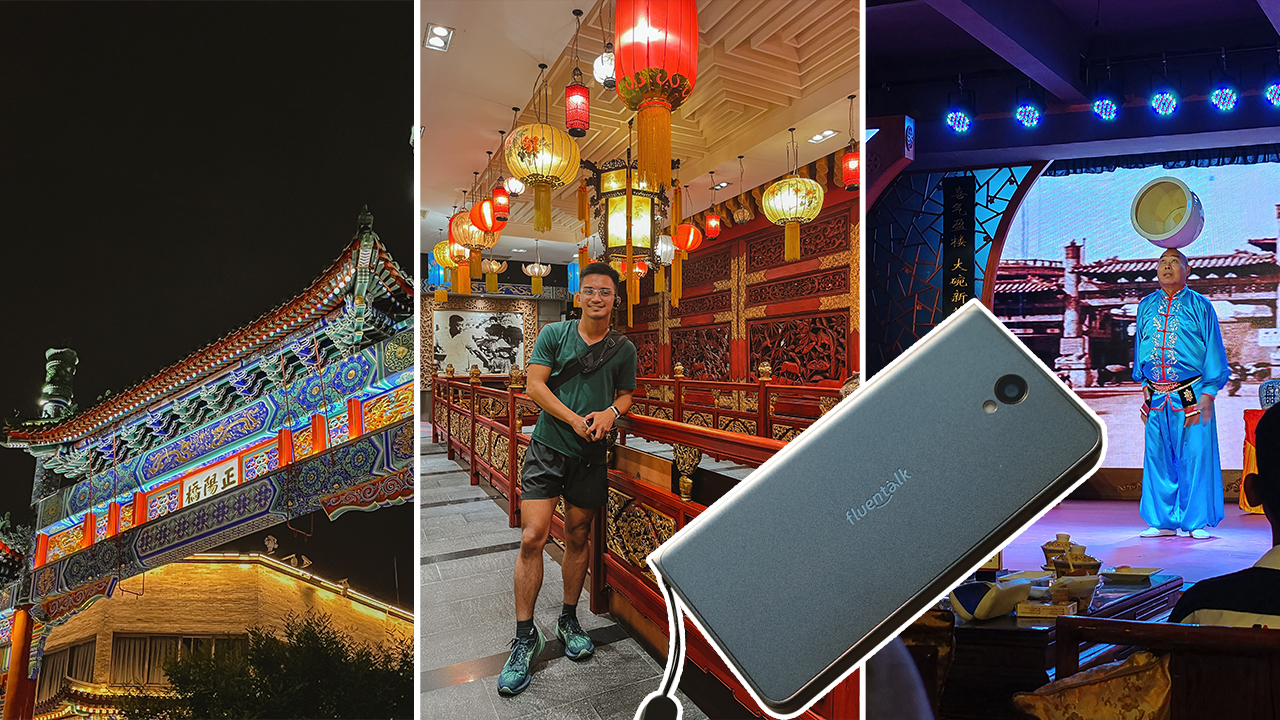
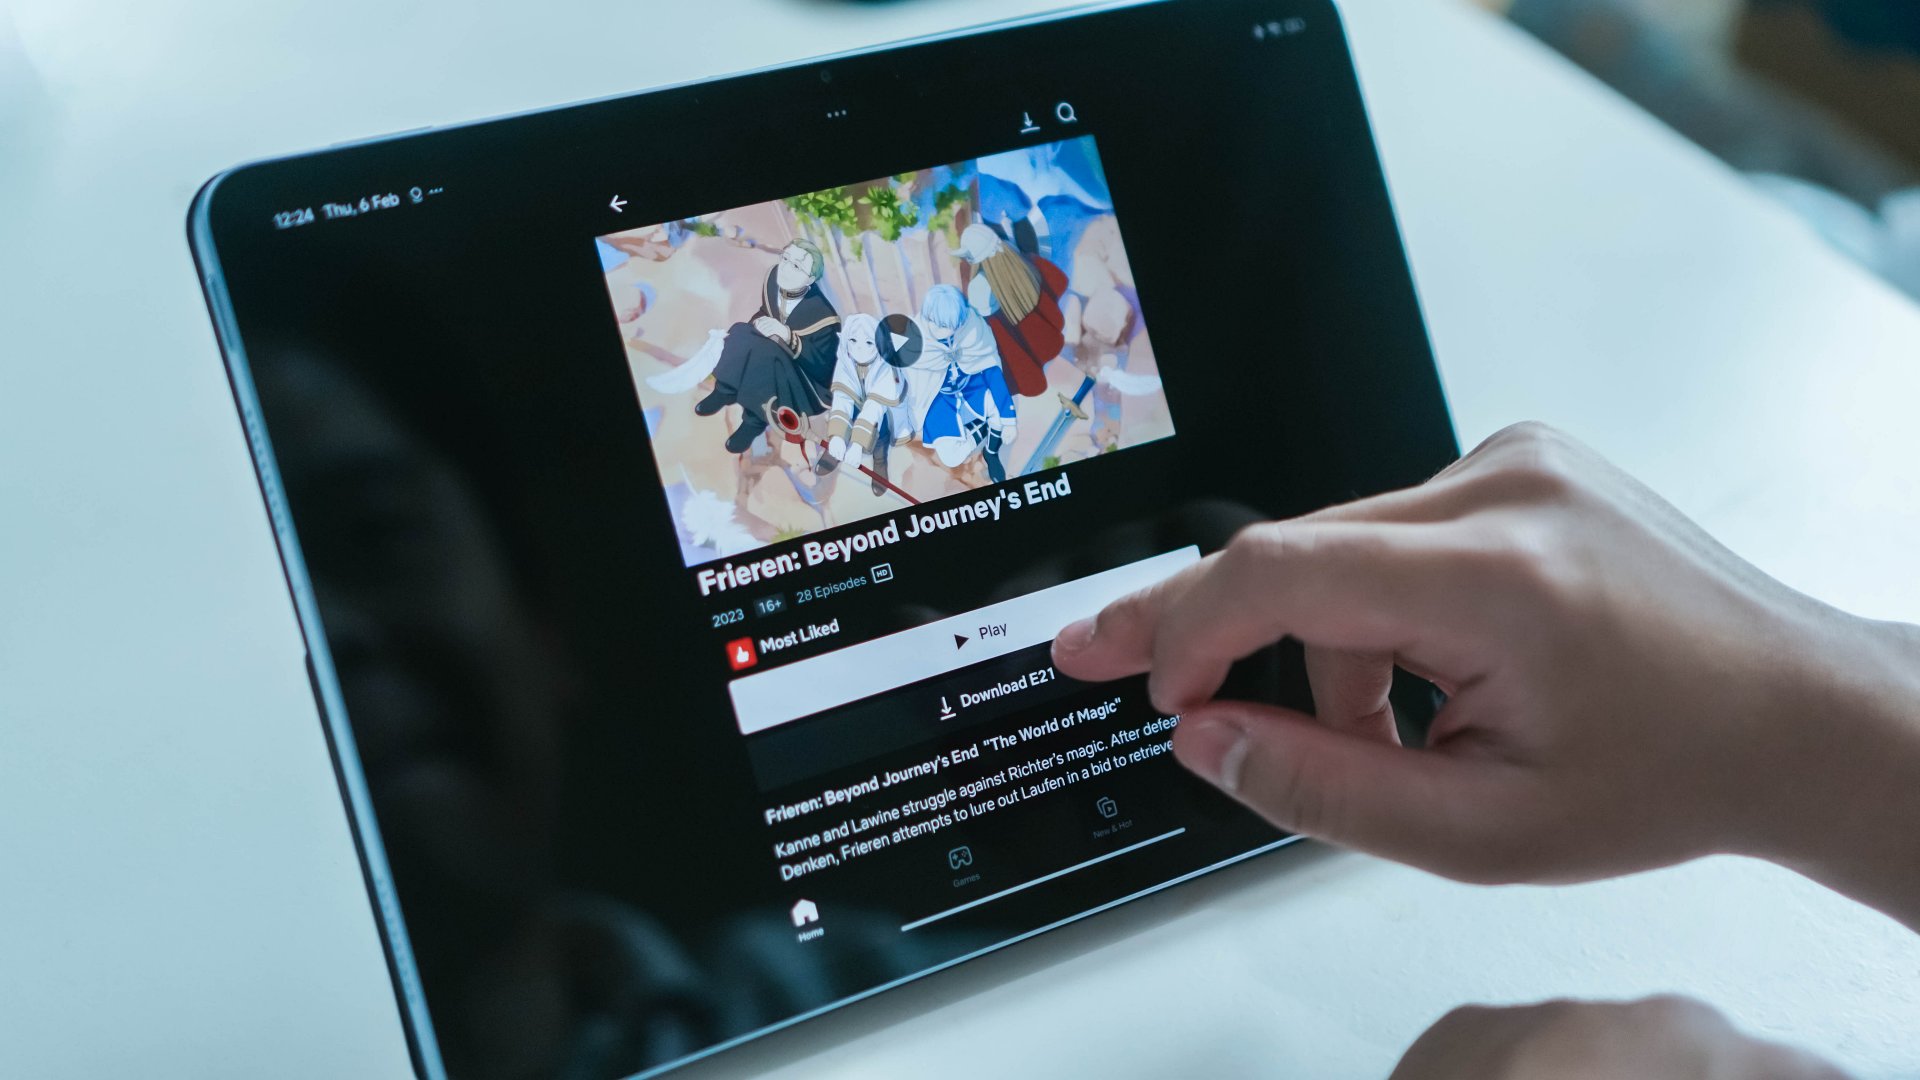
Sometime in July, I brought the Fluentalk T1 translator device when I went to China. Thank heavens, I wasn’t like Emily Cooper from Emily in Paris — struggling with talking to locals due to her inability to speak French while in Paris.
Caution: Don’t fly out ill-prepared
Most of my friends believed in the power of their smartphones and Google Translate when entering a foreign country. Sadly, that wasn’t the case for me.
I wasn’t able to connect to the Airport WiFi. Also, I didn’t get to buy a SIM card right away so I didn’t have any data plan. There were no offline packages within the app, and it just won’t work. Simply put, I was ill-prepared for my trip. It was as if Mercury was retrograding. (But it’s not.)
My iPhone was basically useless when I traveled, except for having the important details of my connecting flights from Chengdu to Shenzhen.

Having the Fluentalk T1 as the last bastion of hope in a foreign country, the device surprisingly served me well.
When I was so confused with the airport signages and the airport staff at Chengdu International Airport didn’t know how to speak English let alone understand hand gestures, the Fluentalk T1 helped me not miss my flight.
One-click is all it takes
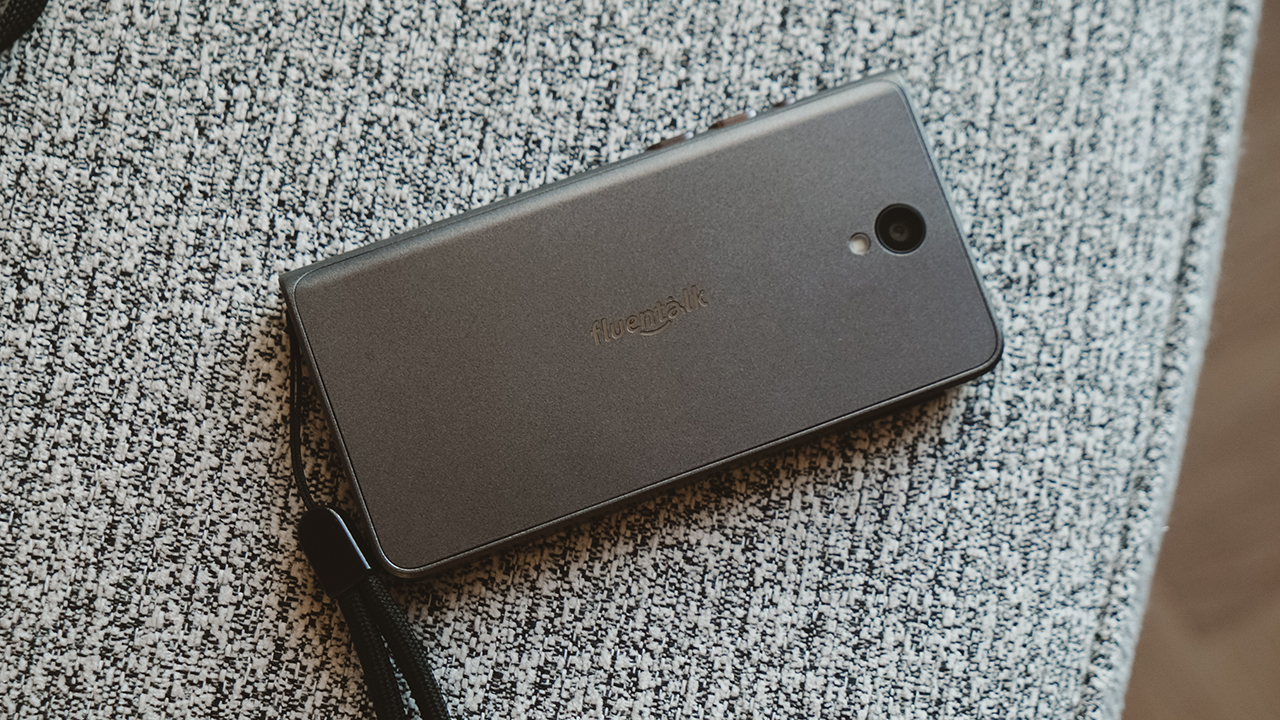
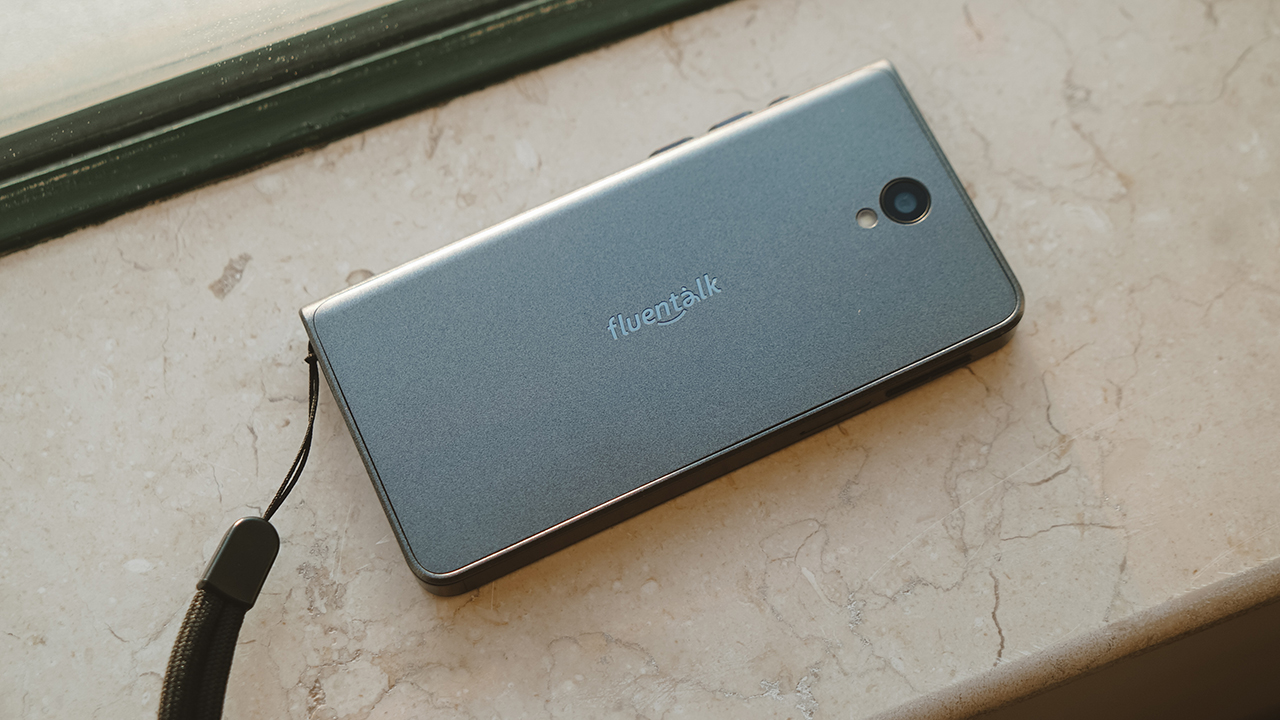
The Fluentalk T1 looks like an actual translator device, reminiscent of an old, fat iPod. It wasn’t intimidating at first sight, knowing that there were only three main buttons on its side. Plus, it’s a touchscreen running on Android and with WiFi and LTE connectivity.

With three main buttons that are color-coded, the device is easy to use, especially for the one-click translation feature. The yellow button serves as the power button, while the blue and red buttons are for translation.
The Blue button is for the language you’re speaking, English in my case, which gets translated into the language I need to speak. Meanwhile, the Red Button is used when the person you’re talking to needs to respond to your conversation.
There were a lot of times that I struggled using this one-click translation feature. The ill-prepared traveler in me forgot to download Chinese language packs so I could use the device offline.
By the power vested in me by the Internet, I can do it all
I had to rely on using the data and signal coming from my hotspot that was lent to me, in order to get my point across. Most days, the poor signal proved challenging to have a conversation with the locals. But when I was able to download the language packs, the experience was sweet.
Occasionally, the device picks up the wrong word through its microphone. When I was with my friend and freelance Japanese journalist Ayano Tominaga, it took a while for us to have a back-and-forth using the device since the Fluentalk T1 hears and translates a different word.
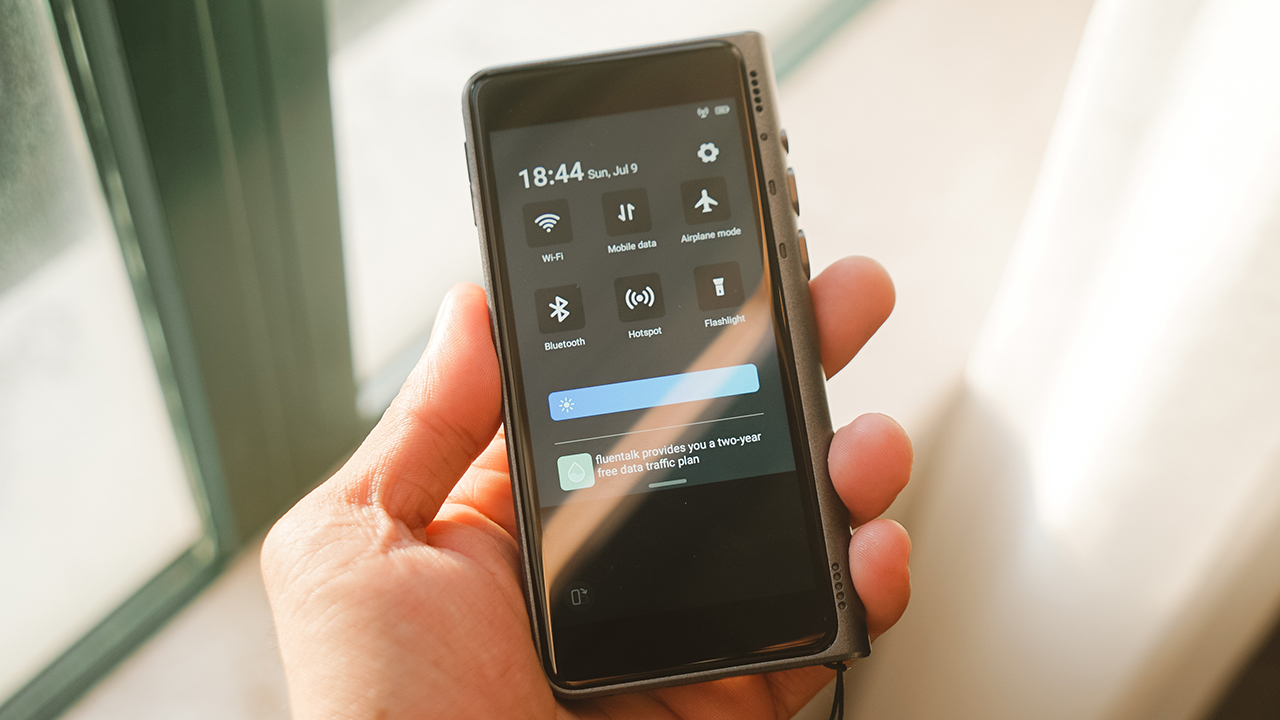
What I wish I had known earlier is that the Fluentalk T1 provides a free 2-year International unlimited data plan with its built-in e-sim. Just imagine: I had to carry three devices in my denim jacket. My iPhone, a dedicated Internet hotspot, and the Fluentalk T1.
I mean, the T1 could’ve done the job by becoming my hotspot. It has a 1500mAh battery that lasts more than a day since you don’t really use it to translate all the time. Had I known this sooner, I would’ve had a better experience at Chengdu Airport. Especially when I got lost and confused switching terminals.
Nevertheless, when you set it up right, the Fluentalk T1 can make your foreign trips smooth.
Scan, read, and have a conversation
But it’s not just the one-click translation that the Fluentalk T1 has. I mean, why buy a translator device if you have Google Translate to do it for you, right?
Of course, the device came with other handy features. One of which is the ability to scan the characters and translate them right away. It sort of works like Google Lens, except I didn’t need to connect to the Internet to have some words translated.

I practically used it when reading the labels of the food being served on the plane and the products I could find inside convenience stores. As someone with lots of dietary restrictions, I needed to be careful with what I eat especially when abroad. It helped me see the ingredients to realize which products I need to avoid.
Another feature is having pre-made messages that help in asking for directions and common expressions that cover different scenarios you’d probably encounter when traveling.
I didn’t get to use them, though it was a nice add-on just in case.
How many languages can you speak?
Currently, the T1 can translate over 40 languages and understand 93 accents when connected to the Internet. Some of these are Portuguese, Italian, Dutch, Danish, Norwegian, Swedish, Finnish, Icelandic, Greek, Bulgarian, Romanian, Slovenian, Slovak, Croatian, Czech, and Ukrainian.

It also understands Filipino, Malay, Indonesian, Vietnamese, and Thai. It’s a pretty helpful device if you decide to backpack across Southeast Asia.
Offline translation, on the other hand, can be only stored for 13 pairs. For instance, you can download language packs of English and get it translated to Chinese, Japanese, Korean, French, German, Spanish, and Russian.
Is this your GadgetMatch?
The Fluentalk T1 portable translator retails for US$ 300 (buy here). It’s outright expensive that you can actually use the money to have a quick, budget-friendly trip somewhere in Southeast Asia. In the Philippines, that is already enough to visit and enjoy one of its beautiful islands for a weekend.
But if you’re a frequent flyer and you have a lot of money to shell out to make your experience worthwhile, the T1 is a traveler’s GadgetMatch. There’s value in its software features, and sometimes, it’s handy to not rely on your smartphone for everything — especially when traveling.
Soak in the sights and experience, folks. Go offline, be in the moment, and make new memories.

Apps
The case for traveling without a plan
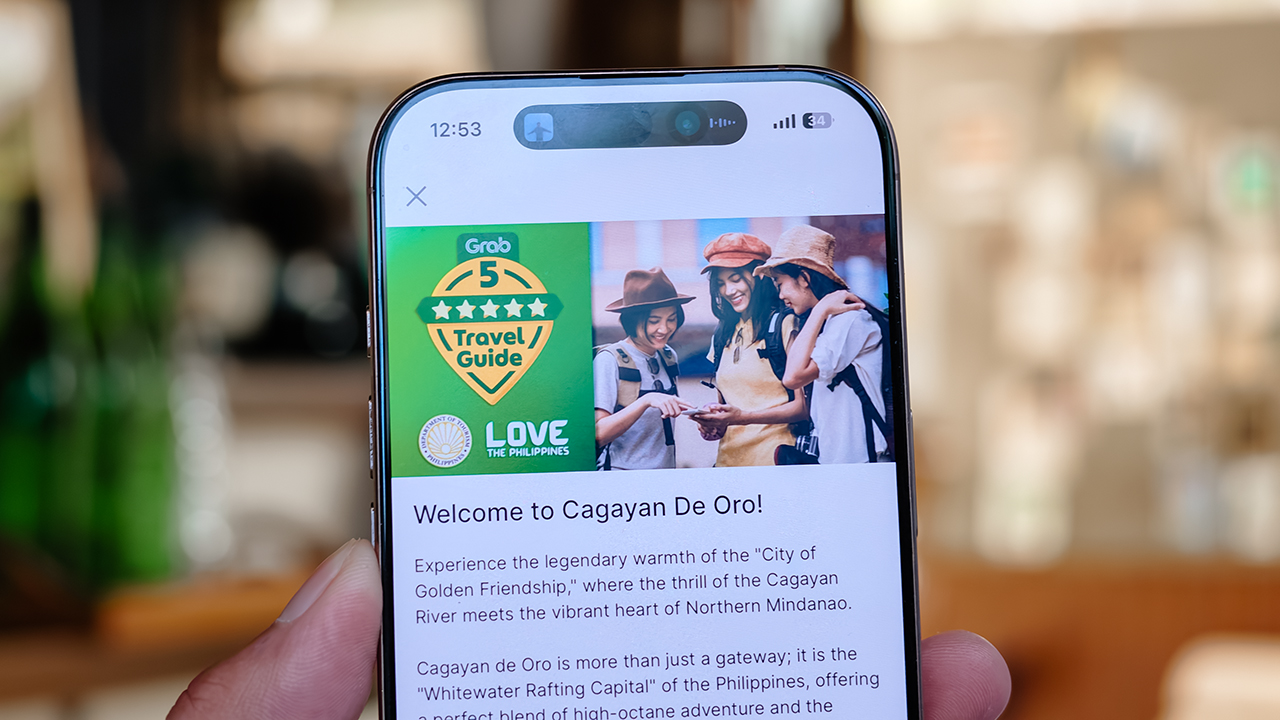
How Grab’s 5-Star Travel Guide replaced my spreadsheets, for personal travel anyway

I have somehow acquired the reputation of a man permanently in transit.
Fill your feed with airport check-ins, road trips, hotel rooms, and race bibs for a decade, and people stop seeing travel as a hobby. They start treating it like a personality trait. And naturally, everyone is always breathless to know: “MJ, how on earth do you manage it all?”
Here’s the truth: every trip begins long before I pack a bag. A good itinerary takes time. Flights, hotels, transfers, backup plans, restaurant lists all have to fit together well enough to make the trip feel worthwhile.
My colleagues would probably call me a Type A traveler. They’ve watched me run international coverages and high-stakes business trips entirely off spreadsheets. Spreadsheets!
Timed down to the exact micro-second, complete with contingency plans for every possible disaster short of an alien invasion.
And they are completely right. For work. But personal travel? Oh, darling, personal travel plays by a completely different set of rules.
The luxury of letting go (and the panic that follows)
A month before departure, I am all about securing the basics. But once the flights and rooms are locked in? I completely let go.
I would much rather leave room for fabulous, unexpected curiosity than fill every single hour with another rigid destination.
Part of it is sheer decision fatigue. I spend so much of my professional life making executive decisions that the last thing I want to do on vacation is have a minor existential crisis at 2:00 p.m. over which artisanal café deserves the honor of my afternoon. I want to wake up, look at the sunlight filtering through the curtains, and let the universe decide.
Of course, ironically, that absolute freedom can spiral into its own fabulous brand of panic. I know I want to go somewhere chic. I just have absolutely no idea where.
Which is precisely how Grab’s 5-Star Travel Guide quietly became the most indispensable accessory of my latest getaway.
Finding somewhere to spend the afternoon
I recently flew to Cagayan de Oro to spend some quality time with my long-term, long-distance, low-commitment, casual boyfriend. (Yes, it’s complicated, but the mystery keeps it glamorous.)
I arrived with absolutely zero plans, and this was entirely deliberate. If there is one thing a strong, independent person must never do, it is rely on someone else to dictate his day — even if that someone is technically his own handsome, local tour guide.
Instead of waiting around for an itinerary to be handed to me, I simply opened my Grab app while I’m in downtown and slithered over to their Travel Guide.
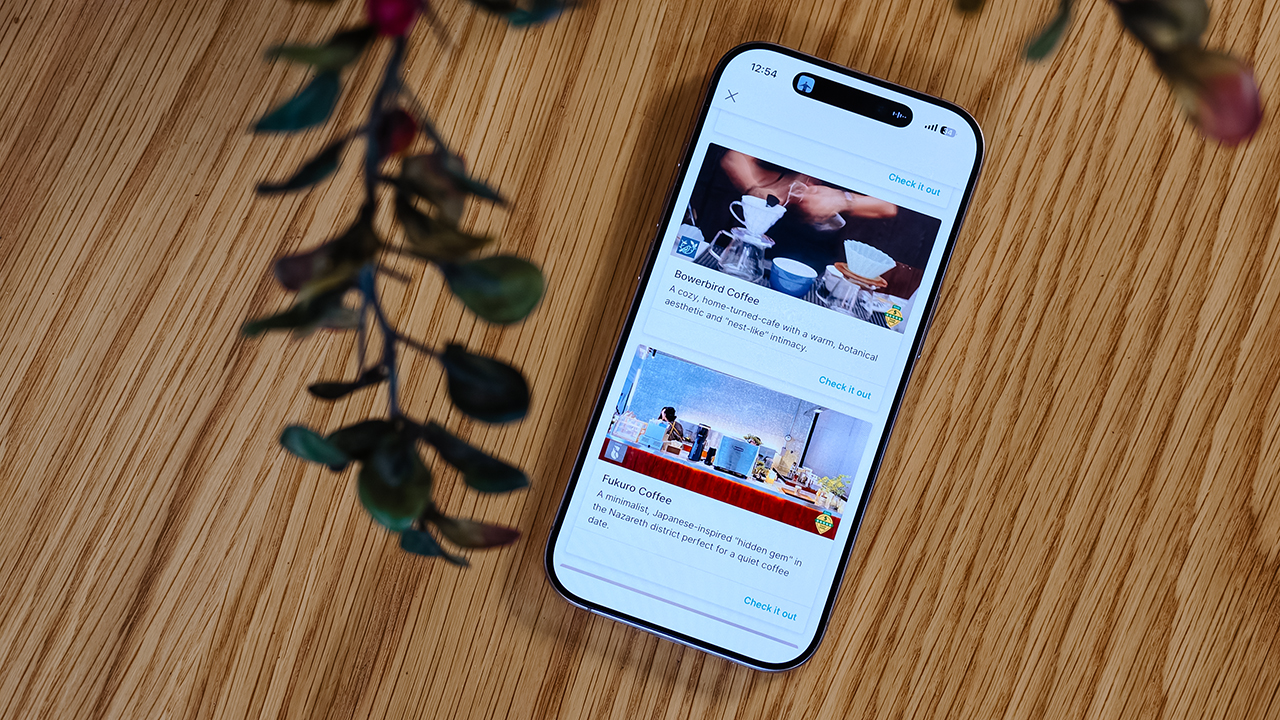
My fabulous friend, Syra, glided over from Midtown, and we agreed to rendezvous in Uptown to finally check out H Proper Coffee, which was practically screaming at me from the top of the Grab list.
It’s the city’s legendary third-wave coffee pioneer — complete with a deeply impressive roastery — and it has recently, thank goodness, expanded to Makati.
-
- Bowerbird Coffee

The guide also flirted with other familiar, delicious names like Milestone Coffee (where Syra and I had gossiped over lattes just six months prior), alongside Bowerbird Coffee, Fukuro, Apostrophe Café, The Lone Wolf, and Grae Coffee.
I must say, the recommendations were utterly spot-on. They weren’t just highly rated by random bots; these were the actual enclaves that the city’s stylish locals genuinely know and love.
Dinner dilemma (solved!)
The Travel Guide came through yet again when the sun began to set and the crucial question of dinner arose. Now, I absolutely adore discovering hidden neighborhood gems and family-run eateries. They possess a soul that no luxury restaurant could ever replicate.
That said, every proper holiday demands at least one evening where you put on a sharp blazer, splash on some Tom Ford, and indulge in a truly beautiful meal.
Unsurprisingly, Cucina Higala seduced me all over again. Look, I am a creature of habit. If I know an establishment delivers perfection, I will return.
Seeing it sitting proudly near the top of Grab’s curated list felt like a delicious little pat on the back; a quiet validation that my impeccable taste is worth trusting after all.
Beyond the plate
Refreshingly, the guide doesn’t stop at flat whites and fine dining. Grab’s Travel Guide also highlights local luxury hotels.
Though, fair warning, a few of them are the sort that make your credit card wince slightly. (But darling, they are five-star for a reason.)
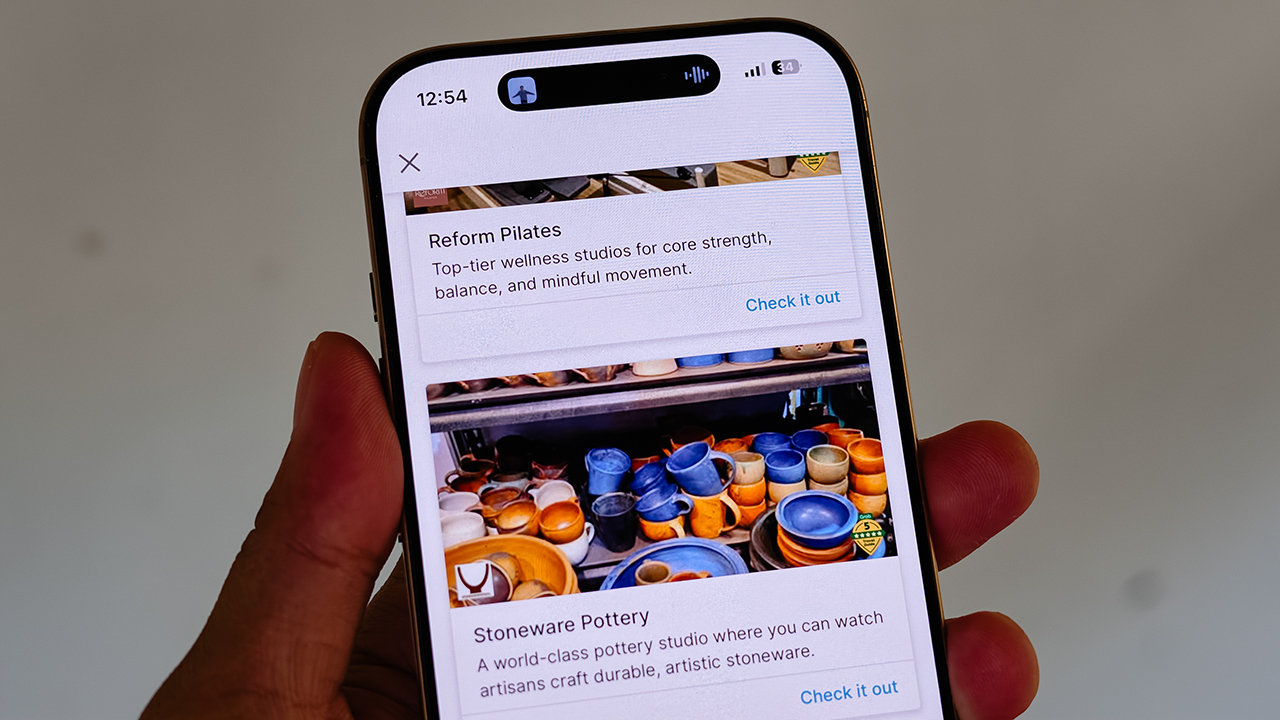
It also curates actual experiences. Browsing through the app, I found options for everything from heart-pounding whitewater rafting and sharp Pilates studios, to a world-class pottery atelier, a folkloric museum, and a sweeping, adventure-filled mountain retreat.
Some were already on my radar, but others? I would never, in a million years, have stumbled upon them myself. And that is the thrill of traveling this way. You leave just enough empty space in your diary to be utterly surprised.
For the spontaneous traveler
Let’s be clear: planning every detail down to the last centavo is not a flaw. When you’re younger or traveling on a strict budget, every single peso counts, and a meticulously plotted itinerary ensures you maximize both your wallet and your time.
But eventually, thank heavens, you reach a stage in life where the itinerary matters just a little bit less. A stage where time and budget stop being the terrifying monsters standing between you and a boarding pass.
You learn that not every single meal requires three weeks of intense counter-research. Not every hour requires a reservation confirmation number.
Sometimes, the most breathtaking, unforgettable moments happen simply because you wandered into a doorway you weren’t even looking for.
So, book the flight. Secure the hotel. Figure out how you’ll get around. Then let your feelings, and Grab’s Travel Guide, decide the rest.
Features
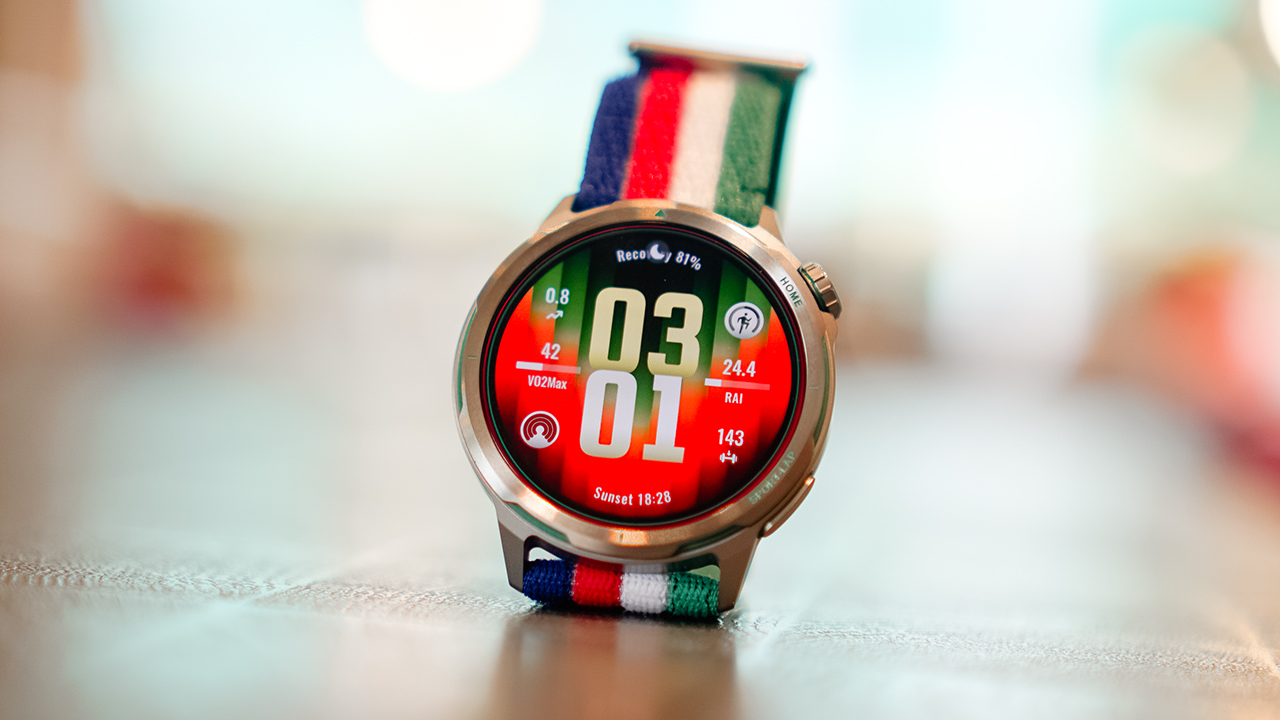
Spotlight: HUAWEI WATCH GT Runner 2 Racing Legend Edition
A marathon coaching system wrapped in the lightest titanium running smartwatch.
@gadgetmatchEliud Kipchoge, the world’s greatest marathon runner, helped design this watch. The HUAWEI WATCH GT Runner 2 Racing Legend Edition is the lightest titanium smartwatch built for runners, featuring the most accurate GPS in its class. It packs an AI-powered marathon coaching system alongside comprehensive health and fitness tracking built right into your wrist. #HUAWEIWATCHGTRunner2RacingLegendEdition HUAWEI Online Store – https://tinyurl.com/479ee4zk Shopee – https://tinyurl.com/yex4dvp9 Lazada – https://tinyurl.com/yu47bktt TikTok – https://tinyurl.com/yxsjsyhw♬ original sound – GadgetMatch
Eliud Kipchoge ran a marathon in under two hours. That’s not a marketing line. It’s one of the most significant feats in the history of human endurance.
So when Huawei says the HUAWEI WATCH GT Runner 2 Racing Legend Edition was designed with his input, that detail deserves more than a passing mention. It shapes what this watch actually is, and more importantly, what it’s trying to do.
The GT Runner 2 isn’t a smartwatch that happens to track runs. It’s a running tool built from the ground up, wrapped in titanium, and finished in a colorway that carries Kipchoge’s energy in its gradient and clean lines.
Lightest titanium watch
The first thing you notice when you put the GT Runner 2 on is how little you notice it.
At 43.5 grams for the watch body, it’s Huawei’s lightest metal running watch to date. For reference, that’s roughly the weight of a small packet of sugar.
On paper that sounds like a marketing metric. On a long run, it’s the kind of thing you actually feel — or more accurately, the kind of thing you stop feeling, which is the point.
The case is aerospace-grade titanium alloy, the same material used in aircraft construction. It’s strong without adding bulk, and at 10.7mm thick, it slides under a long sleeve without a second thought.
The display is a 1.43-inch AMOLED panel with 3,000 nits of peak brightness, enough to read clearly under direct sunlight mid-run, which is where it needs to perform.
The Racing Legend Edition colorway is the visual anchor of the whole package. It doesn’t read as a sports watch in the traditional chunky sense.
The strap situation is thoughtful, too. The in-box AirDry woven strap is designed to breathe.
There’s also a Fluororubber quick-release strap included for race days when you want something more locked in against your wrist.
Accurate GPS
This is the centerpiece of the GT Runner 2, and Huawei has invested the most engineering effort here.
To understand why the GPS on this watch is different, you need to understand a basic problem with how most GPS watches work.
Satellites broadcast signals in a circular, spiral pattern. Most smartwatches are built to receive signals linearly, meaning they’re only catching part of what’s being sent. The result is data loss, and data loss means inaccurate tracking.
The GT Runner 2 addresses this at the hardware level with what Huawei calls a 3D Floating Antenna Architecture. The titanium bezel and metal middle frame of the watch itself function as external receivers, which expands the antenna surface area significantly.
More of the watch is actively listening for satellite signals, which means it captures more of those spiral broadcasts. Huawei positions this as a 50% improvement in antenna performance.
Then there’s the software layer, which is arguably more interesting for anyone running in an urban environment.
Anyone who’s tracked a city run knows the problem: you go under an overpass, cut through a tunnel, or run between towers, and your GPS trace goes straight. The watch gives up and draws a line where your route should be.
The GT Runner 2 has an AI system — Huawei calls it the XDR Inertial Navigation AI Algorithm — that fills that gap intelligently.
It learns your movement patterns: your stride length, your arm swing, your pace. When satellite signal drops out, it uses that accumulated knowledge to estimate your route accurately. When the signal returns, it stitches the two together seamlessly.
Marathon mode
The Marathon Mode on the GT Runner 2 was co-developed with Eliud Kipchoge’s team. That partnership matters because it means the feature set was shaped by people who actually race at the highest level, not just engineers working from data.
The system covers the full race cycle. Before your event, the watch builds you a personalized training plan and tracks your lactate threshold in real time, the point at which your body starts accumulating fatigue faster than it can clear it.
Knowing where that threshold sits is how serious runners train in the right zones and avoid hitting the wall during a race. The GT Runner 2 brings that metric to your wrist without requiring a lab visit or a coach.
During a race, the pace guidance isn’t a static target you set and follow. It adjusts in real time based on how you’re actually performing. The watch also sends smart refueling alerts — not based on a generic timer, but on your personal health data and international nutrition guidelines. So when it tells you to eat or drink, it’s working from your numbers, not a one-size-fits-all schedule.
After the race, it gives you dynamic recovery guidance and exports your full session automatically to Strava and Komoot.
Health tracking that actually goes beyond the basics
The GT Runner 2 tracks your health around the clock, and a few of its features stand apart from what most smartwatches offer.
Heart rate accuracy is rated at 98%. For a wrist-worn device, that’s a serious number. The watch achieves this through Huawei’s TruSense system, which uses an upgraded NPU and advanced algorithms to pull more precise readings from the sensor.
The ECG monitoring is CE-certified, which means it meets the regulatory standard for detecting early signs of irregular heart rhythms.
More importantly, the GT Runner 2 does this in the background — passively, while you’re awake or asleep — without requiring you to manually activate a check.
Sleep tracking includes breathing awareness to flag potential signs of sleep apnea.
HRV — heart rate variability, one of the most reliable indicators of how recovered your body actually is — gets tracked across 24 hours.
There’s also a stress and emotional wellbeing tracker that categorizes your state in real time. When you’re deep in a training block and everything feels harder than it should, this is the kind of data that tells you something concrete rather than just confirming that you’re tired.
Battery life that doesn’t ask you to compromise
Running watches live or die by their battery, and the GT Runner 2 doesn’t disappoint here.
Continuous GPS tracking lasts 32 hours. To put that in running terms, that’s enough to cover five to six full marathons without stopping to charge. Enable Trail Run mode and that extends to 35 hours. Under normal daily use, you’re looking at up to 14 days on a single charge. When it does need power, it charges wirelessly.
Storage comes in at 64GB, which holds thousands of offline songs and heavy map data simultaneously. You can leave your phone behind on a long run and still have music and navigation on your wrist. It works with both Android and iOS, and syncs automatically to Strava and Komoot after every session.
For users in the Philippines, there’s one more practical addition worth calling out: GCash Watch Pay. You can pay at any GCash QR terminal directly from your wrist. For anyone who stops mid-run to refuel, this removes the friction of digging through a bag or pocket to complete a transaction.
Is the HUAWEI WATCH GT Runner 2 Racing Legend Edition your GadgetMatch?
The HUAWEI WATCH GT Runner 2 Racing Legend Edition was built around one clear premise: give runners access to the kind of data and guidance that previously lived inside expensive coaching programs and professional setups, and put it on a wrist that doesn’t feel like it’s carrying anything.
The titanium build, the GPS architecture, the Marathon Mode co-developed with the world’s greatest marathon runner — none of these are incidental features. They’re the point. And the way the watch surfaces all of that information keeps it accessible.
Every purchase comes with a complimentary three-month HUAWEI Health+ membership, which unlocks professional coaching videos, custom sleep music, and personalized nutrition and training plans.
The HUAWEI WATCH GT Runner 2 is available at HUAWEI Experience Stores nationwide, the HUAWEI Online Store, and Huawei’s official stores on Shopee, Lazada, and TikTok Shop.
Purchases made from June 30 onwards come with an exclusive bundle worth up to PhP 11,384 — including a free fluoroelastomer strap, a free pair of HUAWEI FreeArc earphones (on a first-come, first-served basis), the three-month Health+ membership, and a two-year warranty with accidental damage protection.
There’s also a PhP 2,000 trade-in token for buyers coming from an older device.
This feature is a collaboration between GadgetMatch and Huawei Philippines.
Explainers
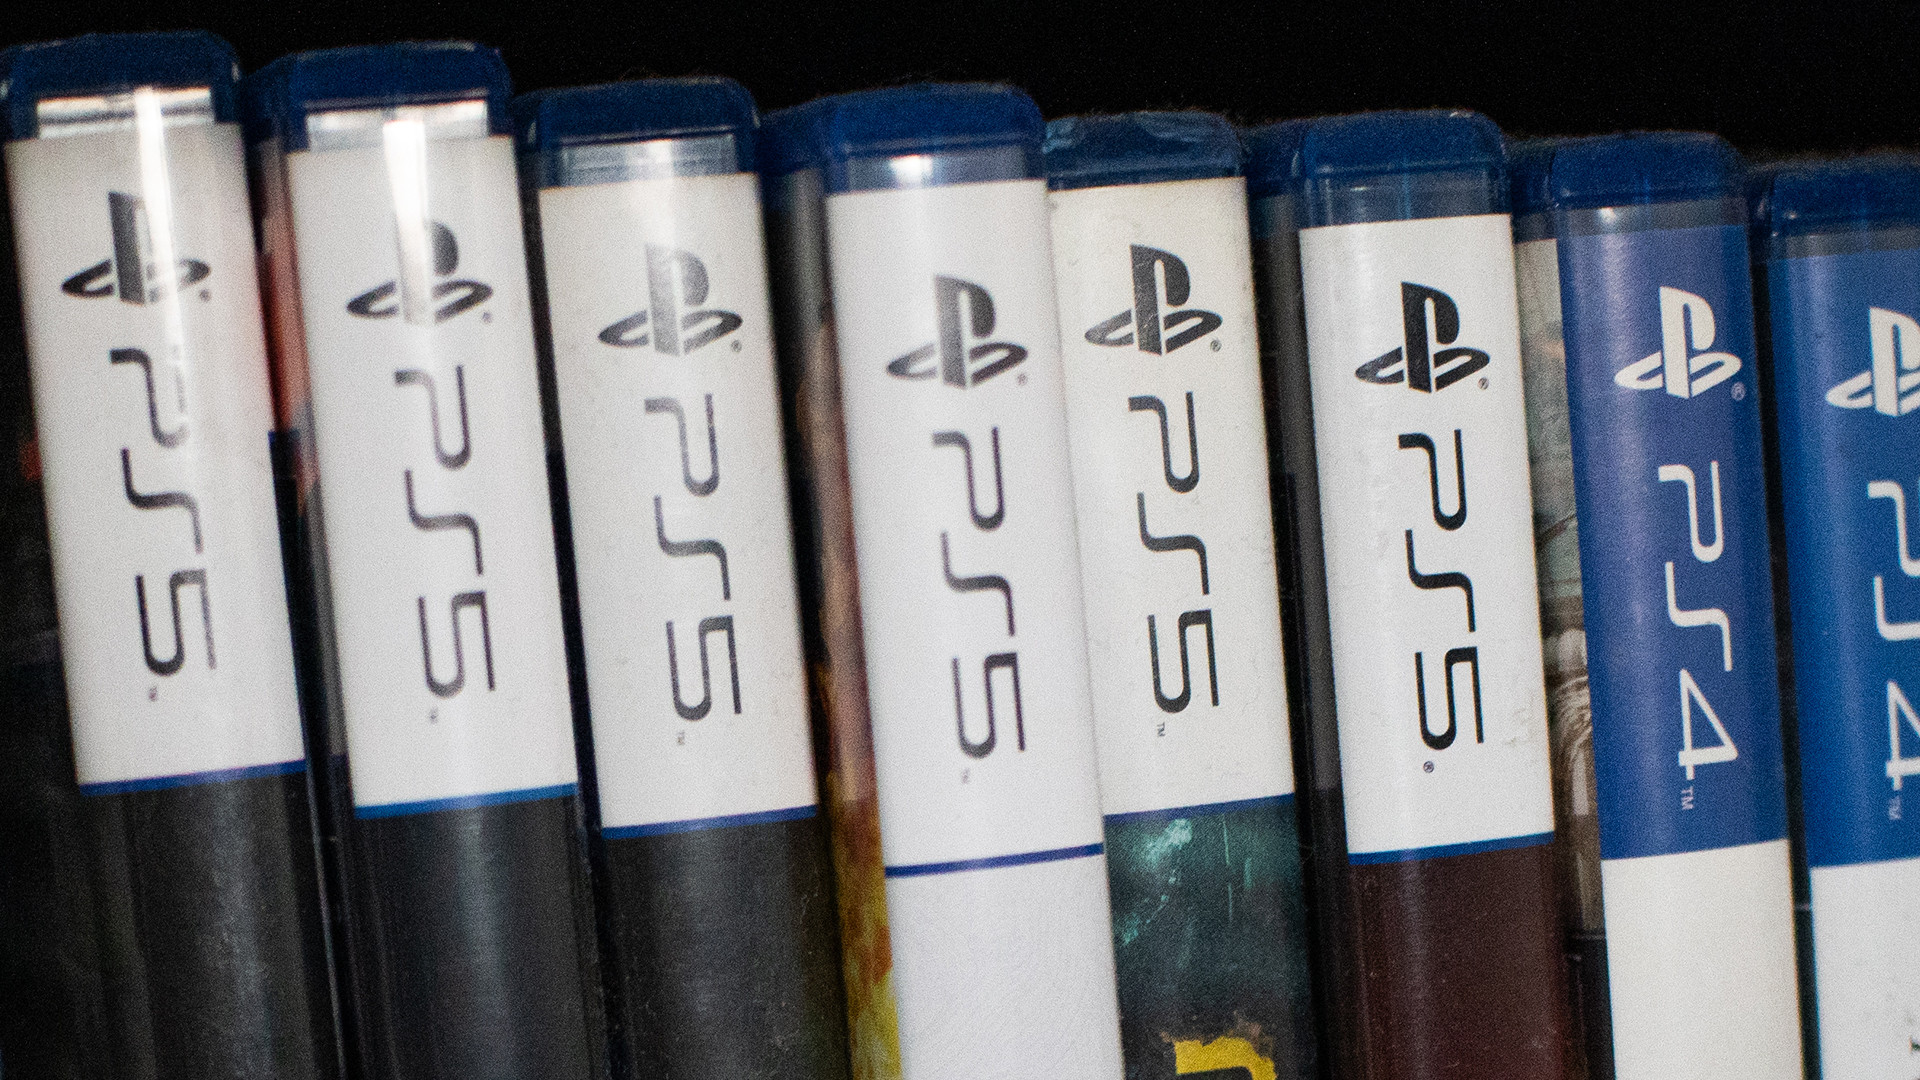
Everyone’s angry at PlayStation’s new no-disc policy, and this is why
It’s a tragedy for nostalgia, ownership, and preservation.
Check in with your gamer friends today. Today, a lot of gamers are up in arms over Sony’s decision to kill the physical game disc starting in 2028. But, if you’re a digital-only gamer or just not a gamer yourself, you might not understand the anger. If you want to understand the ire or just want to relate with your gamer friends, here’s a primer for you.
Ending the era of the physical media
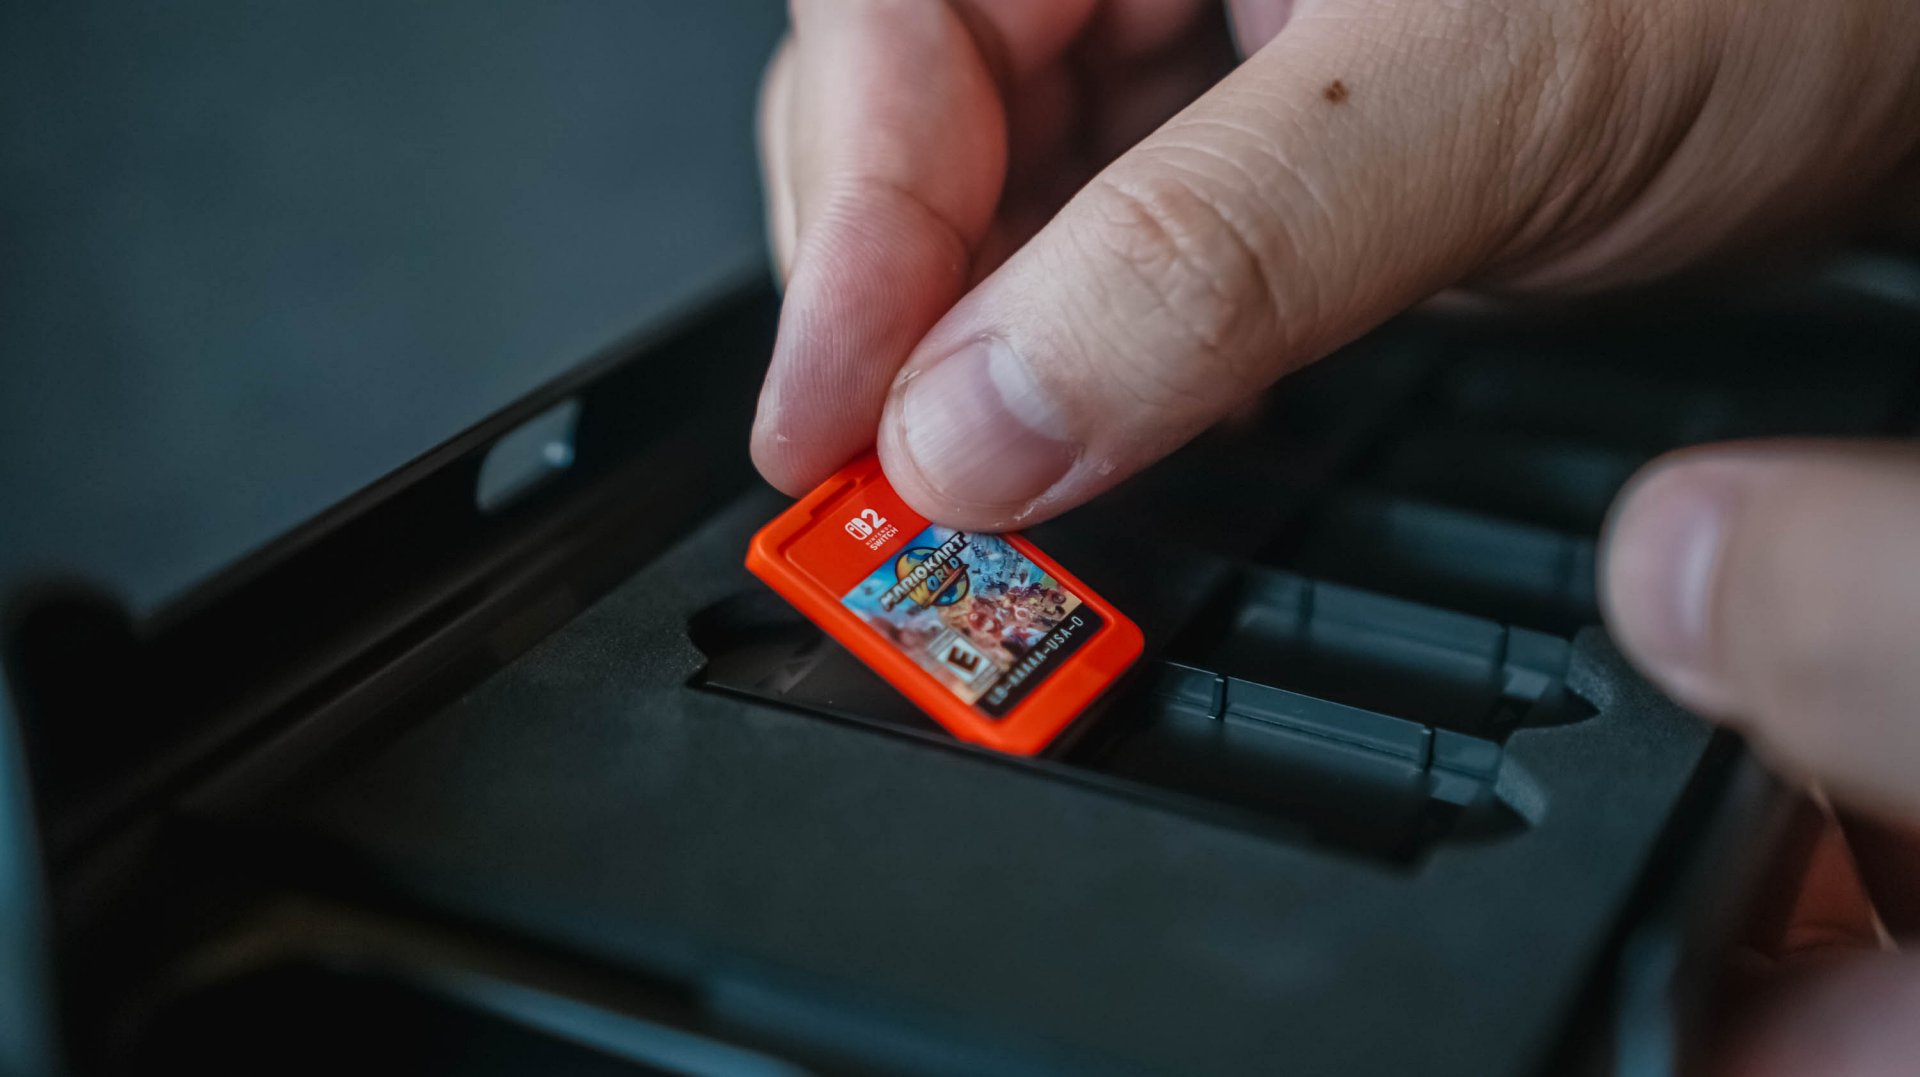
Last year, Nintendo launched the Switch 2. Though the console still has a slot for physical cartridges, the Switch 2 also introduced the Virtual Game Card as a way to digitize your library of games.
Of course, the feature wasn’t positioned as a way to eliminate physical cartridges. In fact, Nintendo just wanted to add the flexibility of physical cartridges to the digital world. In the end, the feature strangely coincided with less cartridges. For example, Pokémon Pokopia, one of the most popular games this year, does not come with a cartridge even if you buy a “physical” copy in a brick-and-mortar store. It was a portent of things to come.
Fast forward to today, Sony has made the monumental decision to stop producing physical game discs starting in 2028. The PlayStation’s future is completely digital.
On a similar note, Microsoft is also experimenting with a disc-to-digital feature. Much like the Nintendo Virtual Game Card, the experiment will digitize libraries and attaches the digital copy to the physical game disc. It sounds awfully like a prelude to killing off the game disc.
Why this matters
The physical disc is synonymous with a simpler time. It represents a time when gamers camped out stores to anticipate midnight releases, when gamers can learn more about their games through an in-box manual, and when gamers can show off their fandom through a beautifully stocked shelf of games.
And yes, that’s part of why this situation sucks, but it’s not the only reason.
If you’re an outsider looking in, this nostalgia factor is the easiest to see. Then again, it’s also the most difficult to relate with, especially if you’ve never had the history of buying physical games.
The more crucial reason — and the one that most people will relate with — is media ownership. By not having a physical copy, you will no longer have ownership of what you bought digitally.
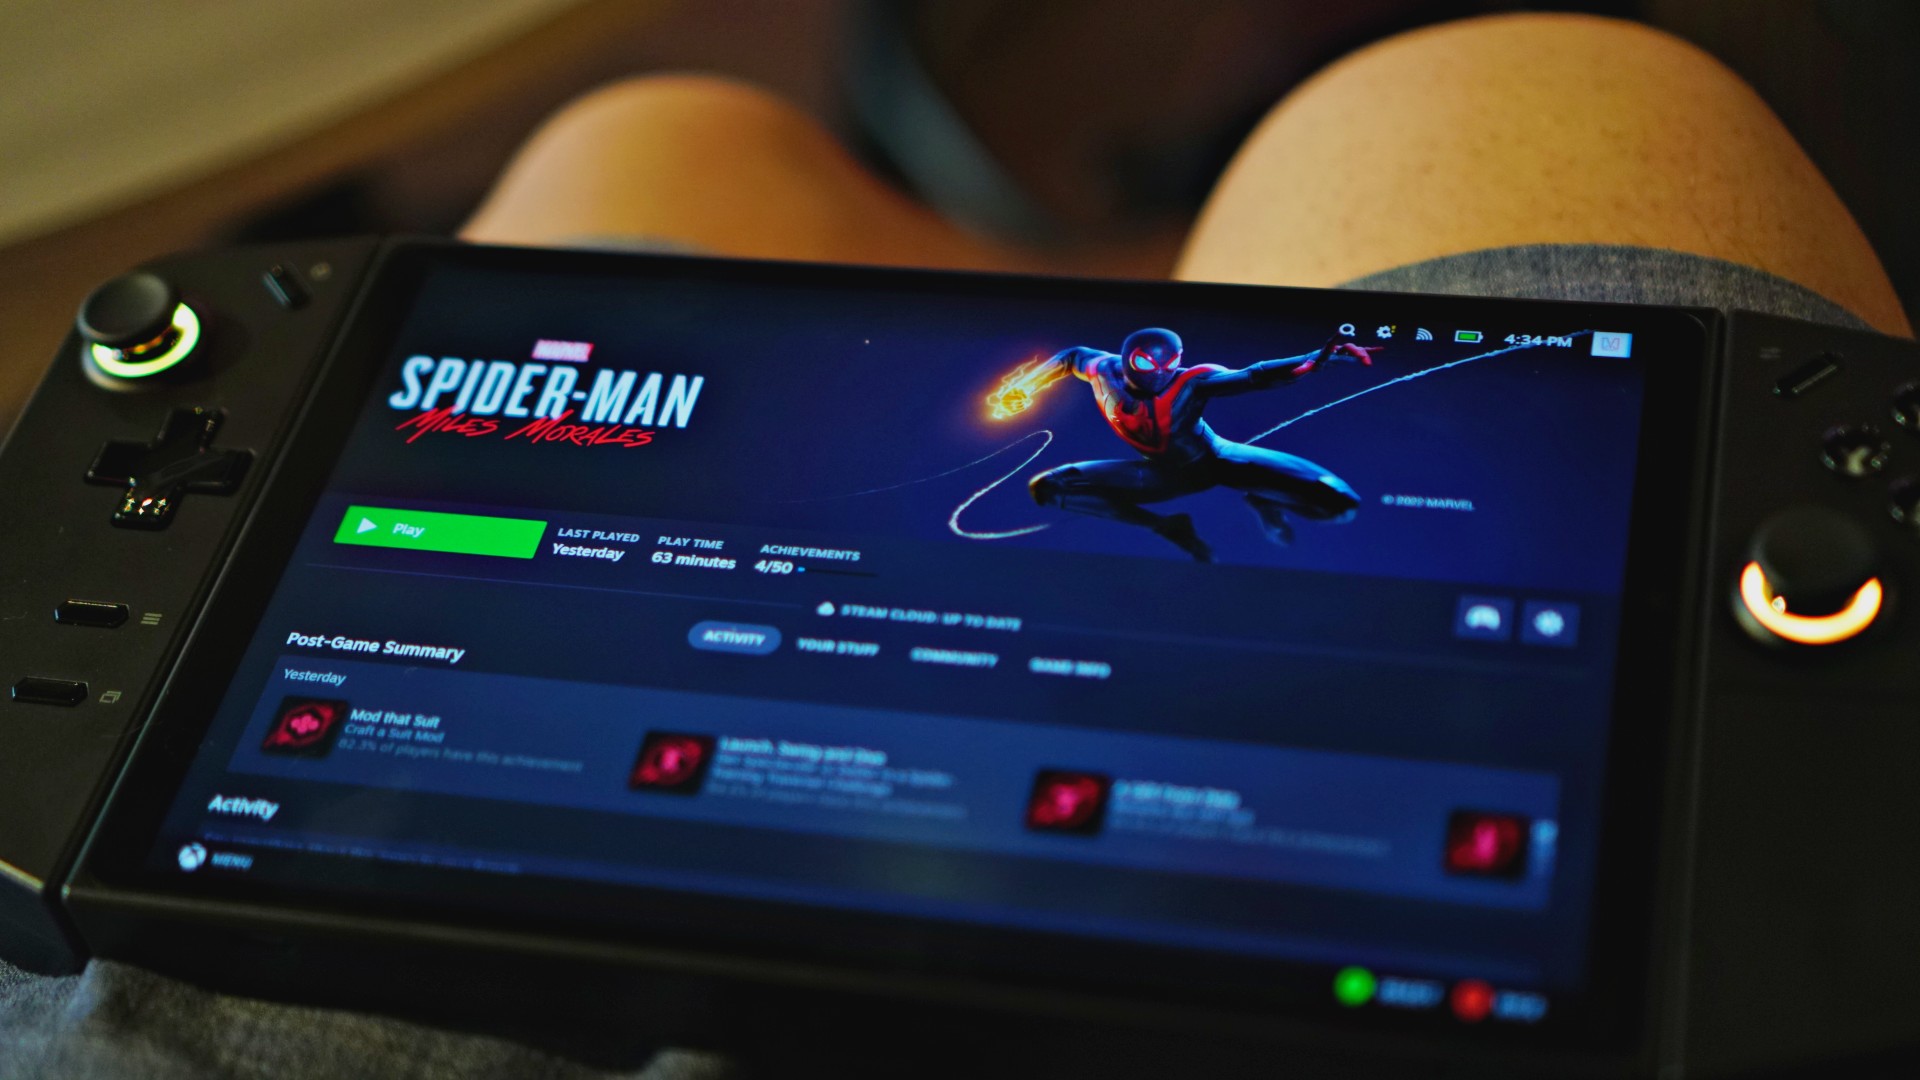
And it’s not an imaginary issue. In 2024, Steam amended its policies to reflect that players do not own the games they buy. Rather, they simply own a license to play the game.
In the same year, Ubisoft delisted The Crew, a sure sign that the new policy means business. Though Steam itself has a relatively good track record of prioritizing its customers, publishers and developers can get rid of games if they choose to.
That limitation doesn’t exist with a physical copy. As long as you have a working disc drive, you can install a game whenever you want, even if the publisher decides to pull it from stores.
Therein lies how much this is a touchy topic. Should you own digital goods in the same way as you own physical ones? If the answer is yes, then selling only the license for the good doesn’t make sense. But if it’s a no, we shouldn’t pay full price for something we don’t own anyway.
Will PlayStation actually delete games?
Now, just because they can, does it mean that they will?
Right now, it’s hard to say. You can certainly go by the optimistic hope that PlayStation would never do something as anti-consumer as that. And yes, there are times when you’d be right.
Plus, there is a good chance that governments, especially those in the European Union, will protect consumers if PlayStation even thinks about deleting a game that others have paid for. Governments have been known to intervene in the past, such as when the EU forced Apple to adopt USB-C as a standard. There are checks and balances available.
![]()
Then again, Sony has had recent history of deleting media from a user’s library.
Only a few days ago, PlayStation made headlines for deleting over 500 titles from their library. Starting September 1, users can no longer access movies distributed by Studio Canal, due to licensing agreements. Sony was unapologetic about unceremoniously deleting this content. No refunds, no apologies; just 500 movies, which you thought you bought, gone for good.
No matter how you angle it, Sony’s recent decisions just don’t bode well for media ownership.
You can argue that this is the price we’re paying for not buying enough physical games. Still, losing PlayStation discs, even as an option, is tragic for nostalgia, ownership, and preservation.
The world we live in
Unfortunately, this all comes with precedent. Unless you buy physical games and movies, we already don’t own anything in today’s world.
Outside games, Netflix and Disney+ remove the ownership of movies and shows from us. It’s already common practice for these platforms to remove titles regularly. Some platforms even give you a last chance to catch these titles before they go away. Moreover, they can even restrict access, like with Disney+, if you travel abroad.
In exchange for convenience, subscription services and digital storefronts have made it all too comfortable to not own media. With a rental service like Netflix, that’s all expected, but we’re now at the inevitable stage when even bought games and movies are at the behest of our corporate overlords.
This is where the fury comes from. Companies are getting more brazen about taking more options from us. Between this and the increasing prices of RAM, it’s getting harder and harder to live as a tech-savvy citizen in today’s age.

realme C100: Enduring and durable in spite of entry-level realities
Enough power but needs more agility


The ASUS ExpertBook Ultra wins you over
The laptop sneaks up on you


vivo X300 Ultra review: A “Whole Different Animal”
Got the beast (finally) unleashed!

iOS 27 public beta gives us our first taste of Siri AI

The case for traveling without a plan

Most of the world’s PlayStations will be officially useless by 2028

Cebu Pacific becomes 1st SEA low-cost carrier with Starlink Wi-Fi

Going ‘back to school’ as an adult with the HP Smart Tank 580

Buyer’s Guide: TECNO SPARK 50 Pro vs SPARK 50 5G
vivo X300 Ultra review: A “Whole Different Animal”

New York becomes first state to ban smart glasses

DJI Osmo Pocket 4P launches with dual lenses and a 1-inch sensor

HONOR Watch 6 review: Less guessing, more knowing


-
 News6 days ago
New York becomes first state to ban smart glasses
-
 Singapore5 days ago
Sony launches IER-M500 in-ear monitors
-
Laptops2 weeks ago
The ASUS ExpertBook Ultra wins you over
-

 Computers7 days ago
GIGABYTE releases new AORUS RTX 5080 INFINITY graphics cards
-

 Gaming6 days ago
Microsoft dictates that a new Fallout game is coming
-

 Enterprise2 weeks ago
Google ordered to pay EUR 4.1 billion in fines
-
 Accessories2 weeks ago
Sony brings 1000X THE COLLEXION to the Philippines
-

 Gaming7 days ago
HoYo FEST 2026 details announced; tickets on sale from July 16