
Cameras
myFirst Insta Wi: For the love of labels, prints, and photographs
Here’s a camera and printer in one!
Kids nowadays are neck-deep into technology — smartphones, tablets, smartwatches, television, and other forms of tech in our day-to-day lives.
Being the legal guardian of my seven-year-old niece is tough, especially since my work involves the latest devices in the consumer technology industry. She has access to all the newest and coolest gadgets in the market more than her peers.
What worries me is that I’ll have a hard time encouraging her to be more present, disconnect, and have fun offline. So when Oaxis Singapore reached out for their Kickstarter campaign, I was ecstatic. An instant camera and printer in one could be the solution to my woes.
A bit of history
Before we dive in, let’s have a bit of a background about myFirst. It’s a kids technology brand under Oaxis, founded by a team of super dads who aim to bridge the gap between tech and the toys we used to love.
There are a lot of issues that almost every parent has when it comes to gadgets. These include security in using technology and against online risks, being a factor in a child’s learning process, possible addiction, and safety from hazardous materials. This is what myFirst has been trying to address ever since they launched the myFirst Camera. And it continues to do so with the newest Insta Wi.
So, what is this Insta Wi?
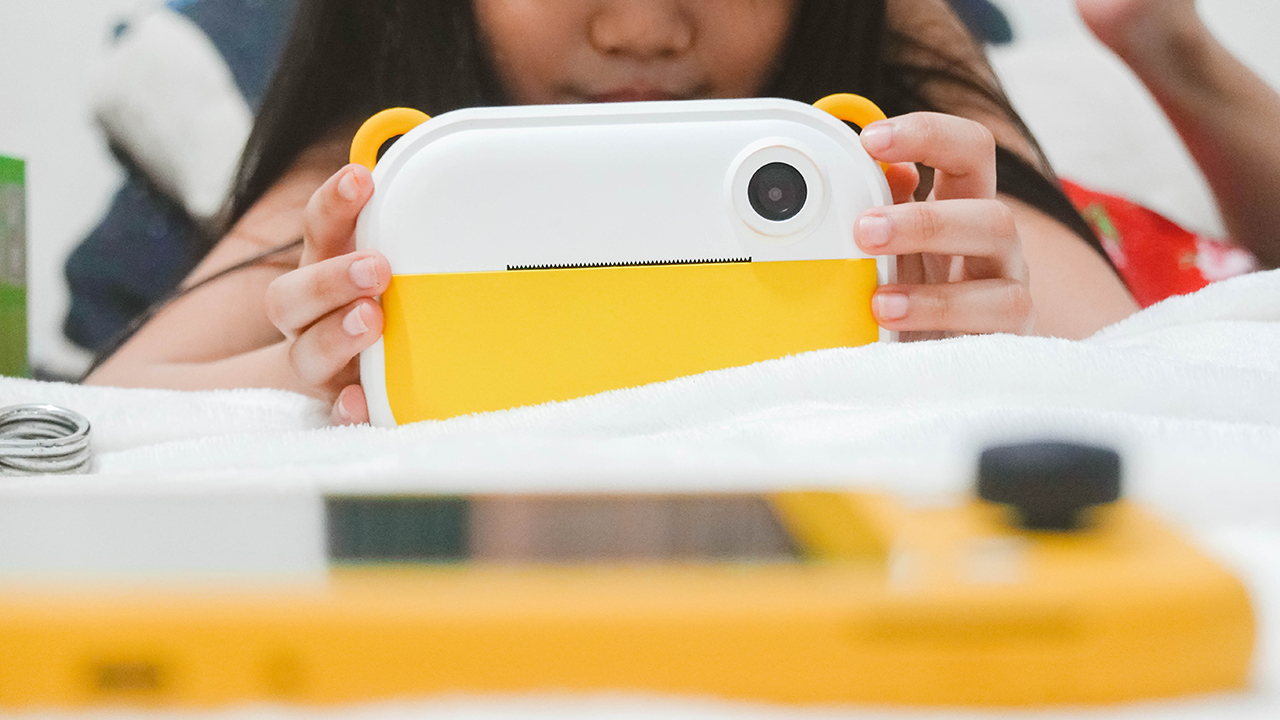
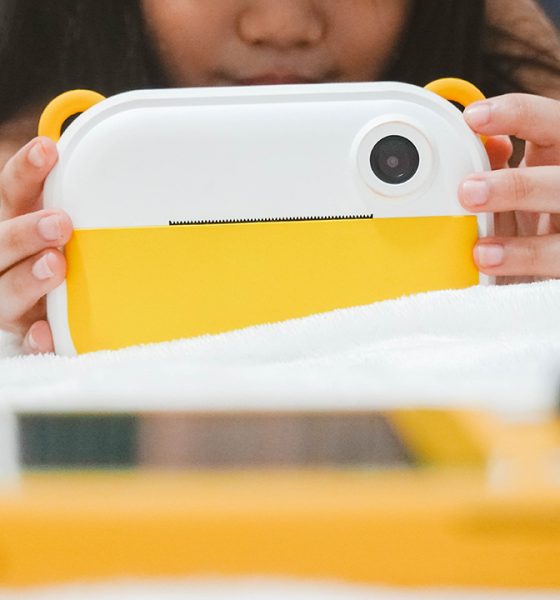
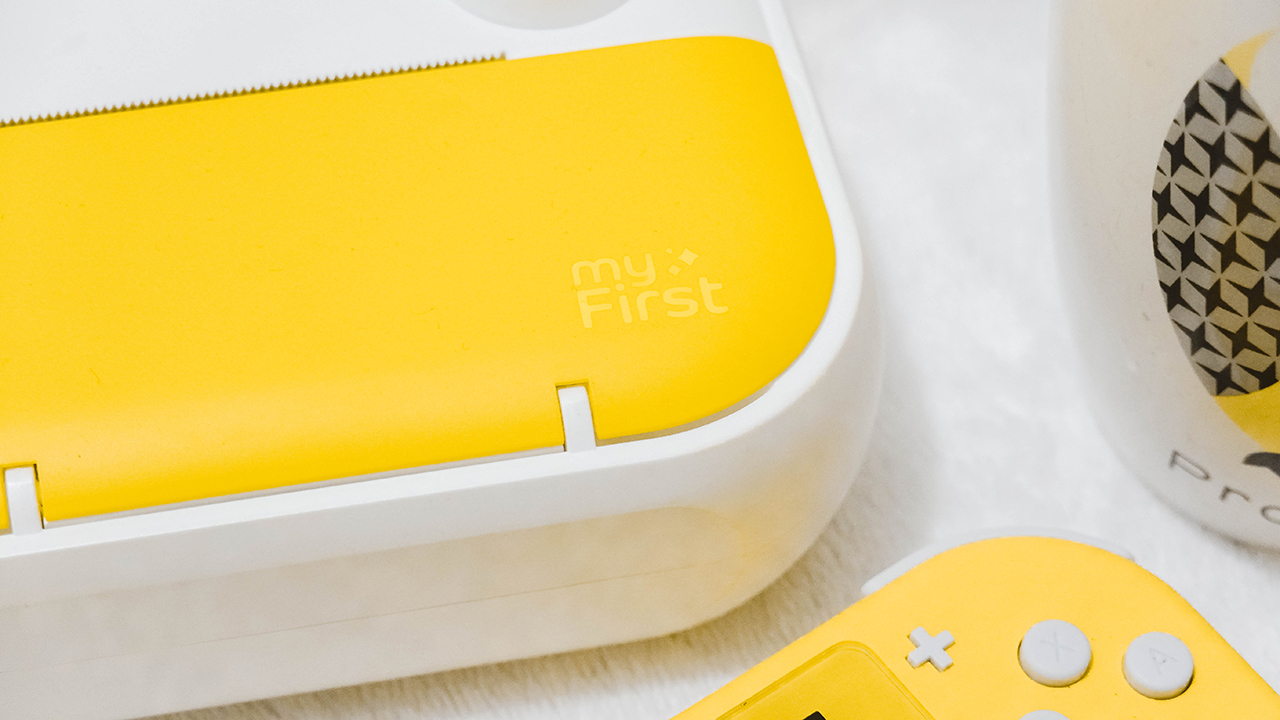
The Insta Wi is myFirst’s newest camera — an all-in-one device that lets you take photos and videos, and print pictures and labels.

It comes in an adorable, familiar shape with a yummy yellow colorway. Seems familiar? The color follows after the Pantone Color of the Year 2021.
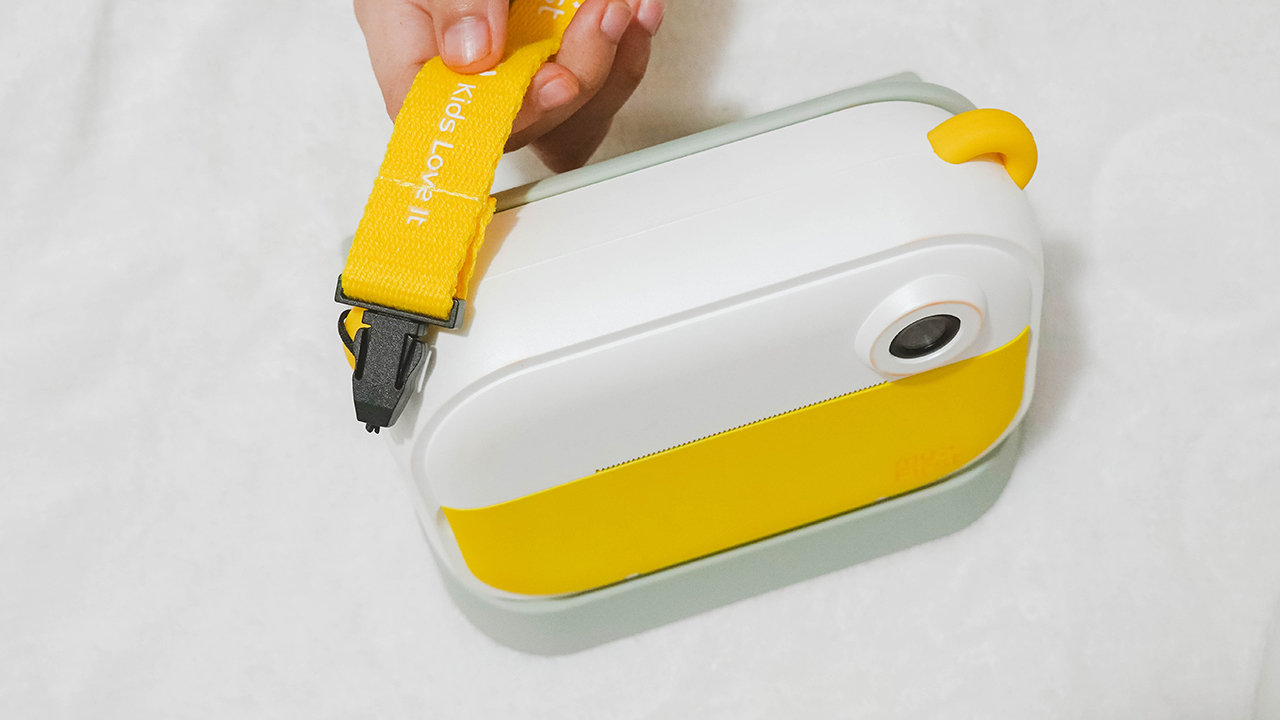
It has little ears where you can hook some straps so you can bring the device wherever you go without worry.

On its front, you can find its 16-megapixel rear camera together with the printer.
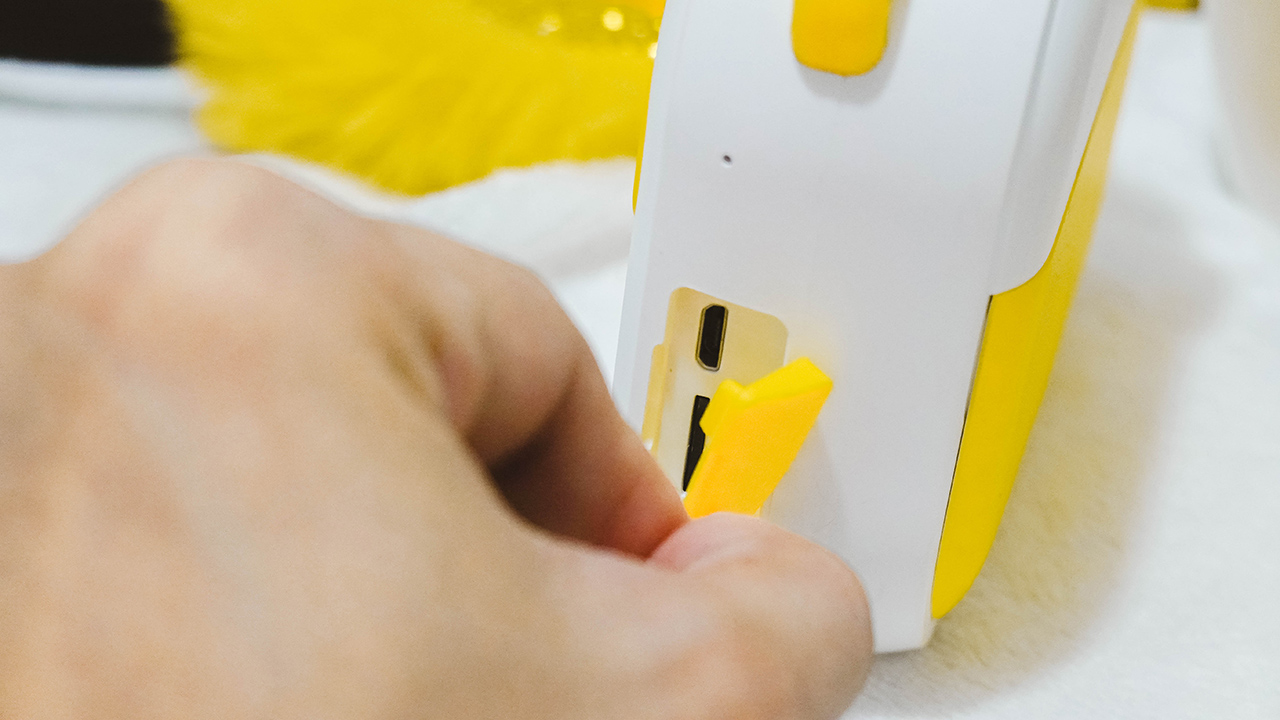
Moving to its sides, the right part has a mouthpiece and a slot for the micro-USB port and memory card, covered by a yellow silicone flap.

The other side comes with its speaker grilles.
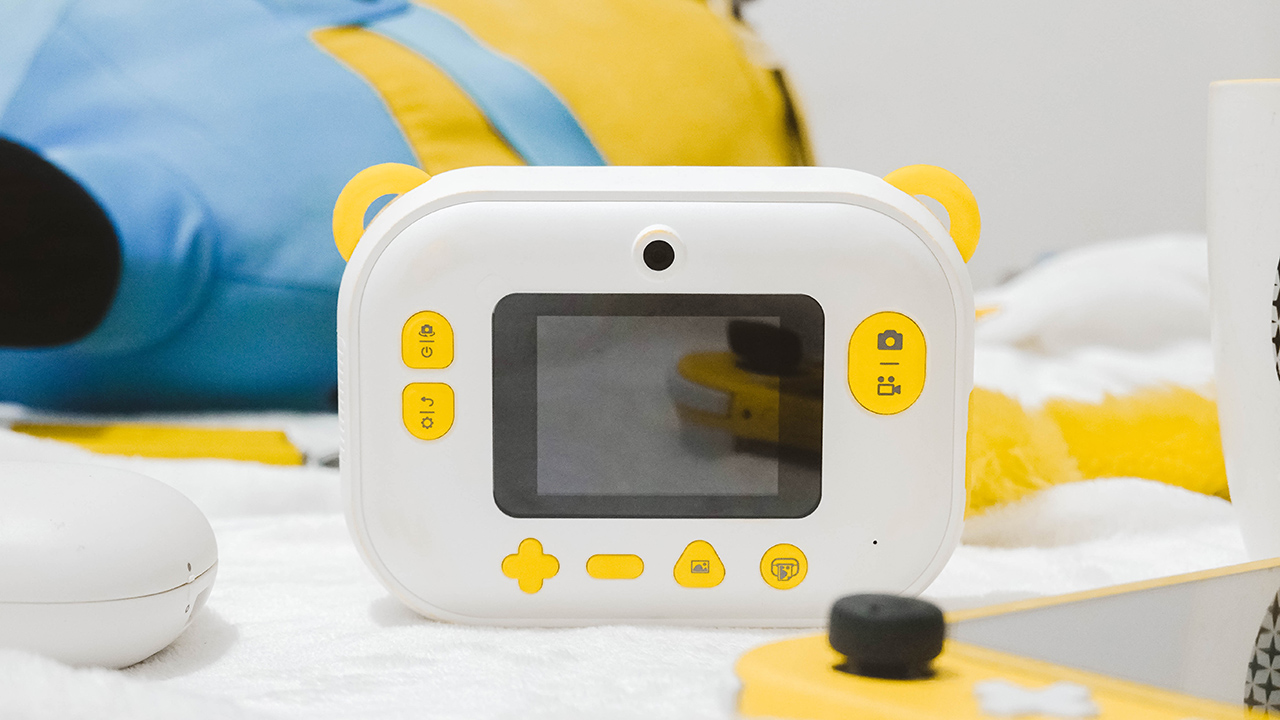
On the back, you can find its selfie camera above the 2.4-inch IPS LCD screen, surrounded by plenty of buttons for navigating the device and doing its function.
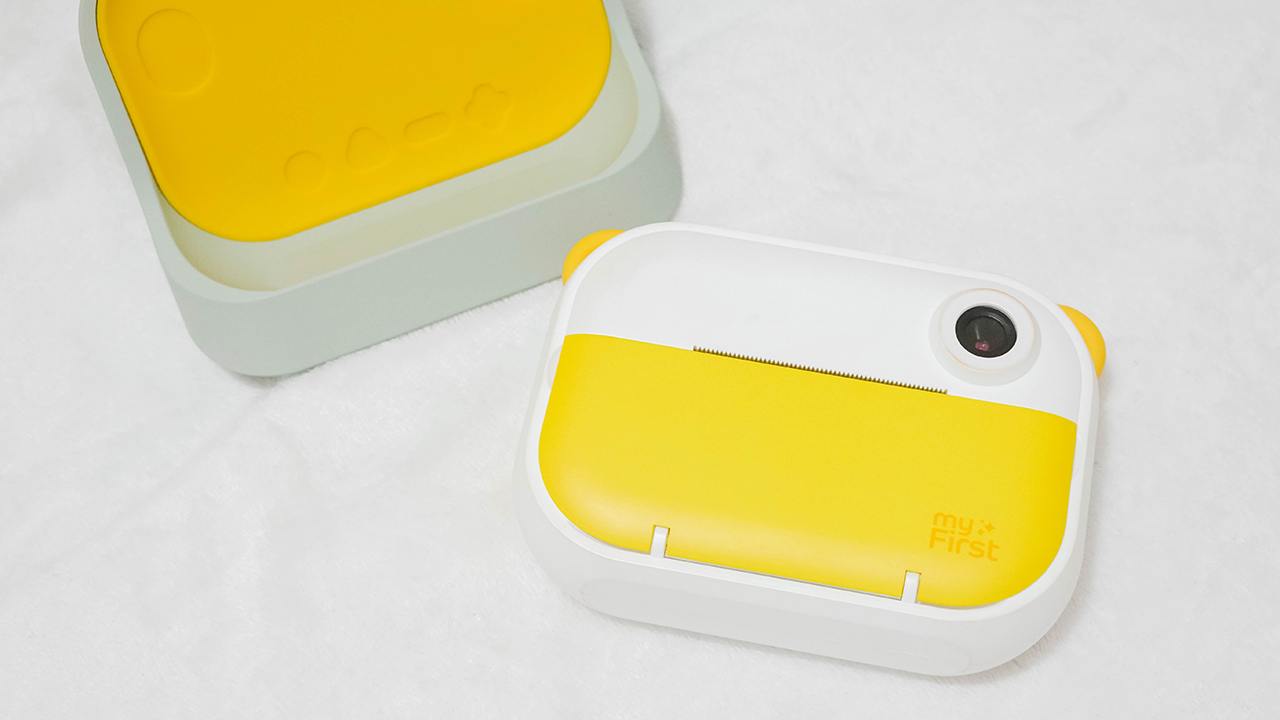
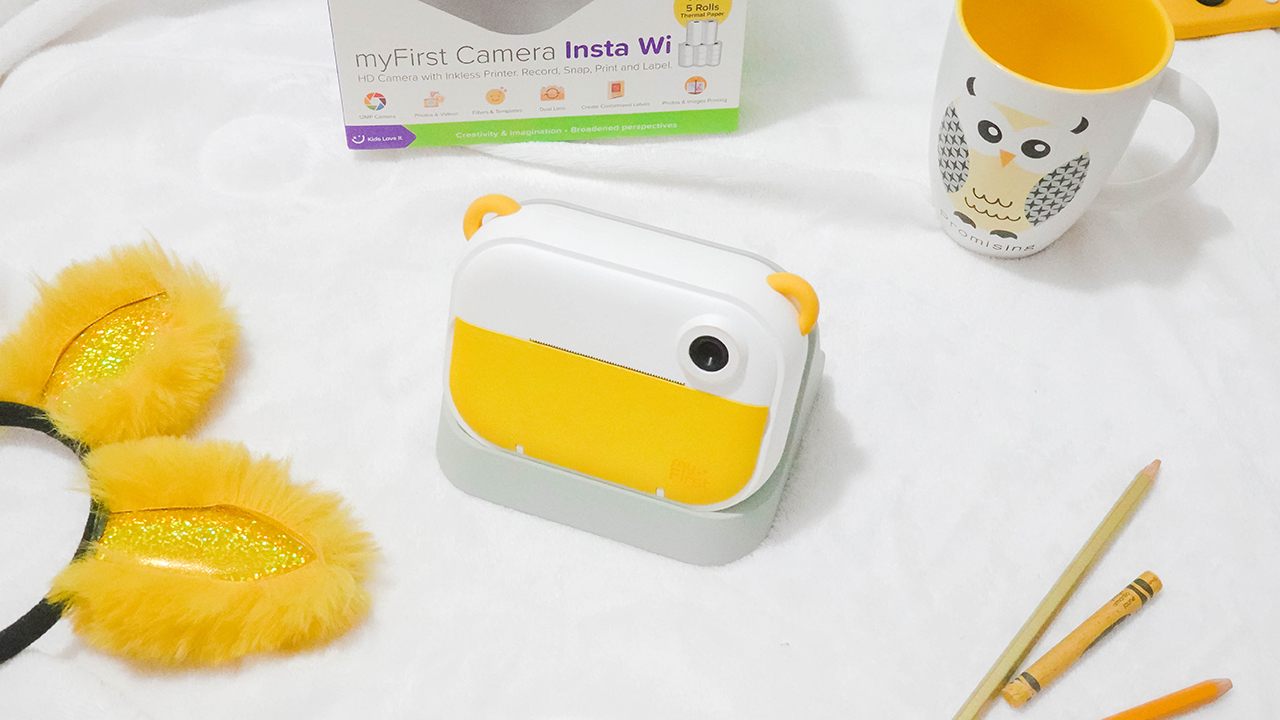
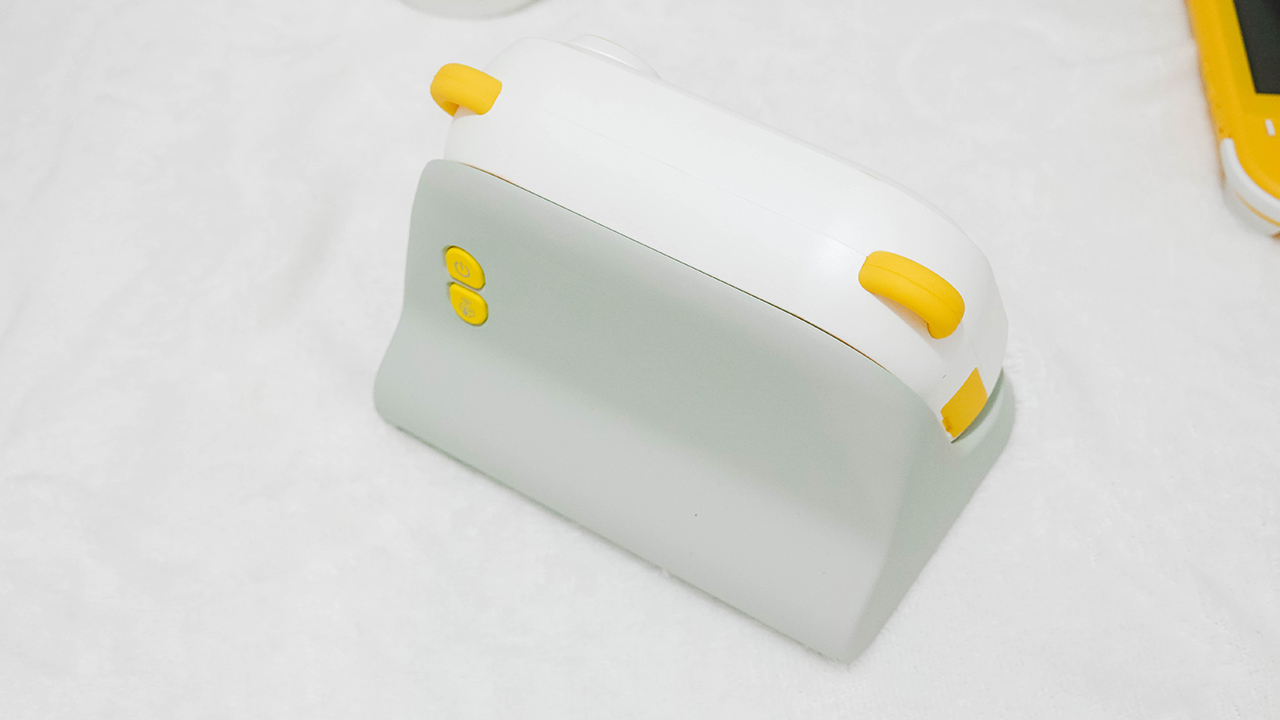
It also comes with a dock that doubles as its protective case and holder for kids to grip easily.
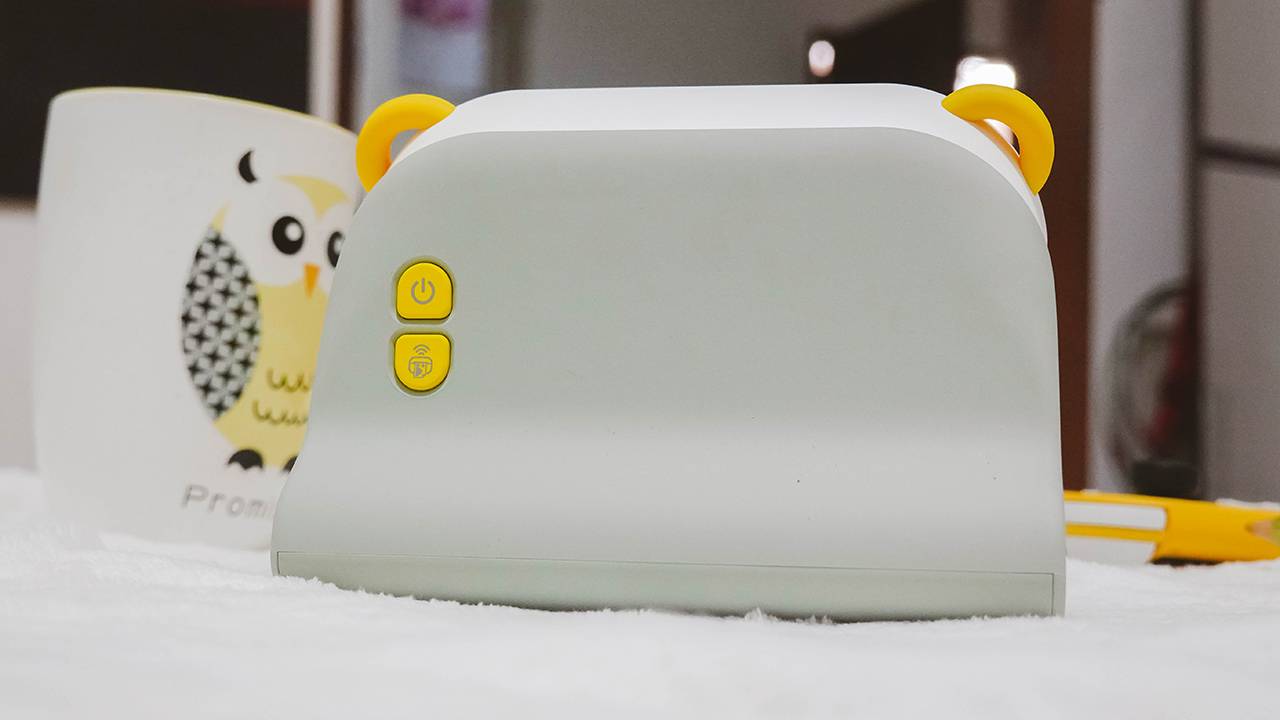
The case has two instant buttons on its back: a power button and a wireless print option.
Playing around
So let’s dive in on what this all-in-one device can do for you or your kid. You can boot the device by pressing the power button on the left side of the screen. When it’s opened, it will automatically use the selfie shooter. If you aim to use the rear camera, flip it through the same button you used to boot the device. You just need to click it to switch, since pressing long will shut it down.

On the right side of the screen are buttons that let you capture photos and videos. It’s the same process as the power button; the icon on top requires a single click while the icon below requires a long press for it to work.
The button below the power toggle is for the back option and settings. You can change the printing density, or switch the photo resolution between 6M (3280×1848), 9M (4000×2248), and 12M (4032×2880). Just make sure to use the plus and minus sign as the up and down buttons, and the camera button as a replacement to the usual “enter” sign.

Other settings include video resolution options (VGA, 720P, and 1080P), language setting, sound, date and time, wireless connection, and format option. The other buttons below the screen let you access the gallery and print photos, assuming you have inserted a roll of paper.
Thermal printing!
Let’s go back to the front and figure out how to print and insert a roll of paper. First, you need to open the yellow cover by pulling it from the side.
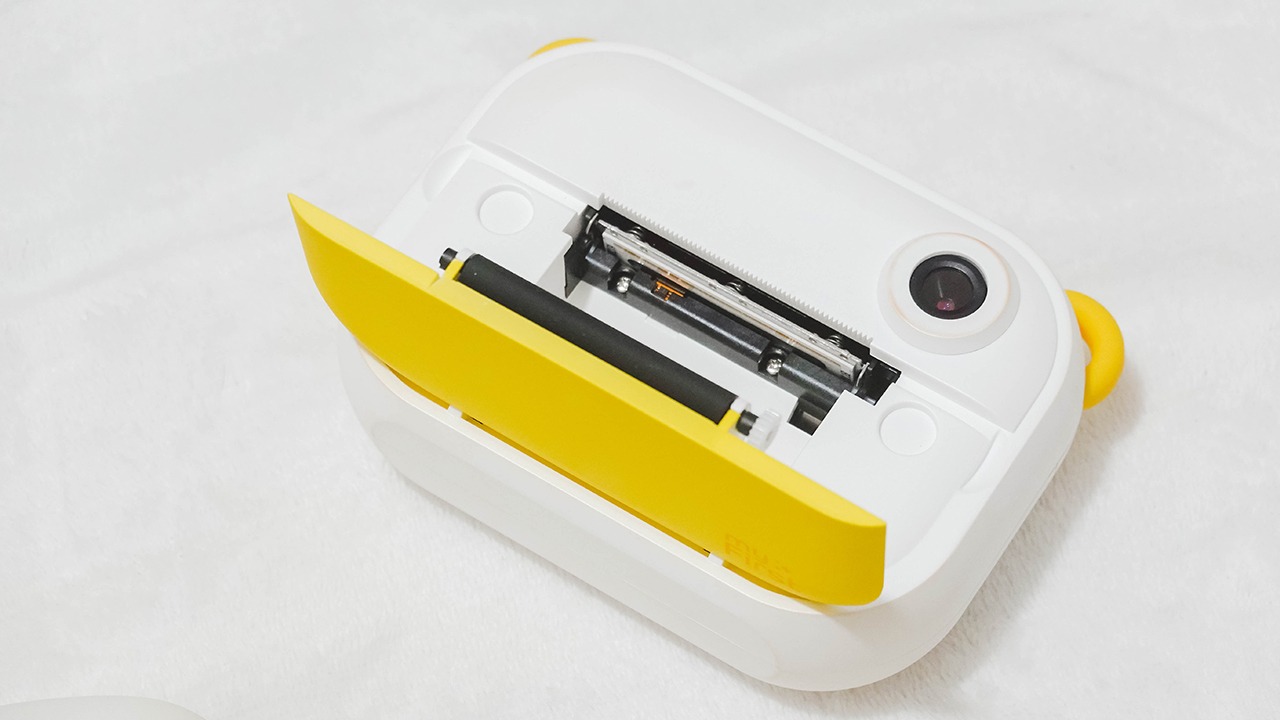
Once opened, you’ll find a slot where you can insert the rolled thermal paper included in the box.
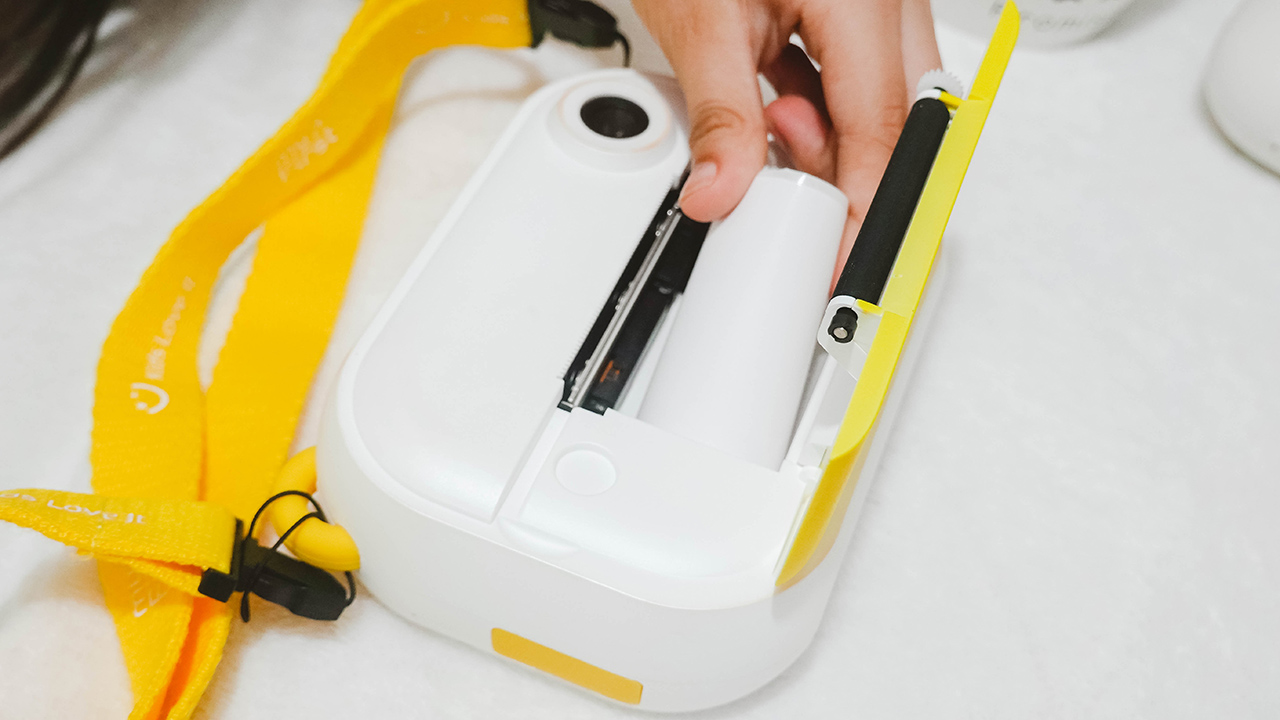
Of course, you have to insert the rolled thermal paper so we can get things rolling. Remember to remove the sticker and put the edge to the opening so the printer can detect the paper.
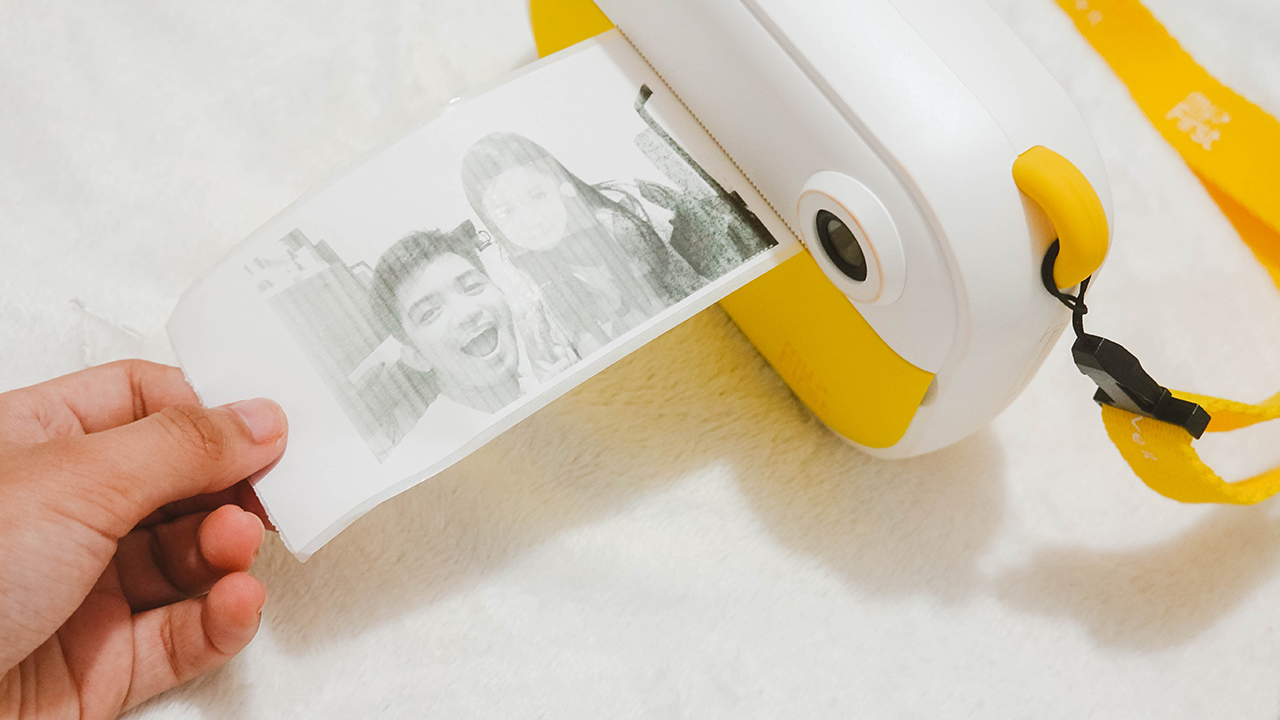
Once you’re set, you can check your gallery and click the print button. Printing doesn’t take long, ten seconds top. The results aren’t quite lovely, since we’ve covered thermal printers before that have clearer and firmer results.
Although, that’s only an inconvenience for adults. When my niece used the printer to make physical copies of her photos, she was astounded. The key here is making the kid indulge and have fun using technology.

To make things more adorable, the package comes with colorful stickers to adorn your prints and labels.
Needing labels
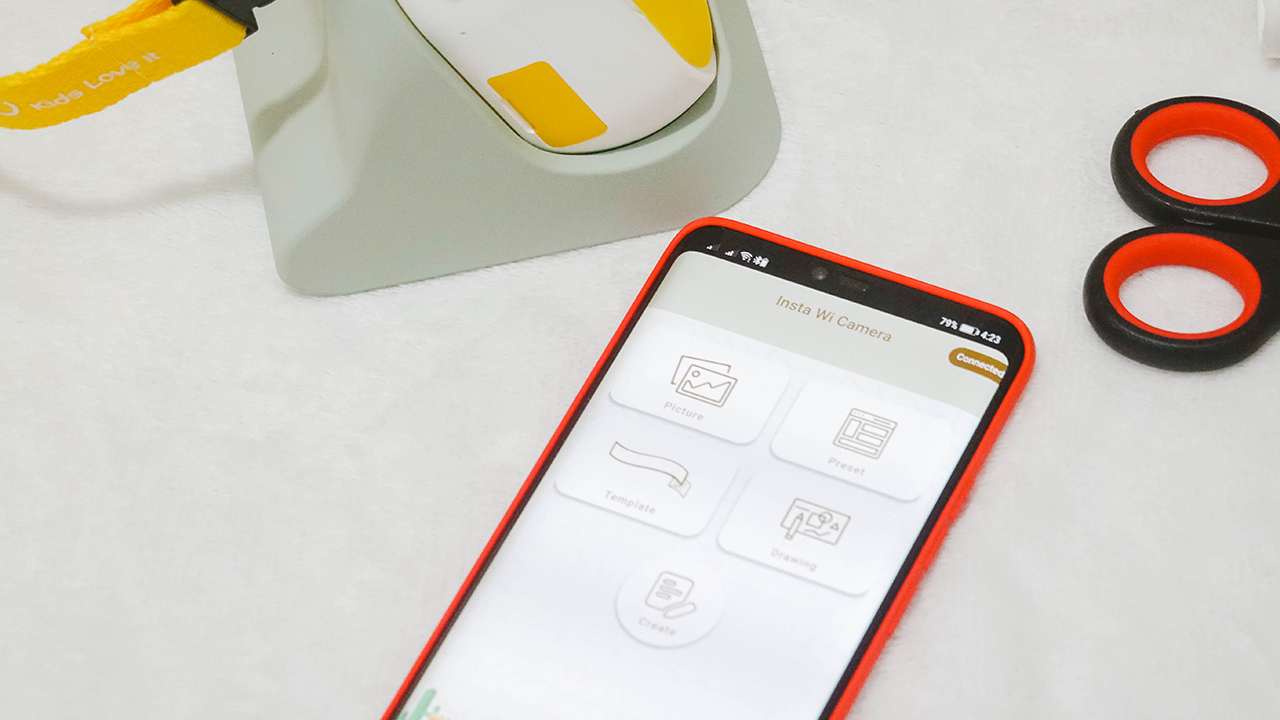
If you don’t have a label in your life, then that’s a problem. Kidding aside, the Insta Wi prints not just photos, but labels, too. You can download the myFirst Insta Wi app on the App Store and the Play Store.
To make it work, remember to turn off the camera (if you have it on), and place it on the dock. Then, turn it on again through the power button and press the wireless print option.
This enables Wi-Fi connectivity so you can connect both your smartphone and the Insta Wi. It took me a few minutes connecting both, but when I succeeded — everything was just seamless.
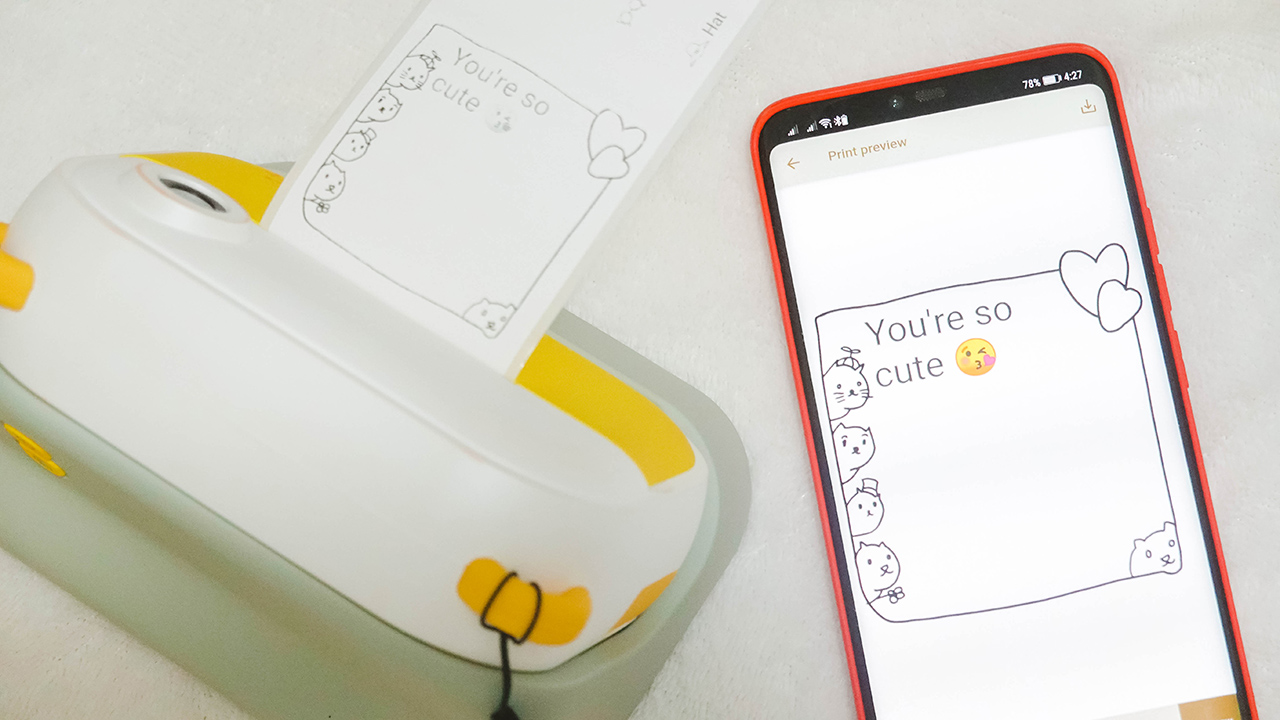
There are so many things you can do using the app. I even asked my niece to write something and use a layout so that the print looks cute.
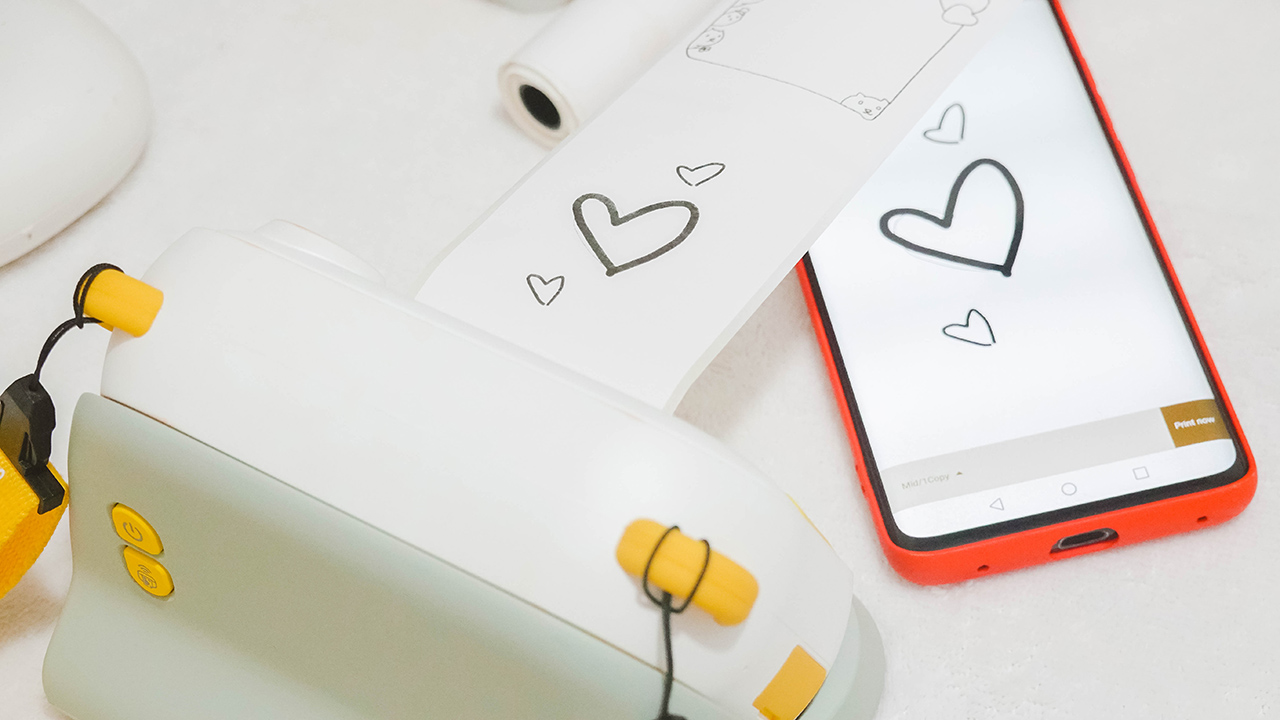
If you have a Galaxy Note or a tablet with pen support, it would be perfect to draw on the app and have it printed to give a handwritten and personal touch to your labels and prints. Nonetheless, fingers do well on any smartphone if you’re creative enough.

There are options to make a label, layout a design, and even add filters to your existing photos through the app — and you can print it easily and continuously. I would advise cutting the rolls using a cutter or a pair of scissors since the thermal paper is tougher than it seems.

For those who want to make things a little bit personal, you can print old photos from your phone. The thermal prints need a higher contrast so consider editing your photos to appear clear and visible when printed.
Taking snaps
I didn’t have any video samples with me but I took a stroll with the device while my cousins and I were out for a walk. And for the record, I was able to upload these photos because the device comes with a memory slot for a microSD card. And a microSD card reader in the box to ensure you can have a copy of your snaps!


Of course, the shots aren’t remarkable if you compare them to the latest cameras and smartphones we have today. However, it’s reminiscent of digital cameras of the past — grainy films, dates and tags, and colors that saturated our photo albums back in the 90s and early 2000s.
Lasts enough

The Insta Wi has a 1,500mAh battery capacity which can last up to five hours. Charging time is capped at 2.5 hours. If you ask me, the capacity is more than enough since we’re not going to spend the whole day using the device. When I went out, I turned it on and off in between chats and walks.
Just because you have cool and cute technology at your hands doesn’t mean you can’t enjoy the present. Remember: variety is key when it comes to recreational activities with our kids.
Price and availability
The myFirst Insta Wi retails for US$ 129. However, you can snag it for EUR 59/US$ 69 through its Kickstarter campaign which started last September 14, 2021, and will end on October 14, 2021.

After the Kickstarter campaign, production will begin in October 2021 and will start shipping in November 2021 for early birds. Regular Kickstarters will have their Insta Wi shipped by December 2021.
Is this your Kid’s GadgetMatch?
I’d give a resounding yes — whether you snag the Insta Wi at an affordable rate through its Kickstarter campaign or if you have spare cash to buy it at retail price.
Most gadgets aren’t designed for kids. There’s a handful that does so, but it’s rare to see a product that considers the kids’ user experience, safety, and security, as well as addressing a parent/guardian’s concerns.
And myFirst’s Insta Wi ticks all the boxes to make it a kid’s GadgetMatch. And possibly, a gift that parents and guardians can consider for birthdays and holidays.

After all, it has an adorable design made of kid-friendly materials and an experience that helps kids unleash their creativity through prints, photographs, and a bit of video recording. More importantly, it encourages a balanced use of technology to help be more present.
My niece surely had a good time, and even I, as an adult, had a fun time playing around with the Insta Wi. Incidentally, it became a bonding moment for us, too. My high-end cameras, printers, and novelty devices are too difficult to grasp for kids under 12. At least with the Insta Wi, my love for prints and photographs lives on to a whole new generation.


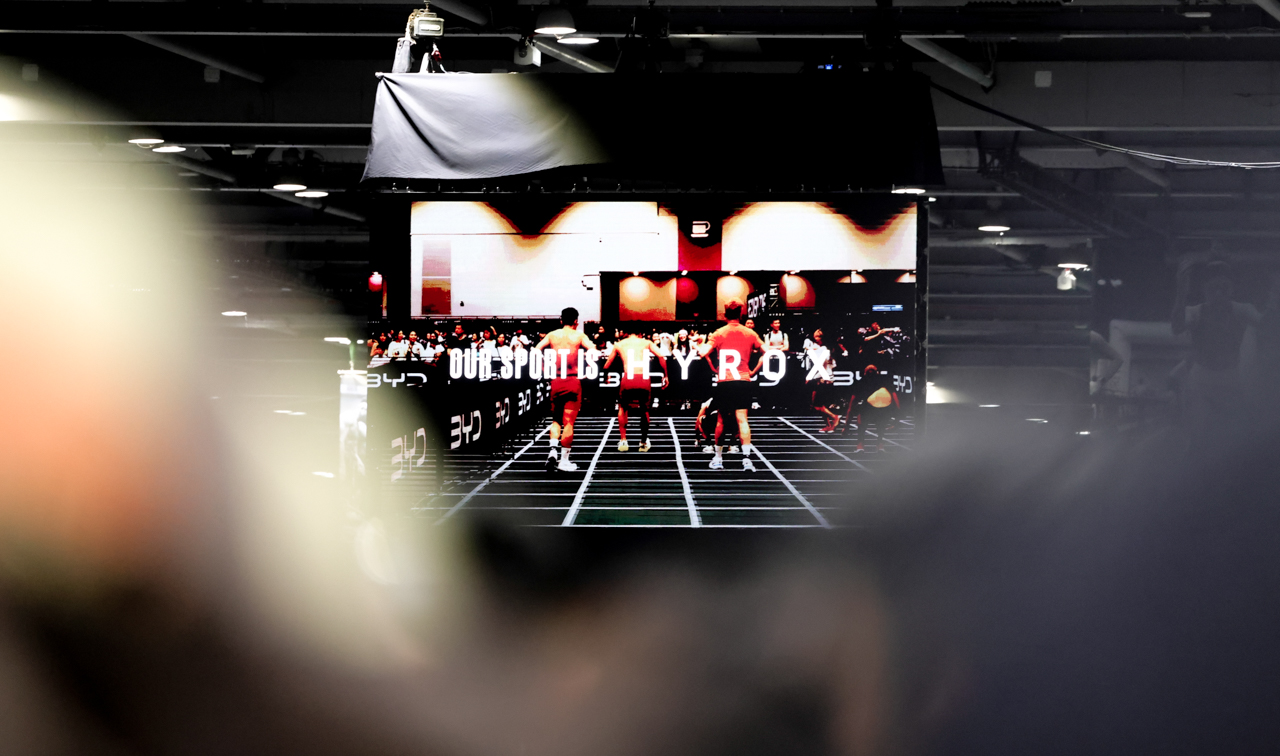
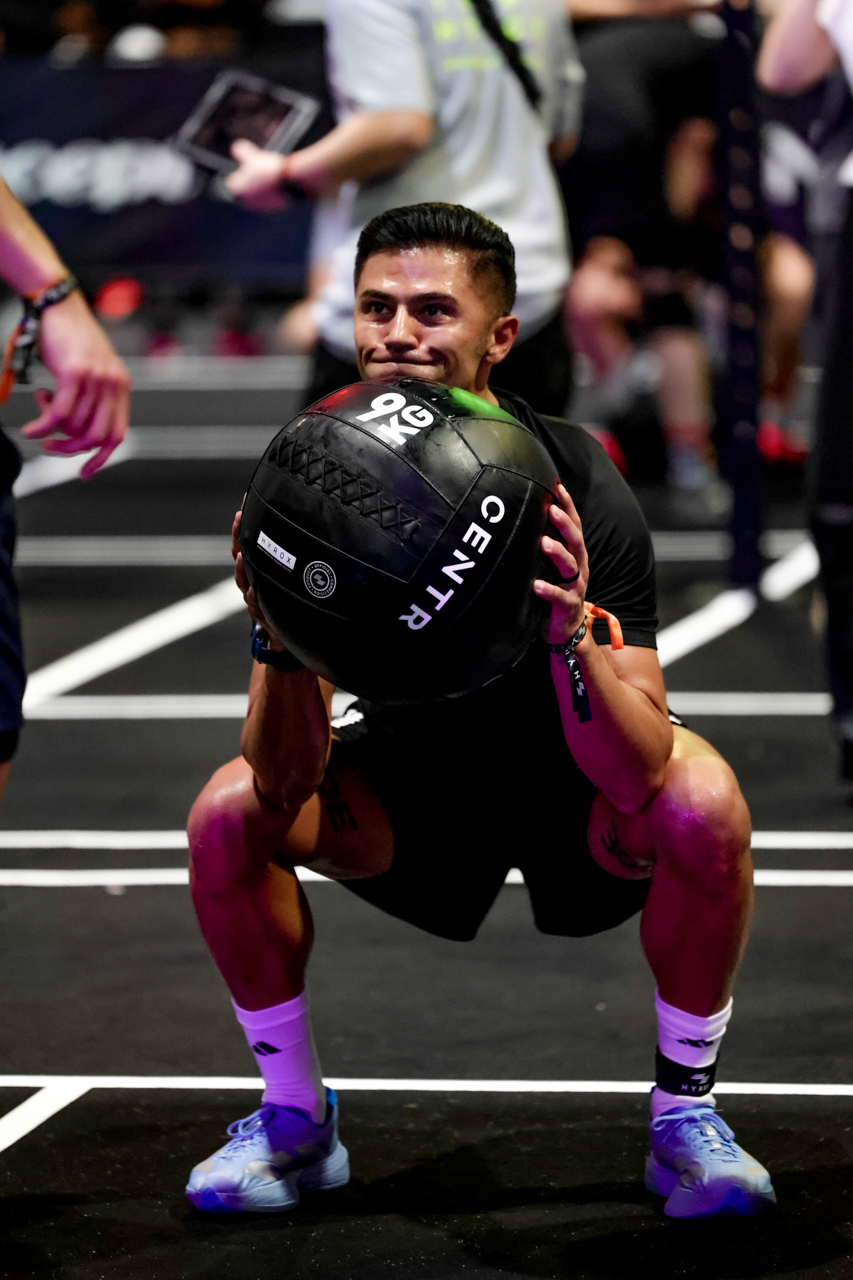
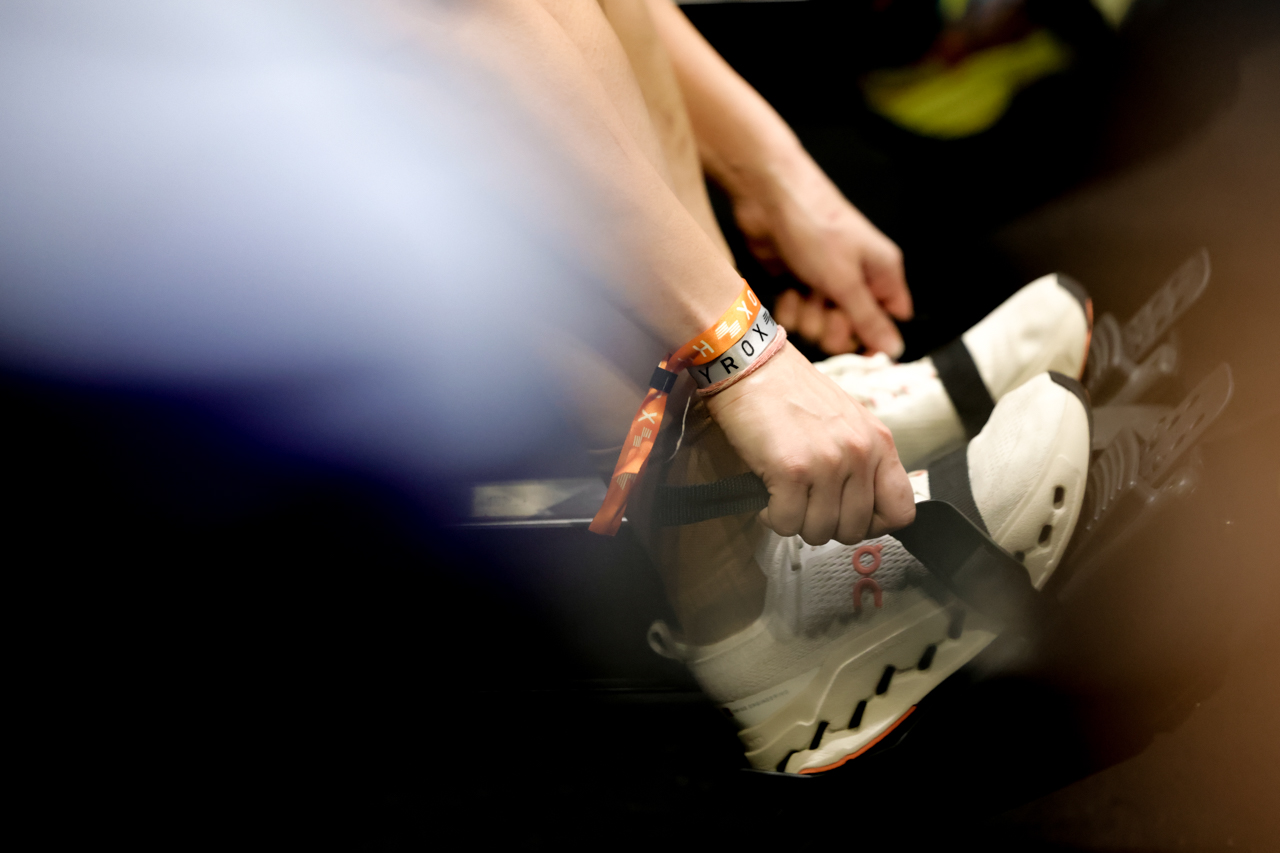
HYROX drew people from all over the world for a single purpose: finish the course. In Hong Kong, athletes showed up at AsiaWorld-Expo ready to run, row, and push through 8 stations of pure functional fitness.
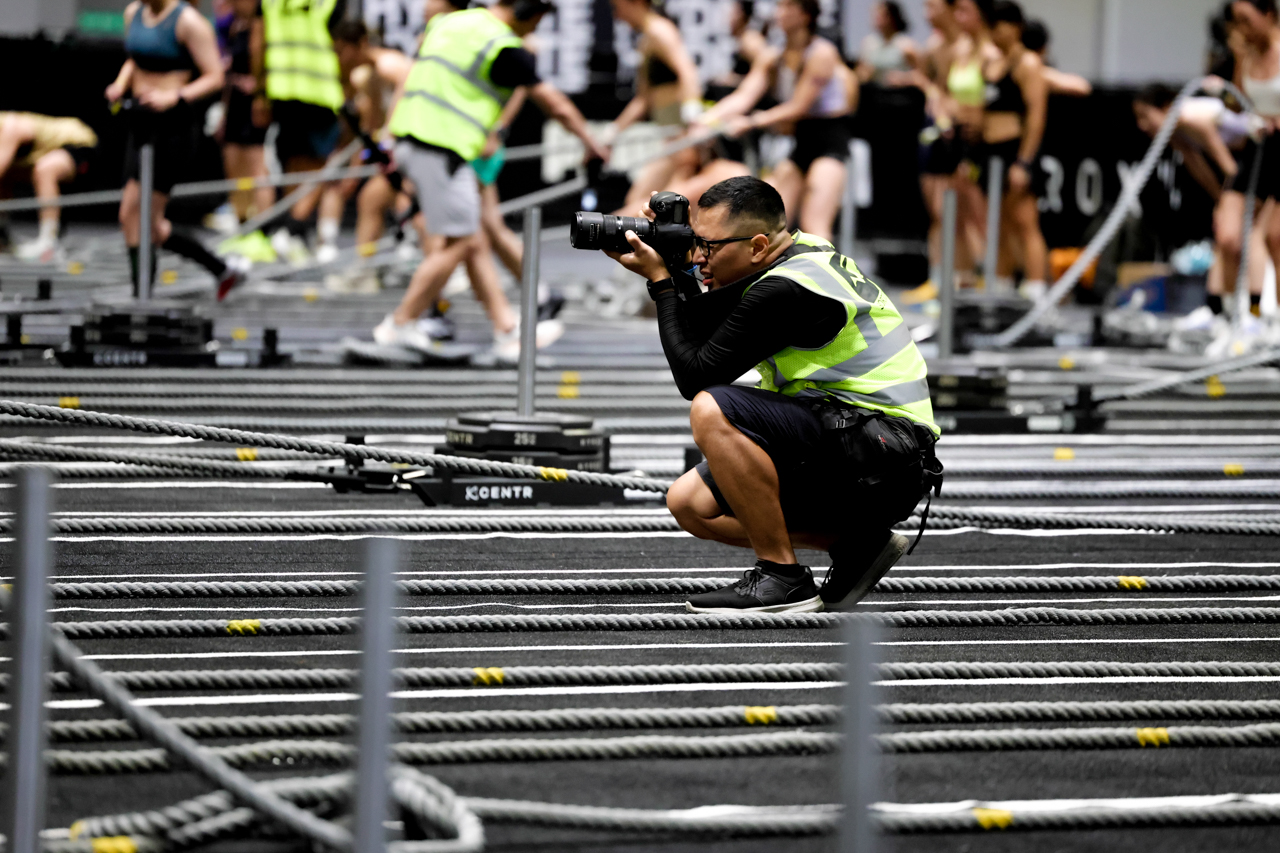
So, we brought the Canon EOS R6 Mark III to capture one of the most demanding fitness races on the planet.
The Expo floor is a lighting nightmare, a mix of harsh overheads and deep shadows, but the 32.5MP sensor handled the contrast without breaking a sweat.
The 40fps electronic shutter and Pre-continuous shooting meant we were already capturing the moment half a second before we consciously decided to press the shutter.
Covering a race means staying mobile, and the 8.5-stop IBIS let us move freely alongside athletes without losing the shot. The Dual Pixel CMOS AF II stayed locked on athletes even when they were squinting through the final stretch.
What came out were stories of triumph and determination. Even when their bodies were screaming, they pushed through anyway.
This is what HYROX Hong Kong looked like from the inside.

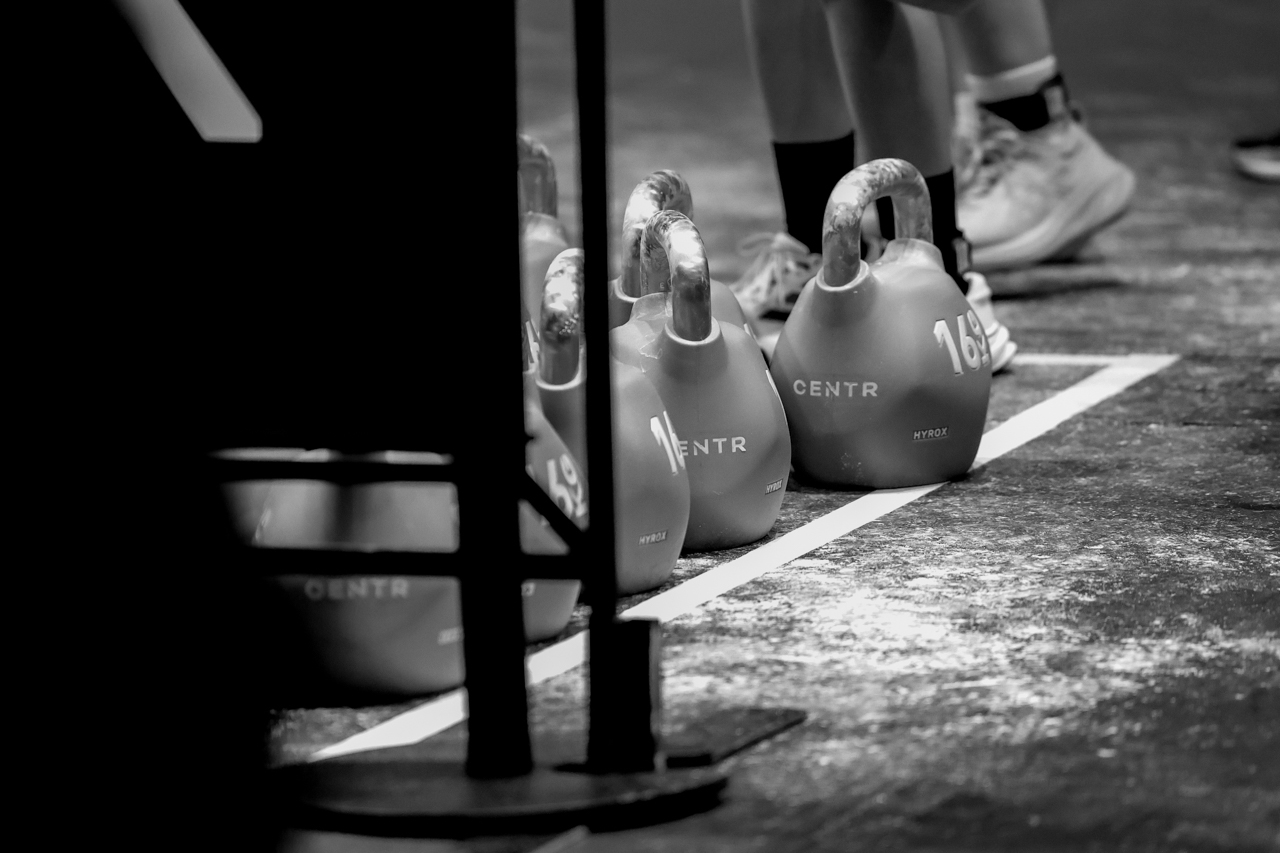


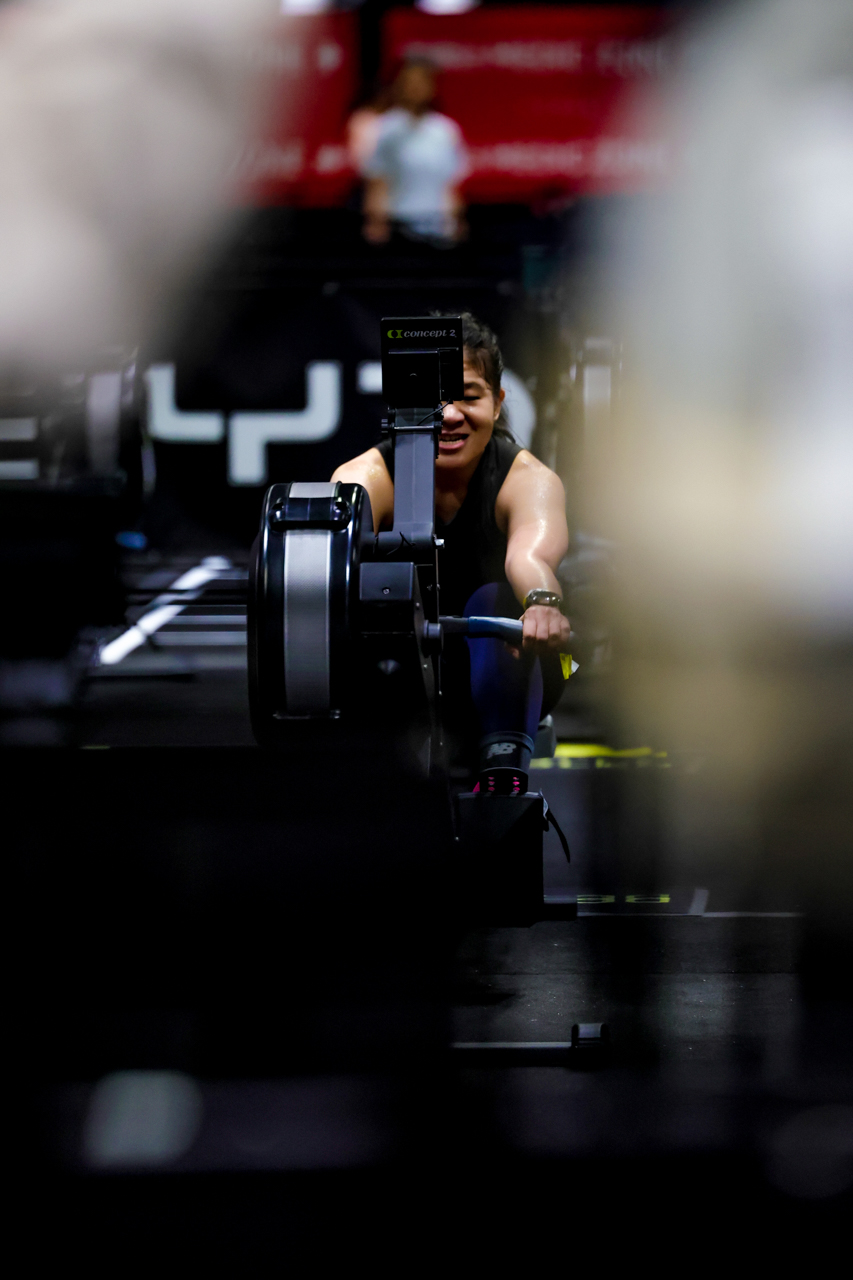


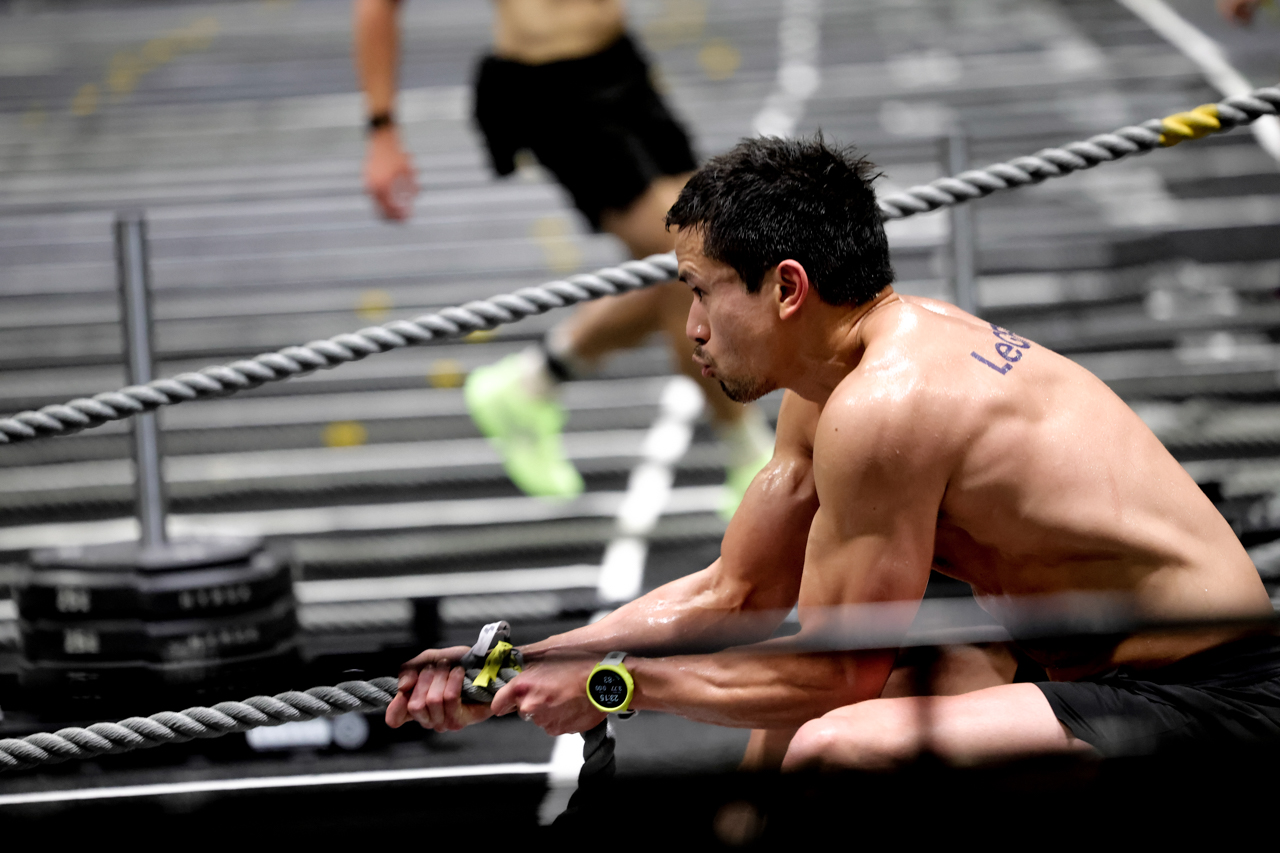
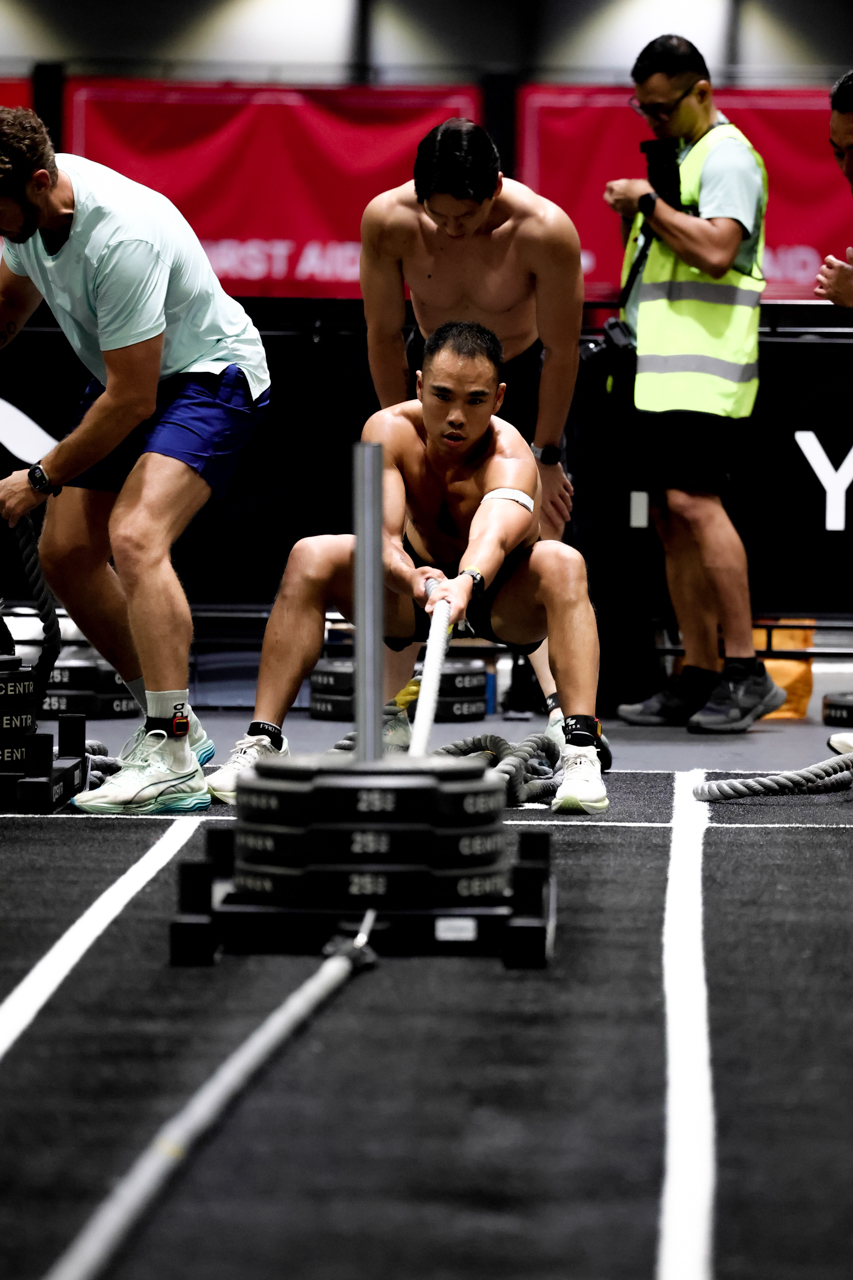


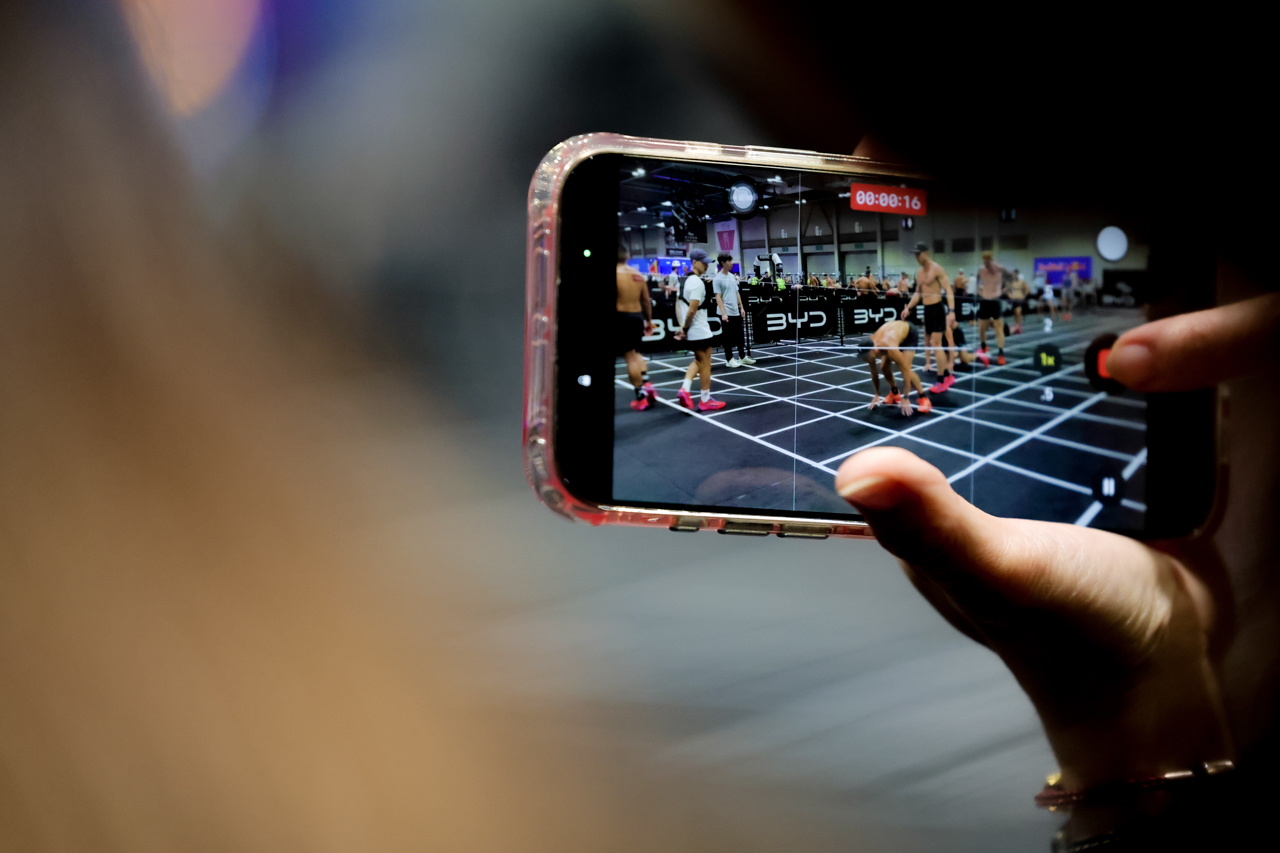


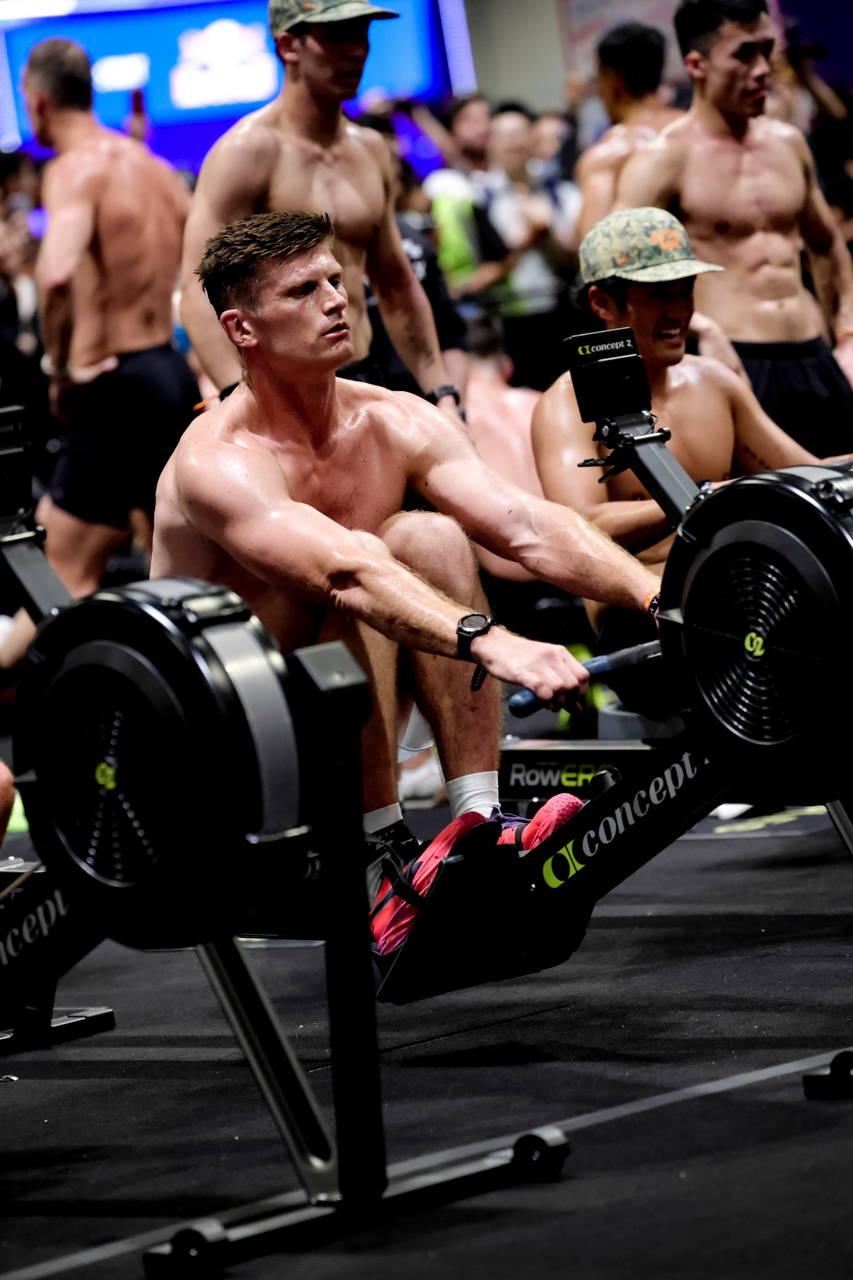


Words by MJ Jucutan. Photos by Sky Rodillas.
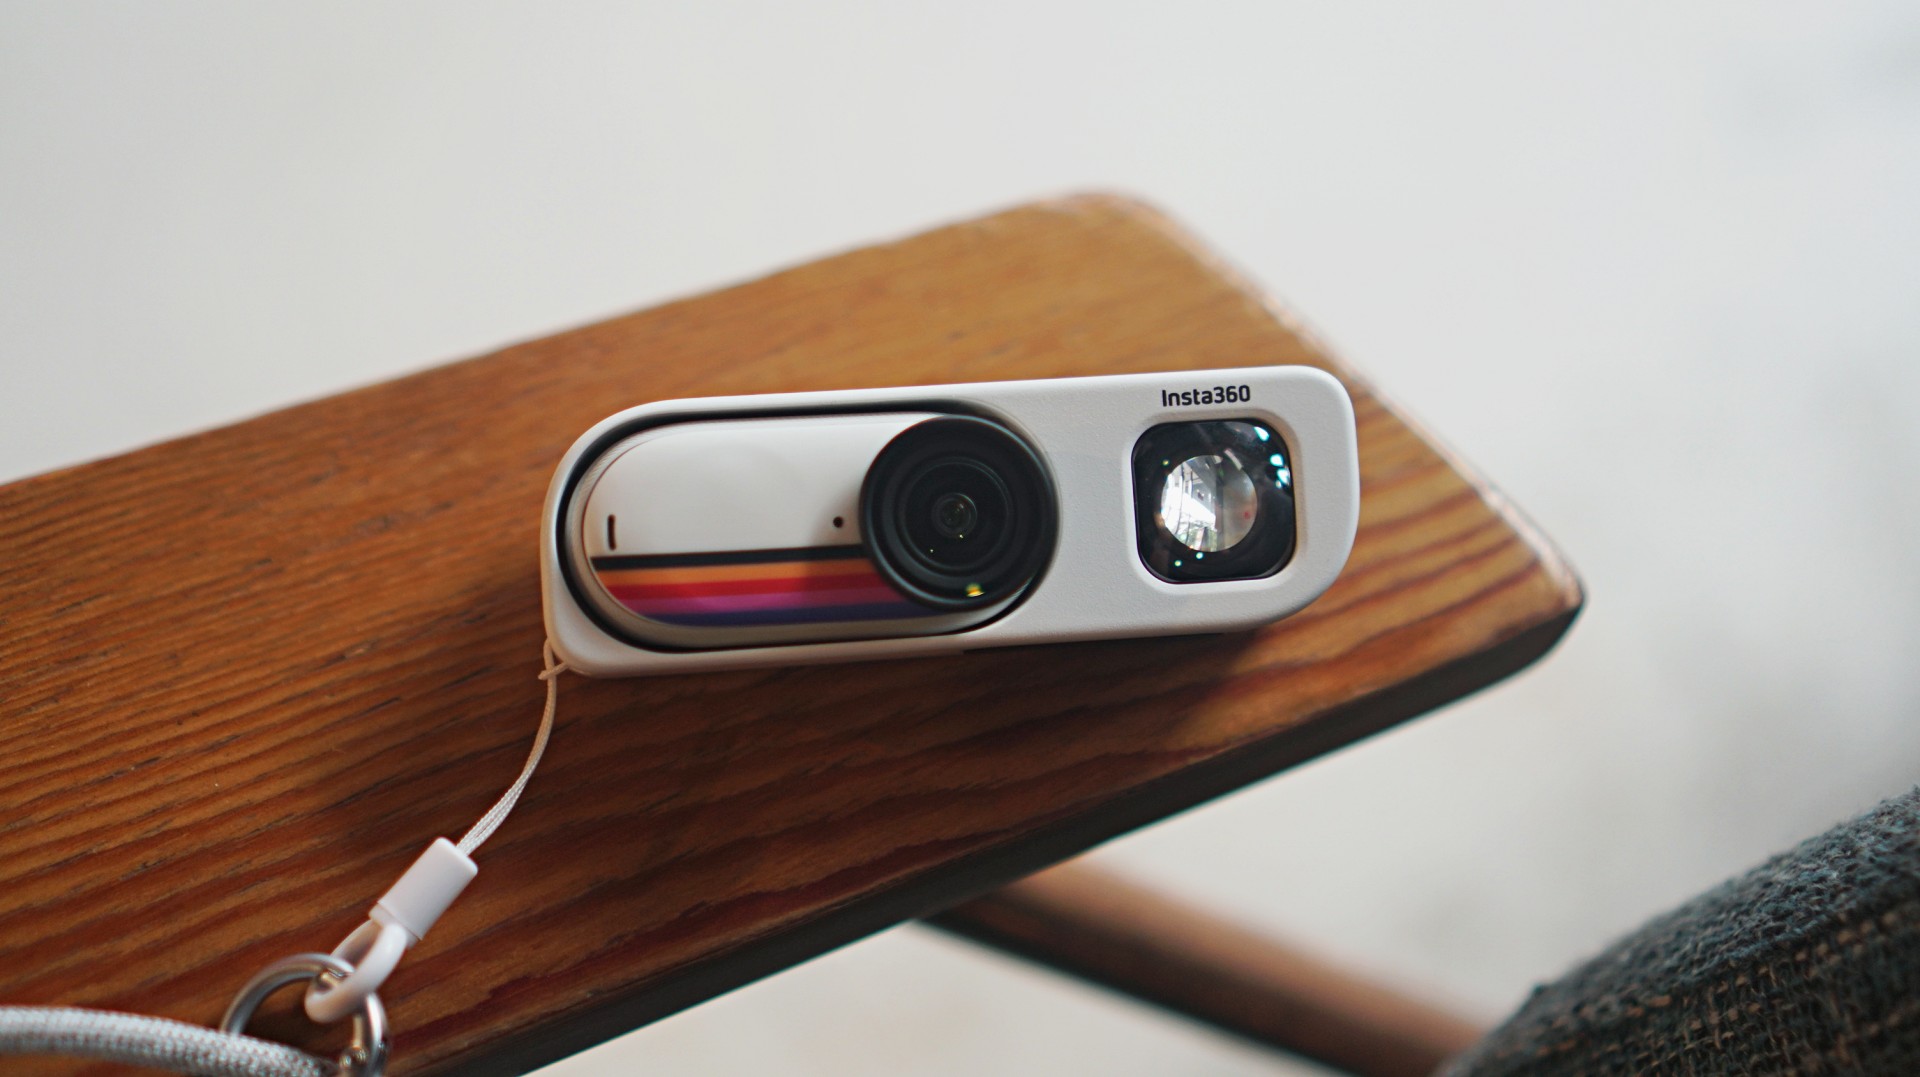
Insta360 GO 3S Retro Bundle Edition is bringing a touch of nostalgia to its tiny POV camera lineup.
The company has announced the new Retro Bundle Edition for the GO 3S, combining the wearable 4K camera with accessories and software features inspired by classic film photography.
At the center of the bundle is the Retro Viewfinder. It transforms the tiny camera into a handheld shooter with a waist-level framing experience reminiscent of vintage film cameras. Instead of relying on a screen, users can compose shots through the optical finder for a more deliberate shooting style. The viewfinder also includes a built-in selfie mirror.

The bundle also includes a Battery Pack that extends recording time to up to 76 minutes while supporting charging during recording. An NFC Custom Skin allows quick access to the Insta360 app by tapping a smartphone against it.
Other accessories include a wearable strap and the Magnet Pendant for hands-free POV capture.
To match the retro-inspired hardware, Insta360 is also adding exclusive film-style filters including Negative Film, Positive Film, and Sticker Filter. Five additional built-in color profiles are also included: NC, CC, GR-F, Mono, and Vintage Vacation.
Despite the nostalgic styling, the GO 3S keeps its modern action camera features. The 39g camera can shoot 4K video with FlowState Stabilization, supports QuickCapture, and is waterproof up to 10 meters.
Price and availability

The Insta360 GO 3S Retro Bundle Edition is now available in Canvas White and Classic Red color options. Pricing starts at US$249.99 for the 64GB version and US$269.99 for the 128GB model.
@gadgetmatchWarm vibes, slow jams, Insta360 GO 3S Retro Bundle Edition time. #insta360 #retro #tinycamera
Accessories
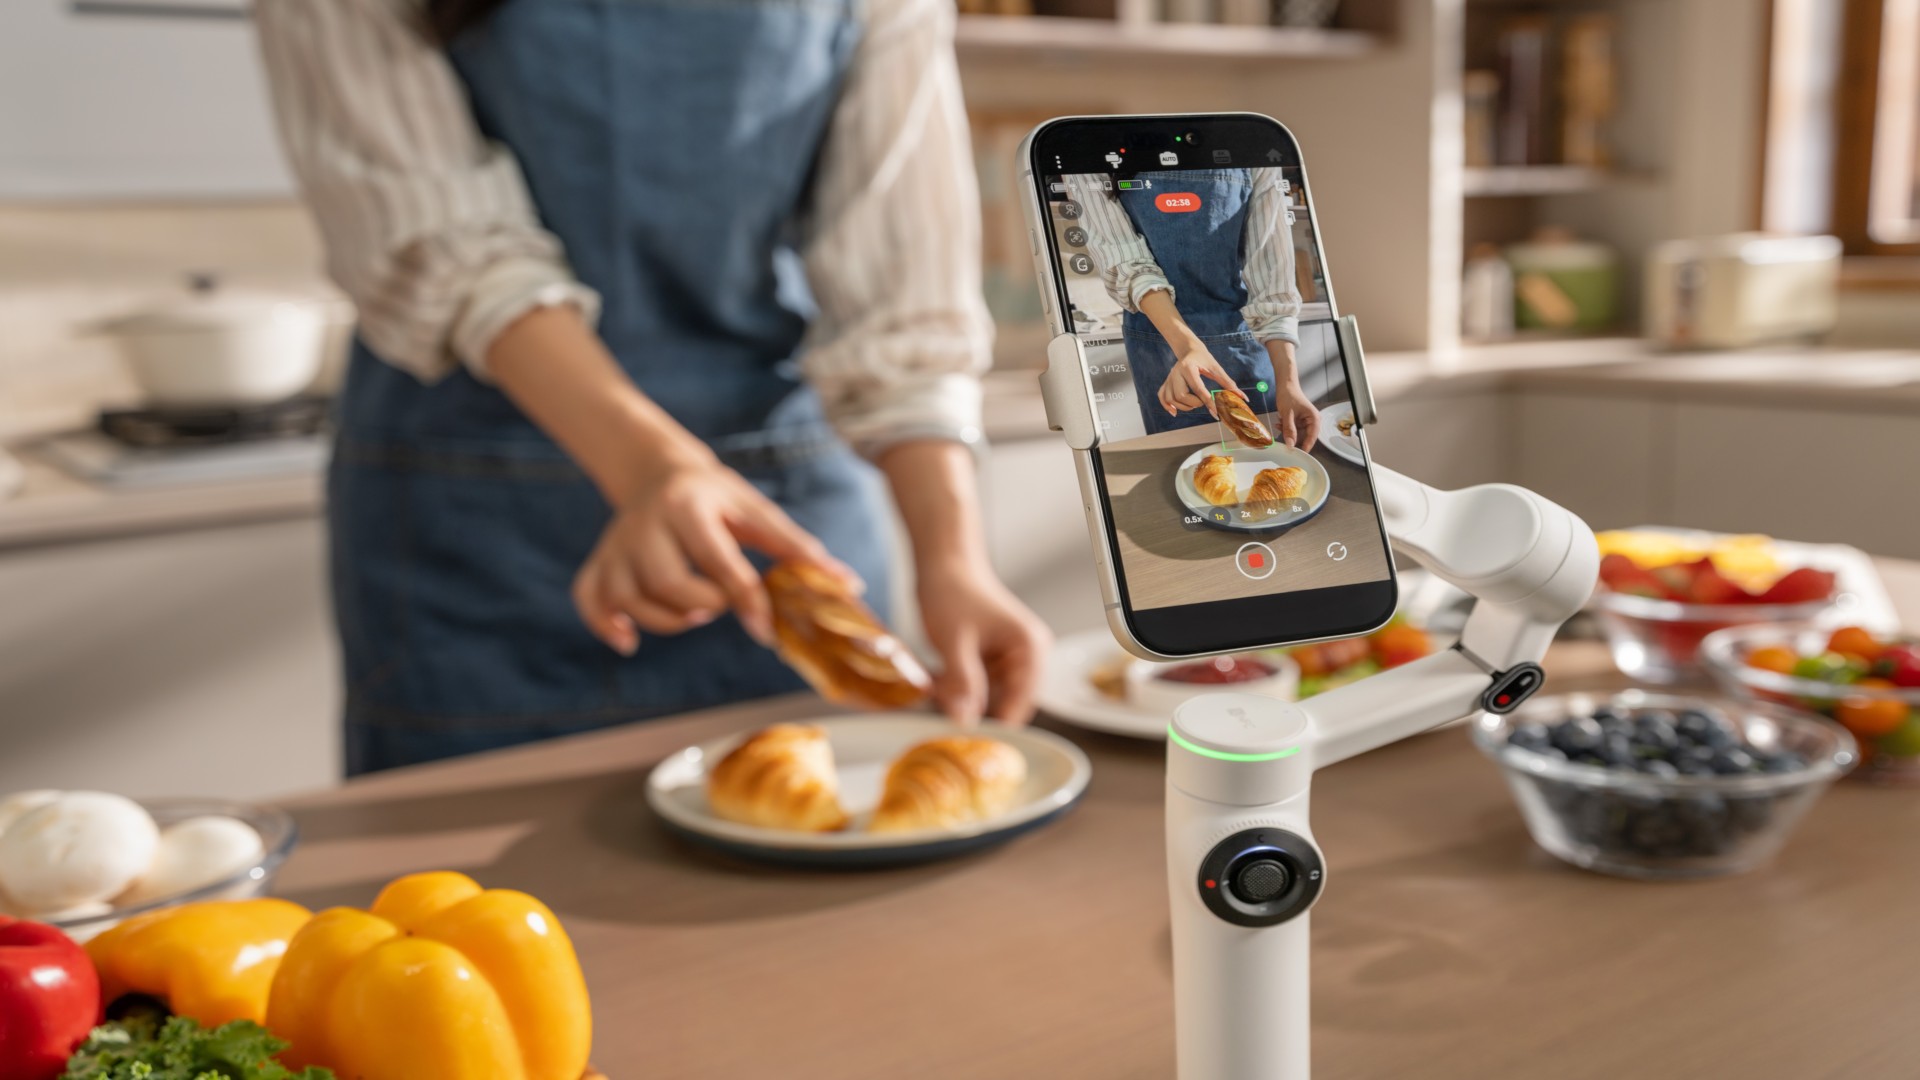
Insta360 Flow 2 update improves Android support, adds new iOS features
Better Android lens support
Insta360 Flow 2 update improves Android support, adds new iOS features
Excerpt: Better Android lens support
Insta360 has released a major spring update for its Flow 2 series handheld gimbals, bringing wider Android compatibility and new features for iPhone users.
The update focuses on improving how the Flow 2 and Flow 2 Pro work across different devices. It expands support for flagship Android phones while adding new shooting tools for iOS, making hands-free, stabilized video easier to capture without extra gear.
Android finally gets full lens access
One of the biggest changes is native multi-lens support on Android. When paired with the Insta360 app, the Flow 2 series can now access ultra-wide and telephoto lenses on supported devices from Samsung, Google Pixel, vivo, OPPO, and more.
This means users can shoot at full resolution using their phone’s native cameras, whether capturing wide landscapes or zoomed-in details. The update brings Android performance closer to what iPhone users have been getting, especially in more dynamic shooting scenarios like concerts, sports, and vlogging.
The improved lens access also works with features like Widescreen Mode, helping users create smoother, more cinematic footage with better framing flexibility.
Faster 360 panoramas for quick sharing
The Flow 2 series continues to stand out with its ability to capture full 360-degree panoramas. With the new 360 Panorama 2.0, stitching is now 50% faster, producing results in about 20 seconds.
Users can capture everything in one go, then choose their preferred framing afterward. The feature also supports interactive sharing via links, letting viewers pan and explore the image on platforms like TikTok and Instagram.
Creative templates such as Tiny Planet are also available for quick edits, making it easier to turn panoramic shots into shareable content.
Dual View adds more angles in one take
Dual View Mode introduces multi-angle recording without the need for additional cameras. It allows simultaneous recording using the front and rear cameras, or even dual rear lenses, producing three clips in a single take.
This is useful for creators who want to capture reactions alongside the main shot or experiment with different focal lengths at once. Combined with AI tracking, the feature keeps subjects centered while adding more variety to footage.
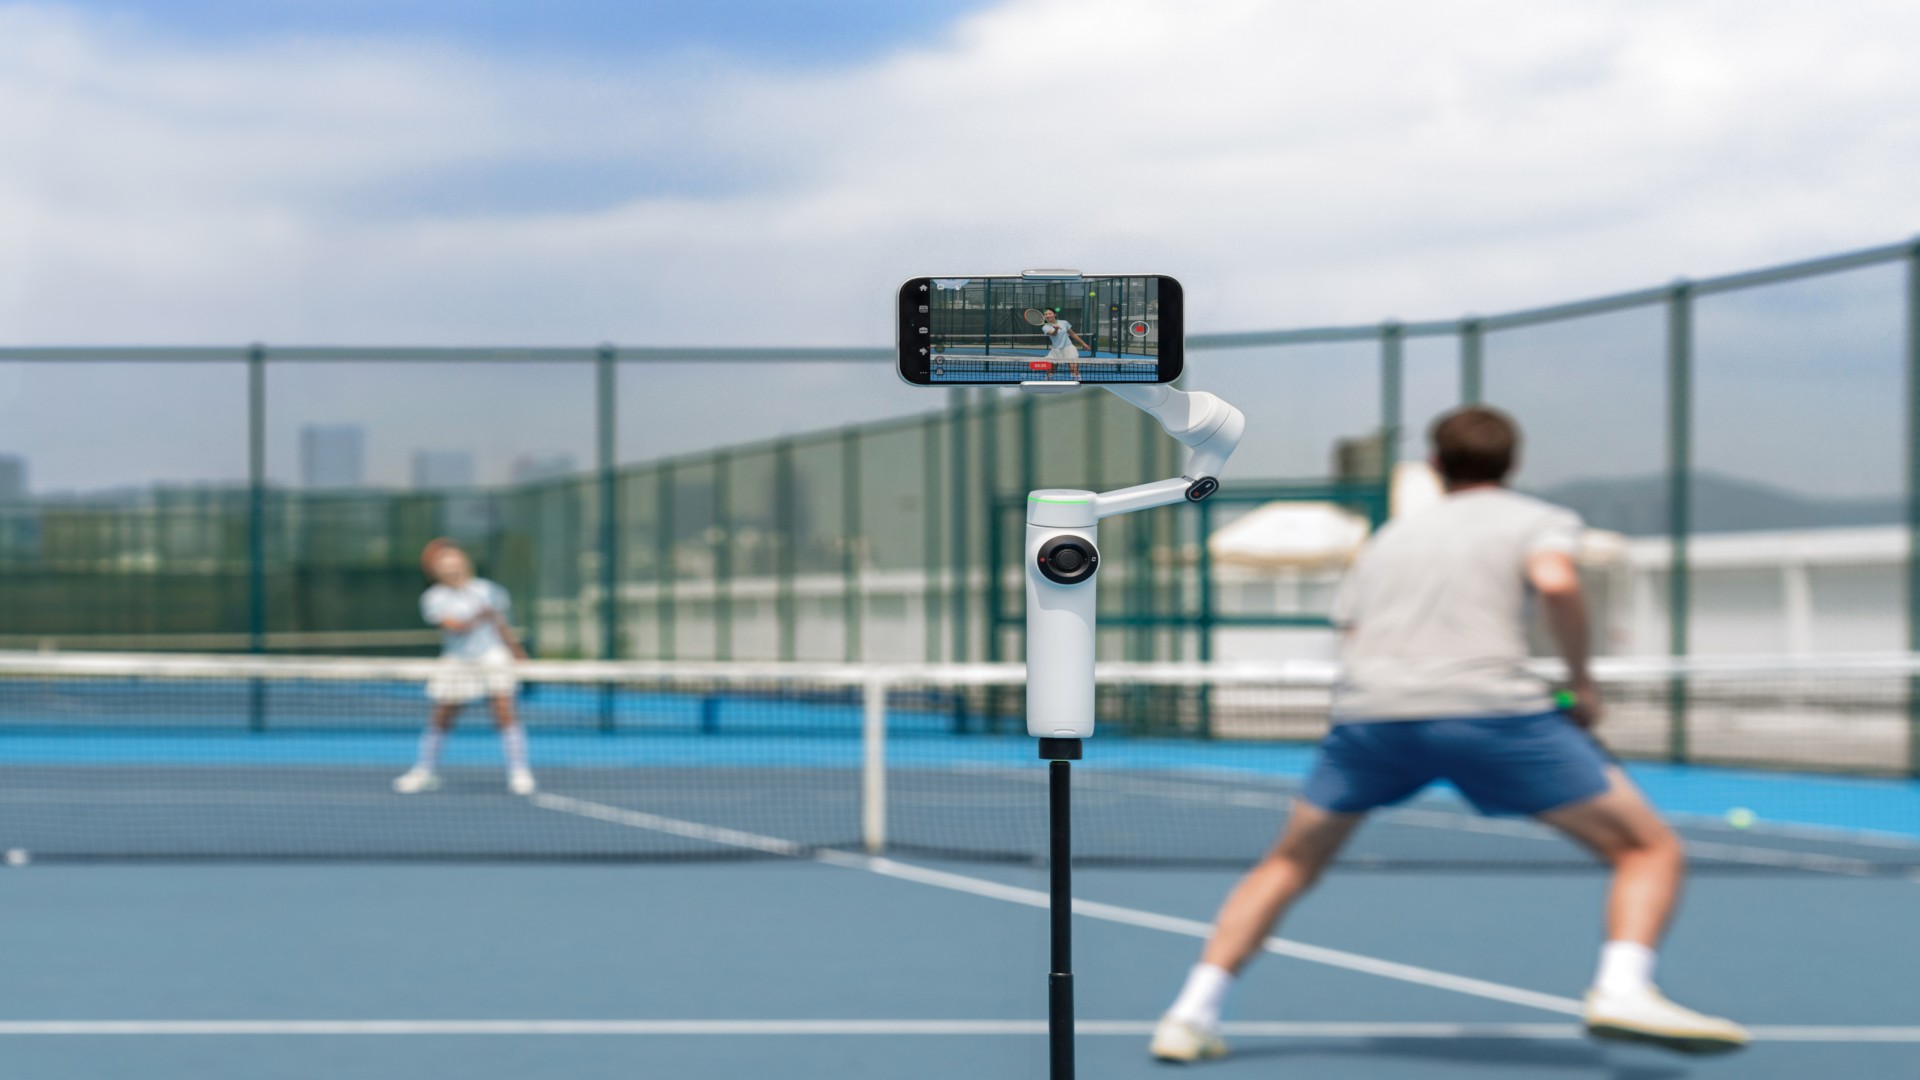
Apple Watch control for hands-free shooting
For iPhone users, the update adds Apple Watch control, turning the watch into a remote for the gimbal.
Users can start or stop recording, adjust settings, switch modes, and even control zoom using the Digital Crown. This allows for better control during solo shoots, especially when the phone is mounted on the gimbal at a distance.
Smarter tracking and remote control tools
The update also improves several AI-powered features across the Flow 2 series.
AI Tracker now works across more Android apps, enabling subject tracking during video calls, livestreams, or hands-free recording. Multi-person tracking keeps groups in frame, while Active Zoom Tracking allows up to 15x zoom while maintaining focus on moving subjects.
There’s also a new smartphone remote control feature, which lets users operate the gimbal using a second phone. This adds flexibility for more complex shooting setups without interrupting the shot.
Availability
The update is available now through the Insta360 app and the official website. Compatibility may vary depending on the smartphone model.


HONOR Magic V6 review: The best version of a book-style foldable?
Little left to sacrifice


Close without crossing: A Xiaomi 17T Pro photo essay
Distance and closeness are not always opposites.


Spring reset: Growing more at home with Auk Mini
From kitchen counter experiment to everyday habit

Nothing is coming to over 500 Best Buy stores in the United States

This is the history of basketball videogames since the ’73 Knicks

Kingdom Hearts IV gets new trailer, confirms Switch 2 release

Final Fantasy fans have two big reasons to look forward to 2026

TECNO’s POVA 8 5G is both futuristic and future-ready

The Infinix GT 50 Pro has the most inspired design for a gaming phone

UGREEN MagFlow Air review: Airy Yet Mighty
Spring reset: Growing more at home with Auk Mini

The UGREEN Nexode Air 65W is the only charger I travel with now
Close without crossing: A Xiaomi 17T Pro photo essay


-
 India4 days ago
TECNO’s POVA 8 5G is both futuristic and future-ready
-

 News2 weeks ago
realme launches P4 Series 5G, including Power with 10,001mAh battery
-

 Hands-On2 weeks ago
The Xiaomi Watch S5 proves you don’t have to take it off
-

 Computex 20262 weeks ago
ASUS ROG XBOX Ally X20 debuts at COMPUTEX 2026
-

 Gaming2 weeks ago
God of War Laufey puts Faye in the spotlight
-

 Buyer's Guide1 week ago
Buyer’s Guide: Xiaomi Pad 8 Series
-

 Gaming2 weeks ago
Marvel’s Wolverine showcases brutal combat, confirms Jean Grey
-
Reviews5 days ago
HONOR Magic V6 review: The best version of a book-style foldable?